


To create an interactive text input box for the user, follow these steps:
- Create a new Unity 2D project.
- In the Inspector window, change the background of Main Camera to solid white.
- Add a UI Input Field to the scene. Position this at the top center of the screen.
- Add a UI Text GameObject to the scene, naming it Text-prompt. Position this to the left of Input Field. Change the Text property of this GameObject to Name:.
- Create a new UI Text GameObject named Text-display. Position this to the right of the Input Text control, and make its text red.
- Delete all of the content of the Text property of this new GameObject (so that, initially, the user won't see any text onscreen for this GameObject).
- Add an instance of the DisplayChangedTextContent C# script class to the Text-display GameObject:
using UnityEngine;
using UnityEngine.UI;

public class DisplayChangedTextContent : MonoBehaviour {
   public InputField inputField;
   private Text textDisplay;

   void Awake() {
         textDisplay = GetComponent<Text>();
   }

   public void DisplayNewValue () {
         textDisplay.text = "last entry = '" + inputField.text + "'";
   }
}
- With Text-display selected in the Hierarchy window, from the Project window, drag the InputField GameObject into the public Input Field variable of the Display Changed Content (Script) component:
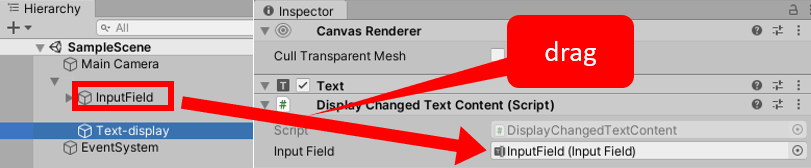
Figure 2.26 – Setting the Input Field variable
- With Input Field selected in the Hierarchy window, add an End Edit (String) event to the list of event handlers for the Input Field (Script) component. Click on the plus (+) button to add an event handler slot and drag the Text-display GameObject into the Object slot.
- From the Function drop-down menu, choose DisplayChangedTextContent and then choose the DisplayNewValue method.
- Save and run the scene. Each time the user types in new text and then presses Tab or Enter, the End Edit event will fire, and you'll see a new content text message displayed in red on the screen.


