Sign In Start Free Trial
Account

Add to playlist

Create a Playlist

Modal Close icon
You need to login to use this feature.
  • Book Overview & Buying Cinematic Photoreal Environments in Unreal Engine 5
  • Table Of Contents Toc
  • Feedback & Rating feedback
Cinematic Photoreal Environments in Unreal Engine 5

Cinematic Photoreal Environments in Unreal Engine 5

By : Giovanni Visai
4.9 (15)
close
close
Cinematic Photoreal Environments in Unreal Engine 5

Cinematic Photoreal Environments in Unreal Engine 5

4.9 (15)
By: Giovanni Visai

Overview of this book

As Unreal Engine 5 continues to conquer all industries thanks to its real-time technology, UE skills are becoming more sought after than ever. This three-part book covers all the processes behind the creation of a stunning environment in UE 5. Starting with the steps for installing the game engine and learning about its potential, you’ll quickly progress toward generating a variety of different upwards scaling outputs, each bigger than the previous one. After completing the first part and getting realistic shots of a single object, you’ll delve into the world of landscapes, procedural material and foliage, the Landmass plugin, and water tools by creating an environment using Megascan assets. At this point, you’ll know everything you need to create a fascinating and realistic environment. The final part of this book will teach you how to craft cinematic shots by working with cinematic tools, post processing, and framing tools, and by rendering a photorealistic shot in the last chapter. By the end of this Unreal Engine book, you'll be able to create outstanding and realistic environments using the powerful tools provided by UE as well as have an understanding of the importance of filming and composition in world building.
Table of Contents (19 chapters)
close
close
1
Part 1: Getting Started with Unreal Engine 5
9
Part 2: Environment Creation Techniques
13
Part 3: Cinematic Fundamentals and Rendering

Creating your first material

In this section, we will learn how to create a new material, and we will take our first steps in creating different kinds of surfaces using the Material Editor.

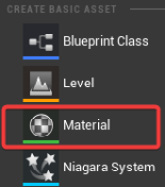
You can create a new material directly in the Content Browser by clicking the right-mouse button inside it and selecting Material. The command will create a new asset in the Content Browser, ready to be renamed. Remember to rename it properly (you can check naming convention tips in Chapter 2). As we saw in the previous chapter, Material thumbnails are always green underlined.

Figure 5.4 – Creating basic assets in the right-mouse button content browser options menu

Figure 5.4 – Creating basic assets in the right-mouse button content browser options menu

To take our first steps in material creation, we can add a simple sphere to the Viewport and assign to it our new material.

You can assign a material in three different ways:

  • Drag and drop the material asset directly on an object placed in the Level Viewport.
  • Drag and drop the material...

Unlock full access

Continue reading for free

A Packt free trial gives you instant online access to our library of over 7000 practical eBooks and videos, constantly updated with the latest in tech

Create a Note

Modal Close icon
You need to login to use this feature.
notes
bookmark search playlist font-size

Change the font size

margin-width

Change margin width

day-mode

Change background colour

Close icon Search
Country selected

Close icon Your notes and bookmarks

Delete Bookmark

Modal Close icon
Are you sure you want to delete it?
Cancel
Yes, Delete

Delete Note

Modal Close icon
Are you sure you want to delete it?
Cancel
Yes, Delete

Edit Note

Modal Close icon
Write a note (max 255 characters)
Cancel
Update Note

Confirmation

Modal Close icon
claim successful

Buy this book with your credits?

Modal Close icon
Are you sure you want to buy this book with one of your credits?
Close
YES, BUY