Sign In Start Free Trial
Account

Add to playlist

Create a Playlist

Modal Close icon
You need to login to use this feature.
  • Book Overview & Buying Edit without Tears with Final Cut Pro
  • Table Of Contents Toc
  • Feedback & Rating feedback
Edit without Tears with Final Cut Pro

Edit without Tears with Final Cut Pro

By : Bruce G. Macbryde
4.2 (5)
close
close
Edit without Tears with Final Cut Pro

Edit without Tears with Final Cut Pro

4.2 (5)
By: Bruce G. Macbryde

Overview of this book

Edit Without Tears with Final Cut Pro is your essential guide to overcoming challenges in video editing using Final Cut Pro, simplifying complex procedures and workflows and providing a structured approach for efficient and impressive video editing. This book will change how you approach editing, guiding you to create professional-grade videos with ease and confidence. Throughout the book, you'll enhance your efficiency and speed, while also learning unique workflows for common tasks. The comprehensive coverage spans planning video narratives, crafting preliminary edits and refining them, improving audio quality, setting up and editing multicam sequences, leveraging the inspector's controls, and working with both built-in and third-party plugins. You’ll then advance to animating objects using keyframes, utilizing color scopes for advanced color correction, and troubleshooting common issues confidently. By the end of this Final Cut Pro book, you’ll have developed an efficient editing style, unlocking the full power of this video editing software for your creative endeavors.
Table of Contents (27 chapters)
close
close
Free Chapter
2
Part 1:Planning
7
Part 2:Editing
13
Part 3:Using the Inspector
20
Part 4: Outside Final Cut Pro

Keyframing in the viewer

You will start keyframing videos in the inspector and then adjust them directly in the viewer. Let’s use the example of the F16, including the dip and flip at the center, and add another keyframe.

Adding new keyframes

With the Option key held down, click on the red path in the viewer. Several things will happen. First, the playhead in the timeline will jump to a new position that represents where you clicked in the path. Then, a yellow diamond will appear on the red line where you clicked. The diamond can be dragged to a new position. On either side of the yellow diamond, you will see Bezier adjustment handles, as shown in Figure 13.19:
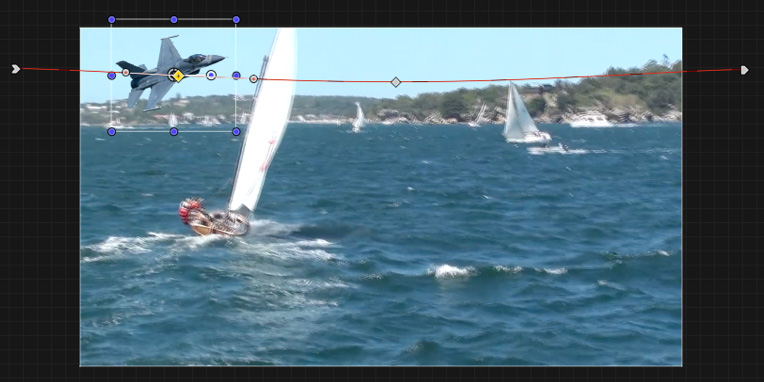
Figure 13.19: New keyframe added with the Option key held

Figure 13.19: New keyframe added with the Option key held

With that, you have seen how to add keyframes. Now, let’s look at how to make them appear as more realistic movements.

Selecting linear or smooth curves

The Bezier adjustment handles can be used to rotate the image...

Unlock full access

Continue reading for free

A Packt free trial gives you instant online access to our library of over 7000 practical eBooks and videos, constantly updated with the latest in tech
bookmark search playlist font-size

Change the font size

margin-width

Change margin width

day-mode

Change background colour

Close icon Search
Country selected

Close icon Your notes and bookmarks

Delete Bookmark

Modal Close icon
Are you sure you want to delete it?
Cancel
Yes, Delete

Confirmation

Modal Close icon
claim successful

Buy this book with your credits?

Modal Close icon
Are you sure you want to buy this book with one of your credits?
Close
YES, BUY