-
Book Overview & Buying
-
Table Of Contents

-
Feedback & Rating

Working Smarter with Microsoft Outlook
By :
Working Smarter with Microsoft Outlook
By:
Overview of this book
Millions of users across the globe spend their working hours using Microsoft Outlook to manage tasks, schedules, emails, and more. Post-pandemic, many organizations have started adopting remote working, and the need to stay productive in workspace collaboration has been increasing.
Working Smarter with Microsoft Outlook takes you through smart techniques, tips, and productivity hacks that will help you become an expert Outlook user. This book brings together everything you need to know about automating your daily repetitive tasks. You’ll gain the skills necessary for working with calendars, contacts, notes, and tasks, and using them to collaborate with Microsoft SharePoint, OneNote, and many other services. You’ll learn how to use powerful tools such as Quick Steps, customized Rules, and Mail Merge with Power Automate for added functionality. Later, the book covers how to use Outlook for sharing information between Microsoft Exchange and cloud services. Toward the concluding chapters, you’ll get an introduction to Outlook programming by creating macros and seeing how you can integrate it within Outlook.
By the end of this Microsoft Outlook book, you’ll be able to use Outlook and its features and capabilities efficiently to enhance your workspace collaboration and time management.
Table of Contents (25 chapters)
Preface

Part 1: Introduction to Outlook
 Free Chapter
Chapter 1: Getting Started with Outlook
Part 2: Email Essentials
Chapter 2: Sending and Receiving Emails
Chapter 3: Managing Email Accounts
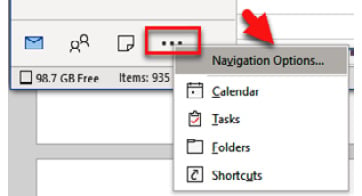
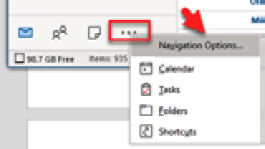
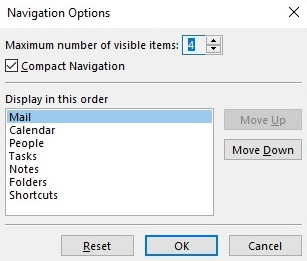
Chapter 4: Organizing Your Outlook Environment
Chapter 5: Outlook Mail Merge
Part 3: Beyond Email – Calendars, Contacts, Notes, and More
Chapter 6: Managing the Calendars
Chapter 7: Contacts in Outlook
Chapter 8: Outlook Notes
Chapter 9: Tasks and To-Dos
Part 4: How to: Share, Search, and Archive in Outlook
Chapter 10: Save Time Searching
Chapter 11: Sharing Mail, Calendars, and Contacts
Chapter 12: Archiving and Backup
Part 5: Outlook Collaboration and Integration
Chapter 13: Collaboration and Integration within Outlook
Part 6: Powerful Ways to Automate Outlook
Chapter 14: Nine Useful Rules
Chapter 15: Programming with Macros
Chapter 16: Managing Your Day System
Assessments
Other Books You May Enjoy
Customer Reviews