Sign In Start Free Trial
Account

Add to playlist

Create a Playlist

Modal Close icon
You need to login to use this feature.
  • Mastering Adobe Captivate 2019
  • Toc
  • feedback
Mastering Adobe Captivate 2019

Mastering Adobe Captivate 2019

By : Dr. Pooja Jaisingh, Bruyndonckx
3.6 (10)
close
Mastering Adobe Captivate 2019

Mastering Adobe Captivate 2019

3.6 (10)
By: Dr. Pooja Jaisingh, Bruyndonckx

Overview of this book

Adobe Captivate is used to create highly engaging, interactive, and responsive eLearning content. This book takes you through the production of a few pieces of eLearning content, covering all the project types and workflows of Adobe Captivate. First, you will learn how to create a typical interactive Captivate project. This will give you the opportunity to review all Captivate objects and uncover the application's main tools. Then, you will use the built-in capture engine of Captivate to create an interactive software simulation and a Video Demo that can be published as an MP4 video. Then, you will approach the advanced responsive features of Captivate to create a project that can be viewed on any device. And finally, you will immerse your learners in a 360o environment by creating Virtual Reality projects of Adobe Captivate. At the end of the book, you will empower your workflow and projects with the newer and most advanced features of the application, including variables, advanced actions, JavaScript, and using Captivate 2019 with other applications. If you want to produce high quality eLearning content using a wide variety of techniques, implement eLearning in your company, enable eLearning on any device, assess the effectiveness of the learning by using extensive Quizzing features, or are simply interested in eLearning, this book has you covered!
Table of Contents (17 chapters)
close
7
Working with Quizzes
14
Variables and Advanced Actions

Formatting the Mouse object

During the preview, you will see a small blue circle and hear a click sound on most mouse clicks. These mouse options can be managed in the Properties inspector. The steps are as follows:

  1. Use the Filmstrip panel to return to slide 1.
  2. Once on slide 1, select the mouse pointer to make it the active object.
  3. Take some time to inspect the properties that are available in the Properties inspector, as shown in the following screenshot:

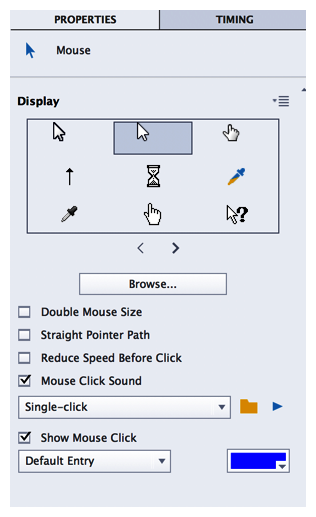
Notice the two drop-down lists that let you choose the click sound to use (single-click or double-click) and the shape of the visual click. You can also change the color of the visual click, if necessary.

The top of the Properties inspector lets you choose the mouse pointer. In this example, the default pointer is perfect, so you will not change it.

Choosing the right mouse pointer
My very first big eLearning project was to build an online course on SAP for a big multinational company. SAP uses custom mouse pointers that I wanted...

Unlock full access

Continue reading for free

A Packt free trial gives you instant online access to our library of over 7000 practical eBooks and videos, constantly updated with the latest in tech
bookmark search playlist download font-size

Change the font size

margin-width

Change margin width

day-mode

Change background colour

Close icon Search
Country selected

Close icon Your notes and bookmarks

Delete Bookmark

Modal Close icon
Are you sure you want to delete it?
Cancel
Yes, Delete