Sign In Start Free Trial
Account

Add to playlist

Create a Playlist

Modal Close icon
You need to login to use this feature.
  • Mastering Adobe Captivate 2019
  • Toc
  • feedback
Mastering Adobe Captivate 2019

Mastering Adobe Captivate 2019

By : Dr. Pooja Jaisingh, Bruyndonckx
3.6 (10)
close
Mastering Adobe Captivate 2019

Mastering Adobe Captivate 2019

3.6 (10)
By: Dr. Pooja Jaisingh, Bruyndonckx

Overview of this book

Adobe Captivate is used to create highly engaging, interactive, and responsive eLearning content. This book takes you through the production of a few pieces of eLearning content, covering all the project types and workflows of Adobe Captivate. First, you will learn how to create a typical interactive Captivate project. This will give you the opportunity to review all Captivate objects and uncover the application's main tools. Then, you will use the built-in capture engine of Captivate to create an interactive software simulation and a Video Demo that can be published as an MP4 video. Then, you will approach the advanced responsive features of Captivate to create a project that can be viewed on any device. And finally, you will immerse your learners in a 360o environment by creating Virtual Reality projects of Adobe Captivate. At the end of the book, you will empower your workflow and projects with the newer and most advanced features of the application, including variables, advanced actions, JavaScript, and using Captivate 2019 with other applications. If you want to produce high quality eLearning content using a wide variety of techniques, implement eLearning in your company, enable eLearning on any device, assess the effectiveness of the learning by using extensive Quizzing features, or are simply interested in eLearning, this book has you covered!
Table of Contents (17 chapters)
close
7
Working with Quizzes
14
Variables and Advanced Actions

Saving a custom shape

Captivate gives you the ability to save your custom shapes and add them to the list of predefined shapes. In this exercise, you will save your custom shape and insert a second instance of it via the following steps:

  1. In slide 2 of your project, make sure that your custom shape is selected (with white selection handles around it).
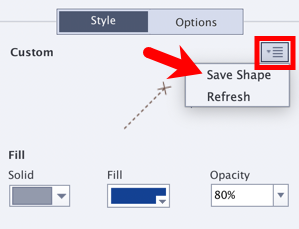
  2. Locate the Custom section at the very top of the Style tab in the Properties inspector.
  3. Click the icon in the top-right corner of the Custom section and choose the Save Shape item, as shown in the following screenshot:
  1. Type myShape into the Rename Item dialog and click OK to save your custom shape.

By saving your custom shape, you make it a part of the collection of predefined shapes, so you can reuse it in the future. Perform the following step to draw a second instance of the same shape.

  1. Click the Shapes icon on the toolbar to open the Smart Shapes panel.

Note that your new shape is present in the Recently Used Shapes section at...

Unlock full access

Continue reading for free

A Packt free trial gives you instant online access to our library of over 7000 practical eBooks and videos, constantly updated with the latest in tech
bookmark search playlist download font-size

Change the font size

margin-width

Change margin width

day-mode

Change background colour

Close icon Search
Country selected

Close icon Your notes and bookmarks

Delete Bookmark

Modal Close icon
Are you sure you want to delete it?
Cancel
Yes, Delete