Sign In Start Free Trial
Account

Add to playlist

Create a Playlist

Modal Close icon
You need to login to use this feature.
  • Unity Certified Programmer Exam Guide
  • Toc
  • feedback
Unity Certified Programmer Exam Guide

Unity Certified Programmer Exam Guide

By : Walker
3.6 (12)
close
Unity Certified Programmer Exam Guide

Unity Certified Programmer Exam Guide

3.6 (12)
By: Walker

Overview of this book

Unity Certified Programmer is a global certification program by Unity for anyone looking to become a professional Unity developer. The official Unity programmer exam will not only validate your Unity knowledge and skills, but will also enable you to be a part of the Unity community. 
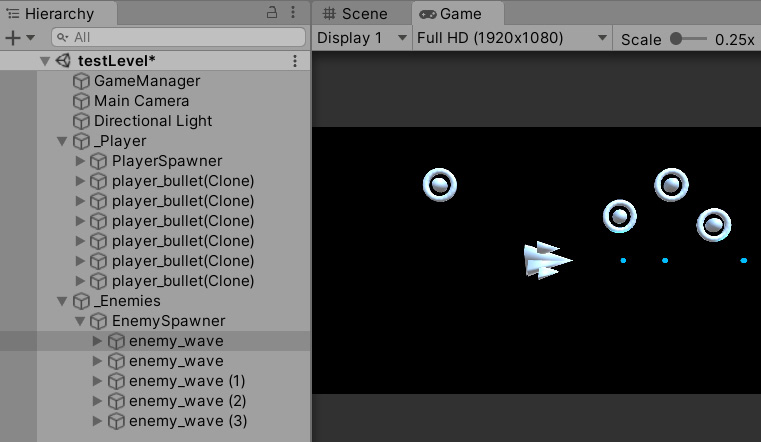
This study guide will start by building on your understanding of C# programming and taking you through the process of downloading and installing Unity. You’ll understand how Unity works and get to grips with the Unity exam’s core objectives. As you advance, you’ll enhance your skills by creating an enjoyable side-scrolling shooter game that can be played within the Unity Editor or any modern Android mobile device. This Unity book will test your knowledge with self-assessment questions and help you take your skills to an advanced level by working with Unity tools such as the animator, particle effects, lighting, UI/UX, scriptable objects, and debugging. By the end of this book, you’ll have developed a solid understanding of the different tools in Unity and be able to create impressive Unity applications by making the most of its toolset.
Table of Contents (17 chapters)
close
14
Chapter 14: Full Unity Programmer Mock Exam

Setting up our EnemySpawner and Enemy scripts

In this section, we are going to make a start on our EnemySpawner script and game object. The purpose of the EnemySpawner script is to have a game object spawn an enemy game object a series of times at a set rate. As soon as our testLevel scene begins, our enemy spawners will start releasing enemies. It will then be up to the enemies to move to the left of the screen. This is fairly simple, and as mentioned briefly in the previous section, the EnemySpawner uses the same interface and scriptable object as the PlayerSpawner to instantiate enemies. Let's start by creating our EnemySpawner script:

  1. In the Project window in the Unity Editor, create a script in the Assets/Scripts folder with the filename EnemySpawner.
  2. Open the script and enter the following code:
    using System.Collections;
         using UnityEngine;

As usual, we are using the default UnityEngine library.

We are also going to be using another library, called System.Collections. This is required when we come to use Coroutines, which will be explained later in this section.

  1. Next, we will check/enter the class name and its inheritance:
    public class EnemySpawner : MonoBehaviour
         {

Make sure the class is named EnemySpawner and that it also inherits MonoBehaviour by default.

  1. Following this, add four global variables to the EnemySpawner script:
     [SerializeField]
          SOActorModel actorModel;
          [SerializeField]
          float spawnRate;
          [SerializeField]
          [Range(0,10)]
     int quantity;
          GameObject enemies;

All variables entered in the previous code have an accessibility level of private, and all of the variables apart from the enemies variable have a SerializeField and a Range attribute of between 0 to 10 applied. The reason for this is so that we or other designers can easily change the spawn rate and quantity of enemies from our EnemySpawner in the Inspector window, as shown in the following screenshot:

Figure 2.47 – Enemy spawn rate slider

Figure 2.46 – Enemy spawn rate slider

  1. Now, let's enter Unity's Awake function along with some content:
    void Awake()
          {
              enemies = GameObject.Find("_Enemies");
              StartCoroutine(FireEnemy(quantity, spawnRate));
          }

Inside the Awake function, we make an instance from the empty _Enemies game object divider and store it in the enemies variable.

The second line of code inside our Awake function is a StartCoroutine.

Important Information

StartCoroutine() and IEnumerator go hand in hand with each other. They act similarly to a method, taking parameters and running the code inside it. The main difference with coroutines is that they can be delayed by frame updates or time. You can consider them a more advanced version of Unity's own Invoke function.

To find out more about coroutines and how to implement them in IEnumerator instances, check Unity's documentation at https://docs.unity3d.com/ScriptReference/MonoBehaviour.StartCoroutine.html.

This will be used to run our method of creating an enemy, but as you may also notice, it takes two parameters. The first is the quantity of enemies it holds and the second is the spawnRate, which delays each spawned enemy.

  1. Next, in our EnemySpawner script, we have the FireEnemy, which will be used to run a cycle of creating and positioning each enemy, before waiting to repeat the process.
  2. Next, below and outside of the Awake function, we can add our IEnumerator:
    IEnumerator FireEnemy(int qty, float spwnRte)
          {
           for (int i = 0; i < qty; i++)
           {
            GameObject enemyUnit = CreateEnemy();
            enemyUnit.gameObject.transform.SetParent(this.transform);
            enemyUnit.transform.position = transform.position;
            yield return new WaitForSeconds(spwnRte); 
           }
            yield return null;
           }

Inside the FireEnemy IEnumerator, we start a for loop that will iterate over its qty value.

Within the for loop, the following is added:

  • A method that we haven't covered yet, called CreateEnemy. The result of CreateEnemy will be turned into a game object instance called enemyUnit.
  • The enemyUnit is the enemy flying out of the EnemySpawner game object.
  • Our EnemySpawner position is issued to our enemyUnit.
  • We then wait however many seconds the spwnRte value is set to.
  • Finally, the process is repeated up until the for loop has reached its total.
  1. Finally, below and outside of the FireEnemy IEnumerator, add the following method:
    GameObject CreateEnemy()
         {
           GameObject enemy = GameObject.Instantiate(actorModel.actor) 
              as GameObject;
           enemy.GetComponent<IActorTemplate>().ActorStats(actorModel);
           enemy.name = actorModel.actorName.ToString();
           return enemy;
         }
         }

As we mentioned, there is a method called CreateEnemy. Apart from the obvious, this method will do the following:

  1. Instantiate the enemy game object from its ScriptableObject asset.
  2. Apply values to our enemy from its ScriptableObject asset.
  3. Name the enemy game object from its ScriptableObject asset.

Don't forget to save the script.

We can now move on to the next section where we will create and prepare the EnemySpawner with its game object.

Adding our script to the EnemySpawner game object

Finally, we need to attach our EnemySpawner script to an empty game object so that we can use it in our testLevel scene. To set up the EnemySpawner game object, do the following:

  1. Create an empty game object and name it EnemySpawner.
  2. As we did with the _Player and PlayerSpawner, we need to move the EnemySpawner game object inside the _Enemies game object in the Hierarchy window.
  3. After moving the EnemySpawner game object into the _Enemies game object, we now need to update the EnemySpawner game object's Transform property values in the Inspector window:
Figure 2.48 – The EnemySpawner Transform values in the Inspector window

Figure 2.47 – The EnemySpawner Transform values in the Inspector window

  1. Still in the Inspector window, click Add Component and type EnemySpawner until you see it in the list, and then click it.

Also, for a visual aid in the Scene window, it is recommended to add an Inspector icon to the EnemySpawner game object, as we did with our PlayerSpawner game object in the Creating the PlayerSpawner game object section.

The following screenshot shows the icon I gave to my EnemySpawner:

Figure 2.49 – The EnemySpawner icon

Figure 2.48 – The EnemySpawner icon

We can now add an enemy to our Enemy Spawner along with the Spawn Rate and Quantity values specified in the Inspector window. The following screenshot shows an example of a filled-in EnemySpawner game object with its script in the Inspector window:

Figure 2.50 – The EnemySpawner component holding the BasicWave Enemy actor

Figure 2.49 – The EnemySpawner component holding the BasicWave Enemy actor

We can now move on to creating our enemy script in the next section.

Setting up our enemy script

As with our player ship being created from the PlayerSpawner, our first enemy will be created from its EnemySpawner. The enemy script will hold similar variables and functions, but it will also have its own movement, similar to the PlayerBullet moving along its x axis.

Let's make a start and create our enemy script:

  1. In the Project window of the Unity Editor, create a script in the Assets/Scripts folder with the filename EnemyWave.
  2. Open the script and check/enter the following required library code at the top of the script:
    using UnityEngine;

Like the majority of our classes, we require the UnityEngine library.

  1. Check and enter the class name and its inheritance:
    public class EnemyWave : MonoBehaviour, IActorTemplate
         {

We have a public class named EnemyWave that inherits MonoBehaviour by default but also adds our IActorTemplate interface.

  1. Within the EnemyWave class, enter the following global variables:
     int health;
          int travelSpeed;
          int fireSpeed;
          int hitPower;
          
          //wave enemy
          [SerializeField]
          float verticalSpeed = 2;
          [SerializeField]
          float verticalAmplitude = 1;
          Vector3 sineVer;
          float time;

The global variables for the EnemyWave class are the top four variables updated with values from its ScriptableObject asset. The other variables are specific to the enemy, and we have given two of these variables SerializeField attributes for debugging purposes in the Inspector window.

  1. Add Unity's Update function along with its content:
    void Update ()
          {
              Attack();
          }

After the global variables, we add an Update function containing an Attack method.

  1. Add our ScriptableObject method, ActorStats, and its content:
    public void ActorStats(SOActorModel actorModel)
          {
              health = actorModel.health;
              travelSpeed = actorModel.speed;
              hitPower = actorModel.hitPower;
          }

We have our ActorStats method that takes in a ScriptableObject SOActorModel. This ScriptableObject then applies the variable values it holds and applies them to the EnemyWave script's variables.

  1. Still in the EnemyWave script, add the Die method along with its content:
    public void Die()
          {
              Destroy(this.gameObject);
          }

Another familiar method if you have been following along is the Die method, which is called when the enemy has been destroyed by the player.

  1. Add Unity's OnTriggerEnter function to the EnemyWave script:
    void OnTriggerEnter(Collider other)
          {
            // if the player or their bullet hits you.
            if (other.tag == "Player")
            {
               if (health >= 1)
               {
                  health -= other.GetComponent<IActorTemplate>
                    ().SendDamage();
               }
               if (health <= 0)
               {
                  Die();
               }
             }
           }
          

Unity's own OnTriggerEnter function will check to see whether they have collided with the player and, if so, will send damage, and the enemy will destroy themselves with the Die method.

  1. Continue and enter the TakeDamage and SendDamage methods:
    public void TakeDamage(int incomingDamage)
          {
            health -= incomingDamage;
          }
          public int SendDamage()
          {
            return hitPower;
          }

Another common set of methods from the IActorTemplate interface is to send and receive damage from the EnemyWave script.

Next is the Attack method, which controls the movement/attack of the enemy. This method is called in the Update function on every frame.

With this attack, we will make the enemy move from right to left in a wavy animation (like a snake) instead of just going straight right to left. The following image shows our enemies moving from right to left in a wavy line:

Figure 2.51 – The enemies' wave attack pattern

Figure 2.50 – The enemies' wave attack pattern

  1. Enter the following Attack method code into the EnemyWave script:
    public void Attack()
          {
            time += Time.deltaTime;
            sineVer.y = Mathf.Sin(time * verticalSpeed) *     verticalAmplitude;
            transform.position = new Vector3(transform.            position.x + travelSpeed * Time.deltaTime,
            transform.position.y + sineVer.y,
            transform.position.z);
          }}

The Attack method starts with Time.deltaTime being collected in a float variable labeled time.

We then use a premade function from Unity that returns a sine (https://docs.unity3d.com/ScriptReference/Mathf.Sin.html) using our time variable, multiplied by a set speed from the verticalSpeed variable, followed by the result being multiplied by verticalAmplitude.

The end result is stored in the Vector3 y axis. What this basically does is make our enemy ship move up and down. The verticalSpeed parameter sets its speed and verticalAmplitude alters how far it goes up and down.

Then, we do a similar task to what we did with the PlayerBullet to make the enemy ship move along the x axis, and we also add a sine calculation to its Y position for it to move up and down.

Make sure to save the script before we wind down this chapter.

Before we summarize, click Play in the Editor, and hopefully, if all is well, you will have a player ship that you will be able to fly around within the boundaries of the Game window's aspect ratio; enemies will come floating into the screen and move from right to left; you will be able to destroy these enemies with your bullets. These enemies will also be able to destroy you if they make contact with you. Finally, our Hierarchy window is all neat and well-structured both before and after playing our game. The following screenshot shows what I have just explained:

Figure 2.52 – The Game window with the current gameplay and the Hierarchy game object structured

Figure 2.51 – The Game window with the current gameplay and the Hierarchy game object structured

You have done so much already! The good news is that you've just conquered one of the biggest chapters in the book – quite sneaky of me, I know. But we already have the backbone of our game, and most importantly, we've covered a good chunk of the Unity Programmer exam.

Understandably, you may have come across some possible issues on the way, and you may feel stuck. Don't worry if this is the case – check the Complete folder for this chapter to load up the Unity project and compare the code in that folder with your own to double-check. Make sure you have the right game objects in your scene, check that the right game objects are tagged, check the radius size of your Sphere colliders, and if you have any errors or warnings appear in the Console window, double-click them, and they will take you to the code that's causing the issue.

Let's wrap up this chapter and talk about our game so far.

bookmark search playlist download font-size

Change the font size

margin-width

Change margin width

day-mode

Change background colour

Close icon Search
Country selected

Close icon Your notes and bookmarks

Delete Bookmark

Modal Close icon
Are you sure you want to delete it?
Cancel
Yes, Delete