In the following series of sections, we are going to create three of the scripts that will cover the following: spawning the player, the player's controls, and the player's bullet.
The scripts we will be creating and including are as follows:
PlayerSpawner: Creates and calibrates the playerPlayer: Player controls and general functionalityPlayerBullet: Bullet movement and general functionalityIActorTemplate: A template of the expected rules assigned to a given object (already made)SOActorModel: A set of values that can be altered by non-programmers (already made)
We will cover all of these scripts thoroughly and break down each of their purposes, as well as how they depend on and communicate with one another. We will start with the PlayerSpawner, which will create the player's ship and issue its values.
Setting up our PlayerSpawner script
The purpose of the PlayerSpawner script is to be attached to a game object, resulting in the player appearing at its position in the game. The PlayerSpawner script will also set the player's values when it is created. For example, if our player had a particular speed value, or if they had received an upgrade from the shop, the PlayerSpawner script would grab these values and apply them to the Player script.
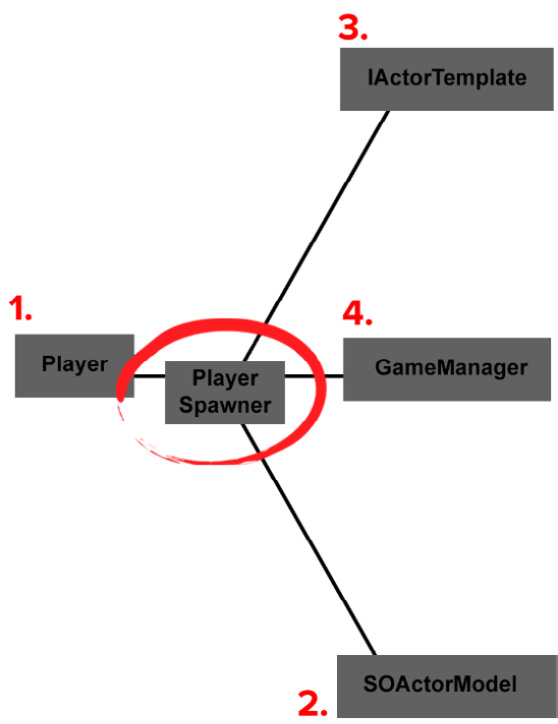
The following diagram shows a partial view of the PlayerSpawner class in the game's framework and its relationship with the other classes around it:
Figure 2.36 – PlayerSpawner UML
As we can see, the PlayerSpawner script is connected to four other scripts:
Player: PlayerSpawner is connected to Player because it creates the player.SOActorModel: This is a ScriptableObject that gives the PlayerSpawner its values, which are then passed on to the Player.IActorTemplate: This is the interface that generalizes the script with other common functions.GameManager: This will send and receive general game information from and to the PlayerSpawner script.
Before we create our PlayerSpawner script, it would be good housekeeping to create an empty game object to store anything to do with our player, their bullets, and whatever else the player might create in our testLevel scene.
Make and name the game object by following these steps:
- Right-click the Hierarchy window in its open space.
- A drop-down list will appear. From the list, select Create Empty.
- Name the game object
_Player.
That's all that we need to do. Now, let's make a start with the PlayerSpawner script:
- In the Project window, create a script in the
Assets/Scripts folder with the filename PlayerSpawner.
- Open the script and make sure that we have the following library entered at the top of our script:
using UnityEngine;
We only require using UnityEngine, as it covers all of the objects we need in the script.
- Continue by making sure our class is labeled as follows:
public class PlayerSpawner : MonoBehaviour
     {
It is common in Unity to inherit MonoBehaviour to give the script more functionality within Unity. Its common purpose is so the script can be attached to a game object.
- Continue by entering the script's variables:
   SOActorModel actorModel;
        GameObject playerShip;
Inside the PlayerSpawner class, we add two global variables: the first variable is the actorModel, which holds a scriptable object asset that will contain values for the player ship, and the second variable will hold our player ship once it's been created from our CreatePlayer method.
- Continue by entering the script's
Start function:void Start()
{
CreatePlayer();
}
After the global variables, we add a Start function that will run automatically as soon as the game object holding the PlayerSpawner script is active at runtime.
Inside the scope of the Start function is a method that we are going to create called CreatePlayer.
- Continue by entering the
CreatePlayer method:void CreatePlayer()
{
//CREATE PLAYER
actorModel = Object.Instantiate(Resources.Load
("Player_Default"))
as SOActorModel;
playerShip = GameObject.Instantiate(actorModel.actor)
as GameObject;
playerShip.GetComponent<Player>().ActorStats(actorModel);
//SET PLAYER UP
}
}
I have split the CreatePlayer method into two commented-out parts (//CREATE PLAYER and //SET PLAYER UP) due to its size.
This first part of the CreatePlayer method will instantiate the player ship's ScriptableObject asset and store it in the actorModel variable. We then instantiate a game object that refers to our ScriptableObject that holds the game object called actor in our game object variable named playerShip. Finally, we apply our ScriptableObject asset to the playerShip method called ActorStats that exists in the Player component script (which we will create later on in this chapter).
- Continue on inside the
CreatePlayer method to add the second half://SET PLAYER UP
playerShip.transform.rotation = Quaternion.Euler(0,180,0);
playerShip.transform.localScale = new Vector3(60,60,60);
playerShip.name = "Player";
playerShip.transform.SetParent(this.transform);
playerShip.transform.position = Vector3.zero;
In the second half of the CreatePlayer method, we add more code at the same point where we have commented //SET PLAYER UP.
The code from //SET PLAYER UP onward is dedicated to setting up the player's ship in the correct position at the start of the level.
The code does the following:
- Sets the rotation of the player's ship to face the right way.
- Sets the scale of the player ship to
60 on all axes.
- When we
instantiate any game object, Unity will add (Clone) to the end of the game object's name. We can rename it Player.
- We make the
playerShip game object a child of the _Player game object in the Hierarchy window so that we can easily find it.
- Finally, we reset the player ship's position.
That is our PlayerSpawner script coded. Now, in the next section, we need to create and attach this script to a game object and name it. Make sure to save the script before moving on.
Creating the PlayerSpawner game object
In this section, we will create a game object that will hold our newly created PlayerSpawner script, and then we will position the PlayerSpawner game object in the testLevel scene.
To create and set up our PlayerSpawner game object, we need to do the following:
- In the Hierarchy window, create an empty game object and name it
PlayerSpawner.
- Drag and drop the
PlayerSpawner game object onto the _Player (remember that _Player is the empty game object in our scene) game object to make the PlayerSpawner its child.
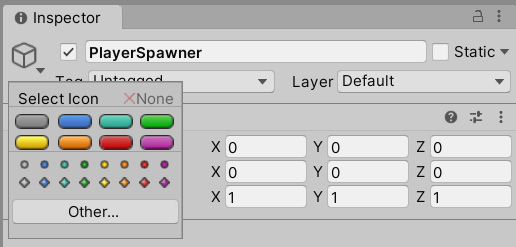
Because our PlayerSpawner game object doesn't have anything visually applied to it, we can give it an icon.
- With the
PlayerSpawner game object still selected in the Inspector window, click the multi-colored box to the left of its name. A selection of colors will be offered, as shown in the following screenshot:
Figure 2.37 – Selecting an icon for the PlayerSpawner
- Pick a color. Now, the
PlayerSpawner game object will be given a label to show us where it is in the scene. This will now appear in the Scene window.Tip
If you still can't see the icon in the Scene window, make sure 3D icons are turned off. You can check by clicking the Gizmos button in the top right of the Scene window and unchecking the 3D Icons box.
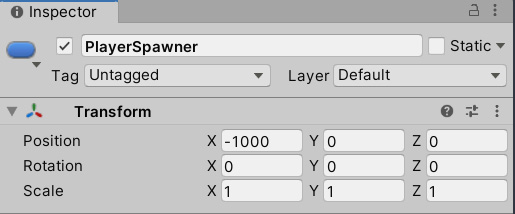
With the PlayerSpawner game object sitting inside the _Player game object in the Hierarchy window, we now need to give it the following Transform property values, which will help two things. The first thing is to help set the boundaries of our ship within the game's screen ratio (we will explain more about this in the next chapter); the second is for later on in the book, where we will make the player ship animate in the screen view. For now, we just need to give our PlayerSpawner game object the following values:
- With the
PlayerSpawner game object still selected, in the Inspector window, give it the following Transform values:
Figure 2.38 – PlayerSpawner Transform values in the Inspector window
- While still in the Inspector window, click Add Component and type
PlayerSpawner until you see the script appear in the drop-down list.
- Click the
PlayerSpawner script to add this to the PlayerSpawner game object.
We can't move the ship yet, nor can we fire because we haven't coded this in yet. In the following section, we will go through the player's controls, then we will move on to coding our player and its bullet to travel across the screen.
Setting up our Input Manager
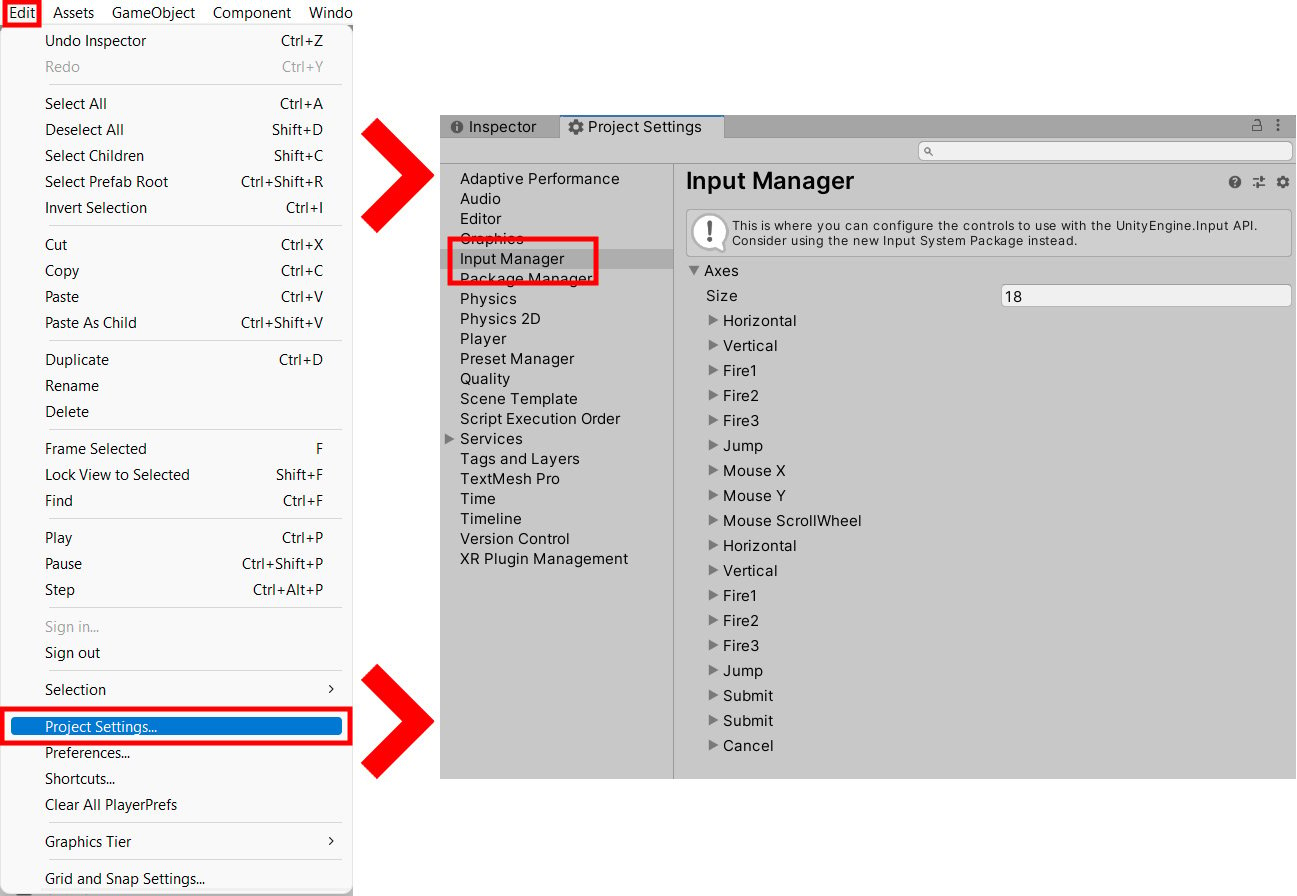
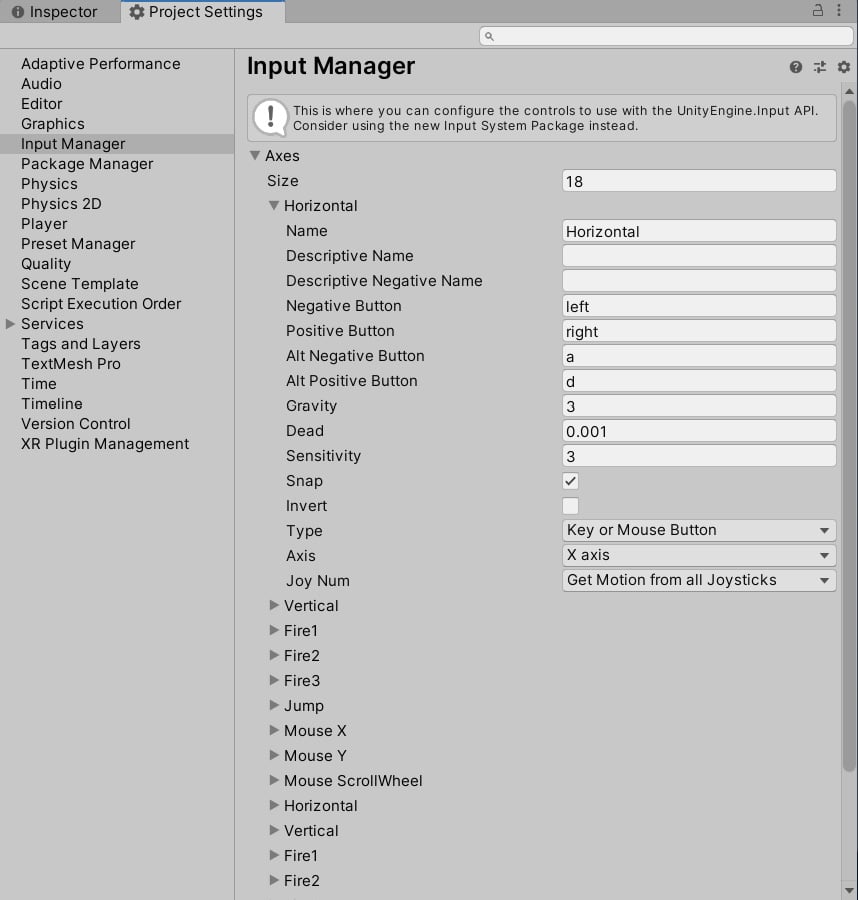
Remember that this is a side-scrolling shooter game, so the controls will be two-dimensional even though our visuals are three-dimensional. Our focus now is to get the Players controls set up. To do this, we need to access the Input Manager:
- Select Edit, followed by Project Settings, and then select Input Manager from the list:
Figure 2.39 – Selecting the Input Manager in the Unity Editor
The Input Manager will offer a list of all available controls for our game. We will first check what the controls are set to by default. There are a lot of options here, but as mentioned, we only need to browse through the properties that matter to us, namely the following:
- Horizontal: Moves the player's ship along its x-axis
- Vertical: Moves the player's ship along its y-axis
- Fire1: Makes our player shoot
To check these three properties, we need to do the following:
- Expand the Axes dropdown by clicking the arrow next to it.
- Expand Horizontal, as shown in the following screenshot:
Figure 2.40 – The Input Manager
- Horizontal: The left button configures horizontal negatively (
-1), and the right button configures it positively (+1). Alternative key presses to this effect are A for left and D for right.
If we had analog controls such as a joystick or a steering wheel, we would likely need to be concerned about the influence of gravity when the player releases the controls and it returns to its center. Dead refers to the center of the analog controls. Sometimes, controllers can be unbalanced and naturally lean to one side, so by increasing the dead zone, we can eliminate false feedback from the player that could be detected as a movement.
- Vertical: This is the same as Horizontal, apart from the fact that the negative button is down (
-1) and the positive button is up (+1). Alternative buttons are S for down and W for up.
- Fire1: This has a similar layout to Vertical, but with Ctrl as Fire (Command on a Mac) (that is, the positive button), with the alternative (positive) button being
mouse 0 (that is, the left mouse button). For now, remove mouse 0 from the alternative button.
To find out more about the Input Manager window, click the little blue book at the top-right corner of the Input Manager panel.
Our controls are now set in the Input Manager window, so let's move on to coding the Player script to take advantage of these controls.
Setting up our Player script
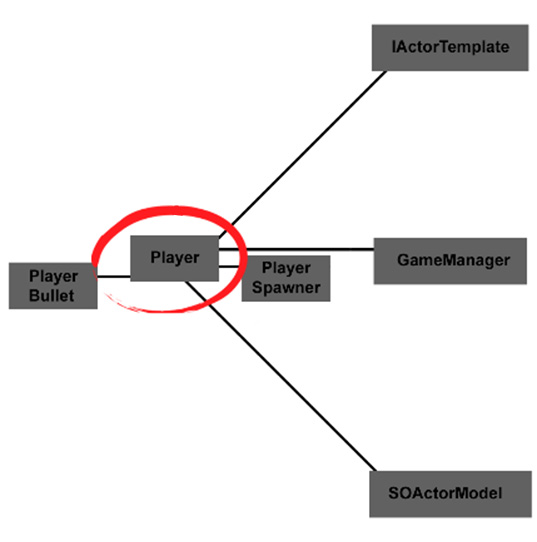
The Player script will be attached to the player ship game object, from which the player will be able to move and shoot, as well as inflict and receive damage. We will also make the player ship not go outside of the screenplay area. Before we continue, let's remind ourselves where the Player script lies in our game framework:
Figure 2.41 – Player UML
The Player script will be in contact with the following scripts:
PlayerBullet: The Player script will create bullets to fire.PlayerSpawner: The Player script is created from the PlayerSpawner.IActorTemplate: Contains damage control and the properties for Player.GameManager: Extra information such as the number of lives, the score, the level, and whatever upgrades the player ship has accumulated will be stored in GameManager.SOActorModel: Holds ScriptableObject properties for Player.
Now that we are familiar with the Player script's relation to the other scripts, we can start coding it:
- In the Project window of the Unity Editor, create a script in the
Assets/Scripts folder with the filename Player.
- Open the script and add the
IActorTemplate interface to the existing default code:using UnityEngine;
public class Player : MonoBehaviour, IActorTemplate
{
The script will by default import a UnityEngine library (including some others), the name of the class, and MonoBehaviour. All of these are essential to make the script work in the Unity Editor.
- Continuing with the
Player script, enter the following global variables: int travelSpeed;
int health;
int hitPower;
GameObject actor;
GameObject fire;
public int Health
{
get {return health;}
set {health = value;}
}
public GameObject Fire
{
get {return fire;}
set {fire = value;}
}
GameObject _Player;
float width;
float height;
We have entered a mixture of integers, floats, and game objects in our global variables; starting from the top, the first six variables will be updated from the player's SOActorModel script. travelSpeed is the speed of the player's ship, health is how many hits the player can take before dying, hitPower is the damage the ship will cause when colliding into something that can receive damage (the enemy), actor is the three-dimensional model used to represent the player, and finally, the fire variable is the three-dimensional model from which the player fires. If that seemed a little rushed, go back to the Introducing our ScriptableObject – SOActorModel section, where we went into more detail about these variables.
The two public properties of Health and Fire are there to give access to our two private health and fire variables from other classes that require access.
The _Player variable will be used as a reference to the _Player game object in the scene.
The last two variables of width and height will be used to store the measured results of the world space dimensions of the screen that the game is played in. We will discuss these two more in the next block of code.
Before we begin the following Start function code block, you may question why we would pick Start over Awake when it comes to running a function's code content. Both functions run once at runtime; the only noticeable difference is that Awake runs when the object is created. Start is executed when it's enabled, as can be seen in the documentation at https://docs.unity3d.com/Manual/ExecutionOrder.html.
For simplicity in our Unity project, we will vary between which of the two functions to use. This is so we avoid conflicts between several Awake functions running at the same time. As an example, one script may try to update its Text UI, but the variable updating the text may still be null at runtime because the script with the variable is still waiting for its content to be updated.
There is a way to avoid conflicts between several Awake functions being called by several scripts at runtime, by going to Unity's Script Execution Order in Edit | Project Settings | Script Execution Order.
If you would like to know more about the Script Execution Order, check the documentation at https://docs.unity3d.com/Manual/class-MonoManager.html.
- Continuing with entering code into the
Player script, next up, we will type out the Start function along with its content: void Start()
{
height = 1/(Camera.main.WorldToViewportPoint (new
Vector3(1,1,0)).y - .5f);
width = 1/(Camera.main.WorldToViewportPoint(new Vector3(1,1,0))
.x - .5f);
_Player = GameObject.Find("_Player");
}
As previously mentioned, the height and width variables will store our world space measurements. These are required so that we can clamp the player's ship inside the screen. Both the height and width lines of code use similar methods; the only difference is with the axis we are reading.
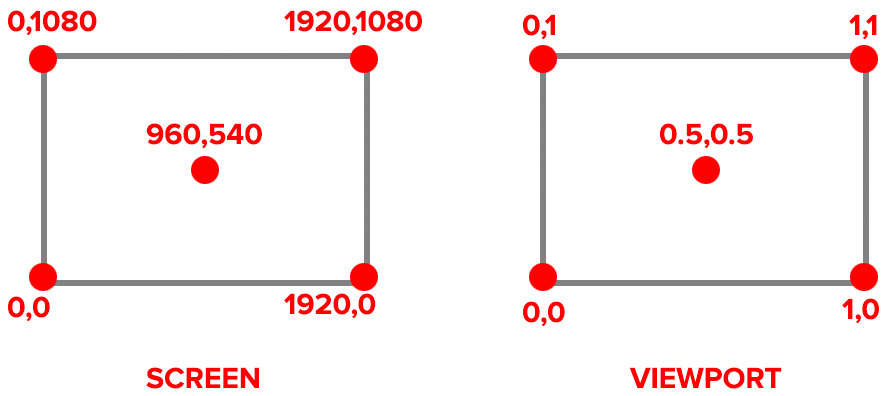
The Camera.main component refers to the camera in our scene, and the function it uses, WorldToViewportPoint, is to take the results from the game's three-dimensional world space and convert the results into viewport space. If you aren't sure what viewport space is, it's similar to what we know as a screen resolution, except its measurements are in points and not pixels, and these points are measured from 0 to 1. The following diagram shows the comparison between screen and viewport measurements:
Figure 2.42 – Screen versus viewport measurements
So, with viewports, no matter what the screen's resolution is, the full height and width are 1 and everything between that is a fraction. So, for the height, we feed Vector3 to WorldToViewportPoint, where Vector3 represents a world space value, followed by -0.5f, which sets its offset back to 0. Then, we divide 1 (which is our full-screen size) by the result of our formula. This will give us our current world space height of the screen. We then apply the same principles for the width and use x instead of y and store the result.
Finally, the last line of code takes the reference of the _Player game object in the scene and stores it into our variable.
- Continuing with the
Player script, we have our Update function that is called on every frame. Enter the function along with the following two methods: void Update ()
{
//Movement();
//Attack();
}
The Update function runs the Movement method and Attack method on every frame. We will go into depth about these two methods later on in the chapter, for now we will comment ("//") these two methods out to avoid the script not being able to run.
The next method we are going to put into our Player script is the ActorStats method. This method is a requirement, as we declare it in the interface we are inheriting.
- Just after the scope of our
Update function, enter the following piece of code:public void ActorStats(SOActorModel actorModel)
{
health = actorModel.health;
travelSpeed = actorModel.speed;
hitPower = actorModel.hitPower;
fire = actorModel.actorsBullets;
}
The code we have just entered assigns values from the player's SOActorModel ScriptableObject asset that we made earlier on in the chapter.
This method doesn't get run in our script but gets accessed by other classes, the reason being that these variables hold values regarding our player and don't need to be anywhere else.
- Save the
Player script.
Before we test what we have so far, we need to attach our Player script to our player_ship in the Project window.
- In the Project window, navigate to
Assets/Prefab and select the player_ship prefab.
- Select the Add Component button in the Inspector window. Type
Player until the script appears and then select it.
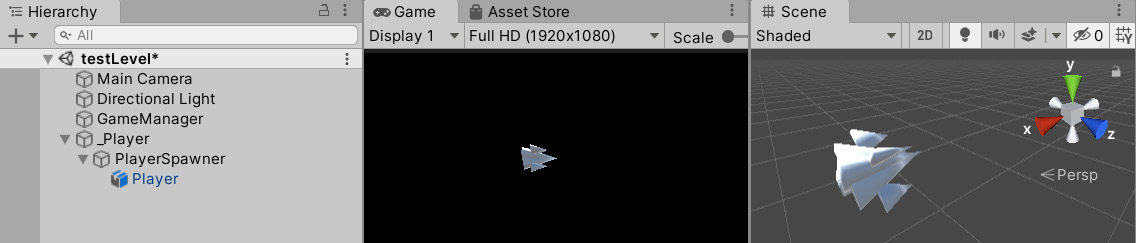
With our Hierarchy window containing the _Player, PlayerSpawner, and the GameManager game objects, it's time to test out the game. We can see the player ship get created in our Game window by pressing Play in the Editor.
The following screenshot shows our game in Play mode; note the Hierarchy window on the left with the PlayerSpawner game object as the parent of the Player game object; also note the Game window with its black background, and in the center, the player's ship is facing right and is located in the center of the screen. Finally, the far-right image shows our Scene window with our PlayerSpawner icon:
Figure 2.43 – The current Player setup in our game
Tip
Before moving on to the next section, create a prefab of the PlayerSpawner game object by dragging and dropping it into the Project window to Assets/Player. That way, if you lose the scene for whatever reason along with its Hierarchy content, you can drag and drop your prefab back in. This should be a rule with any common active game object.
Let's move on to the next section where we'll continue to work on the Player script, but this time, we will look at what happens when our player's game object comes into contact with an enemy.
Colliding with an enemy – OnTriggerEnter
In this section, we are going to add a function to our Player script that will check to see what has collided with our player's game object during runtime. Currently, the only thing that can collide with our player is an enemy, but we can still demonstrate the use of Unity's own OnTriggerEnter function, which handles most of the work for us:
- Continuing after the scope of our last method (
ActorStats) in the Player script, we are going to add the following code that detects our enemy colliding with the player's ship: void OnTriggerEnter(Collider other)
{
if (other.tag == "Enemy")
{
if (health >= 1)
{
if (transform.Find("energy +1(Clone)"))
{
Destroy(transform.Find("energy +1(Clone)"). gameObject);
health -= other.GetComponent<IActorTemplate>
().SendDamage();
}
else
{
health -= 1;
}
}
if (health <= 0)
{
Die();
}
}
}
Let's explain some of the code we have just entered into the Player script:
Let's continue with our Player script and add the functionality so that the player can receive and send damage from and to the enemy respectively.
- In the next method, we are going to add two methods. The first method (
TakeDamage) will take an integer called incomingDamage and use whatever the value is to deduct from our player's health value.
The second method (SendDamage) will return an integer of our hitPower value.
- Just below and outside of the scope of our
ActorStats method, now add the following code:public void TakeDamage(int incomingDamage)
{
health -= incomingDamage;
}
public int SendDamage()
{
return hitPower;
}
Let's continue with another method for the Player script and make it possible for the player to control the player ship around the Game window.
The Movement method
In this section, we will code the Movement method, which will take input from the player's joypad/keyboard and also make use of the height and width floats to keep the player's ship within the scree:.
- Still in the
Player script, make a start with the following method using the following content to check for the player's input:void Movement()
{
if (Input.GetAxisRaw("Horizontal") > 0)
{
if (transform.localPosition.x < width + width/0.9f)
{
transform.localPosition += new Vector3
(Input.GetAxisRaw("Horizontal")
*Time.deltaTime*travelSpeed,0,0);
}
}- The
Movement method will consist of detecting movement in four directions being made from the player; we'll start with when the player presses right on the controller/keyboard. We run an if statement that checks whether the Input Manager has detected any movement from the Horizontal property. If the GetAxisRaw detects a value higher than zero, we fall into the if statement's condition. Note that GetAxisRaw has no smoothing, so the player's ship will instantly move unless extra code is added. - Next, we have another
if statement; this checks whether the player has exceeded past the width (that is, of the screen's world space that we calculated earlier on in the chapter). We've also added an extra partial width to avoid the geometry of the player's ship leaving the screen. If the player's position is still under the width (and its buffer) value, we run the content inside the if statement. - The player's position is updated with a
Vector3 struct, which holds the value of the Horizontal direction, multiplied by time per frame and by the travelSpeed we set from our ScriptableObject.
- Let's continue in the
Movement method and add a similar if statement for moving the player ship to the left:if (Input.GetAxisRaw("Horizontal") < 0)
{
if (transform.localPosition.x > width + width/6)
{
transform.localPosition += new Vector3
(Input.GetAxisRaw("Horizontal")
*Time.deltaTime*travelSpeed,0,0);
}
}
As we can see, the code is close to the previous block; the only difference is that our first if statement checks whether we are moving left; the second if statement checks whether the player's position is greater than the width and a slightly different buffer.
Apart from that, the if statement and its content serve the same position, just in the opposite direction.
- Let's continue with our
Movement method and add the if statement code for moving the player's ship down:if (Input.GetAxisRaw("Vertical") < 0)
{
if (transform.localPosition.y > -height/3f)
{
transform.localPosition += new Vector3
(0,Input.GetAxisRaw("Vertical")*Time.deltaTime*travelSpeed,0);
}
}
Yet again, we follow the same rule from the previous two if statements, but this time, instead of Horizontal, we add the Vertical string property. In the second if statement, we check whether the player's y-axis is higher than a negative height/3. The reason why we divide by this value is that later on in the book (Chapter 9, Creating a 2D Shop Interface and In-Game HUD), we will be adding graphics at the bottom of the screen that will restrict the player's view.
- Let's move on to the last
if statement in the Movement method, moving up:if (Input.GetAxisRaw("Vertical") > 0)
{
if (transform.localPosition.y < height/2.5f)
{
transform.localPosition += new Vector3
(0,Input.GetAxisRaw("Vertical")*Time.deltaTime*travelSpeed,0);
}
}
}
As before, this if statement carries a similar role, but this time, it's checking whether the player's position is under the height/2.5f value. A buffer is applied to stop the three-dimensional geometry from leaving the top of the screen.
Tip
When making a game, sometimes it occurs that when the player moves diagonally, their speed increases. This is because the player is effectively pressing two directions at the same time instead of just one.
To ensure a direction has just the magnitude of 1, we can use Unity's pre-made Normalize function.
To find out more about this function, check the documentation at https://docs.unity3d.com/ScriptReference/Vector3.Normalize.html.
- Don't forget to save the script.
We will continue with the Player script by adding the Die method.
The Die method
Adding the Die method to the Player script will make it possible for our player to be destroyed. Currently, inside the Die method is a Unity function called Destroy; this function will delete whatever game object is within its parameter.
Enter the following method in the Player script to destroy the player:
public void Die()
      {
          Destroy(this.gameObject);
      }
Let's move on to the last method in the Player script, which is to attack.
The Attack method
In this section, we will add content to the Attack method in the Player script.
The purpose of this Attack method is to receive input from the player, create a bullet, point the bullet in the correct direction, and make the bullet a child of the Player game object to keep our Hierarchy window tidy.
Enter the following Attack method into the Player script to allow the player to fire bullets:
public void Attack()
      {
       if (Input.GetButtonDown("Fire1"))
         {
             GameObject bullet = GameObject.Instantiate
                (fire,transform.position,Quaternion.Euler
                  (new Vector3(0, 0, 0))) as GameObject;
             bullet.transform.SetParent(_Player.transform);
             bullet.transform.localScale = new Vector3(7,7,7);
         }
       }
Inside the Attack method, we call an if statement that checks whether the player has pressed the Fire1 button (Left Ctrl on Windows; command if you are using a Mac). If the player has pressed the Fire1 button, we will drop into the if statement's scope.
Note
When a developer refers to the scope of a function, if statement, class, and so on, they are referring to what is happening between the opening and closing of the curly braces. For example, if the following code has a higher value in its money variable, the following if statement will run:
if (money > costOfPizza)
{
//Whatever happens between the top and bottom of the two curly braces is within the if statements scope.
}
Within the if statement, we make another if statement to make sure that when clicking the mouse, we are clicking on the screen and not anything UI-related. This will become more relevant when we look at adding a Pause button in Chapter 10, Pausing the Game, Altering Sound, and a Mock Test. If we do click on something UI-related, we call return, which means we exit the if statement so that we don't fire a shot.
Because we have entered the movement and attack function content we can scroll back up to the Update function and remove the comments we added.
Our Update function will now look like the following:
void Update()
{
	Movement();
	Attack();
}
Next, we Instantiate our PlayerBullet game object from its instance name, fire. We also face the fire game object to the right, relative to the screen, and move it toward oncoming enemies. We store the results of creating and orienting our game object in a variable named bullet.
We then set the size of the bullet to be seven times larger than its original size, which makes it look bigger.
Finally, within the if statement, we make our bullet game object sit within a single game object with the variable name _Player.
That is all of the code required for the Player script! Make sure to save the script before moving on.
In the next section, we are going to move on to a different player script that controls what happens when the player fires their bullet.
Setting up our PlayerBullet script
In this section, we will be creating a bullet that will travel across the screen from the player's ship.
You will notice how similar the PlayerBullet script is to the Player script because it carries the IActorTemplate and SOActorModel scripts, which are already coded into the Player script.
Let's create our PlayerBullet script:
- In the Project window of the Unity Editor, create a script in the
Assets/Scripts folder with the filename PlayerBullet.
- Open the script and check/enter the following code at the top of the script:
using UnityEngine;
By default, we require the UnityEngine library, as previously mentioned.
- Let's continue by checking the correct class name and entering the following inheritance:
public class PlayerBullet : MonoBehaviour, IActorTemplate {
We declare the public class and by default inherit MonoBehaviour. We also inherit the IActorTemplate interface to give our game object-related methods from the other game object scripts, such as SendDamage and TakeDamage.
- Enter the following global variables into the
PlayerBullet script:GameObject actor;
int hitPower;
int health;
int travelSpeed;
[SerializeField]
SOActorModel bulletModel;
All the variables we add are private. The last variable has a SerializeField attribute added. SerializeField makes it possible for this variable to be visible in the Inspector window, so even though it's private, we can still drag and drop assets into its field (which we will do shortly). More information on the SerializeField attributes can be found at https://docs.unity3d.com/ScriptReference/SerializeField.html.
- Next, we'll move on and enter the
Awake function along with its content:void Awake()
{
ActorStats(bulletModel);
}
In our Awake function is the ActorStats method, which is a requirement because we are inheriting an interface that declares it.
- Continue by entering the
SendDamage and TakeDamage methods: public int SendDamage()
{
return hitPower;
}
public void TakeDamage(int incomingDamage)
{
health -= incomingDamage;
}
As mentioned already in this chapter, we require these methods to send and receive damage.
- Moving on, we enter the
Die method along with its content: public void Die()
{
Destroy(this.gameObject);
}
Another method to include from our interface is the Die method.
- Next, enter the
ActorStats method: public void ActorStats(SOActorModel actorModel)
{
hitPower = actorModel.hitPower;
health = actorModel.health;
travelSpeed = actorModel.speed;
actor = actorModel.actor;
}
The last method that we inherit from our interface is the ActorStats method, which will hold our ScriptableObject asset. This asset will then be assigned to our PlayerBullet script's global variables.
- The next function is the
OnTriggerEnter, along with its if statement condition checks, as follows:void OnTriggerEnter(Collider other)
{
if (other.tag == "Enemy")
{
if(other.GetComponent<IActorTemplate>() != null)
{
if (health >= 1)
{
health -= other.GetComponent<IActorTemplate>
().SendDamage();
}
if (health <= 0)
{
Die();
}
}
}
}
In the preceding block of code, we run a check to see whether our bullet has collided with an "Enemy" tagged collider. If the collider is tagged as "Enemy" to the player, we then check to see whether the collider holds an IActorTemplate interface. If it doesn't, then it's likely the "Enemy" collider is an obstacle. Otherwise, we deduct health from the Enemy game object and check to see whether it's dead.
- Now, let's enter Unity's
Update function for the bullet's movement:void Update ()
{
transform.position += new
Vector3(travelSpeed,0,0)*Time.deltaTime;
}
The Update function adds to its x-axis each frame based on its travelSpeed value multiplied by Time.deltaTime (Time.deltaTime is the time in seconds from the last frame).
Important Note
If you would like to know more about Time.deltaTime, check the documentation at https://docs.unity3d.com/ScriptReference/Time-deltaTime.html.
- Next, enter Unity's
OnBecameInvisible function: void OnBecameInvisible()
{
Destroy(gameObject);
}
}
This last function will remove any unnecessary bullets that have left the screen. This will help the performance of our game and keep it tidy. Make sure you have saved the script before continuing.
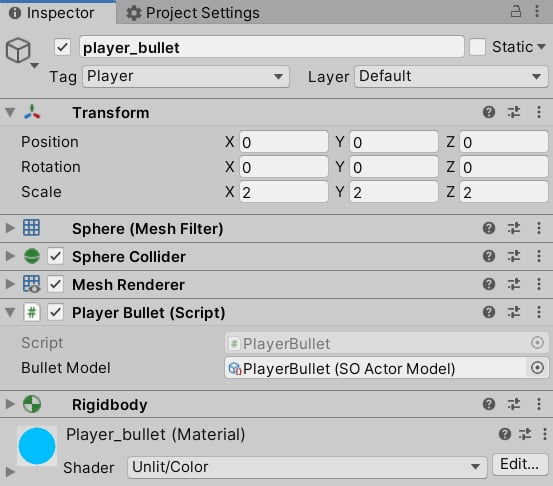
Next, we need to apply the PlayerBullet script to our player_bullet prefab:
- Navigate to
Assets/Prefab/Player and select player_bullet.
- With
Player_Bullet selected, click the Add Component button in the Inspector window and type PlayerBullet until you see the PlayerBullet script.
- Select the script and add the
PlayerBullet asset to it from the Bullet Model field (drag the asset into the field or click the remote button to the right of its field).
The following screenshot shows our player_bullet with its script and asset:
Figure 2.44 – The player_bullet components in the Inspector window
We can now move on to the next section about making enemies for the player to attack!


 Free Chapter