In today’s cloud-driven environment, achieving SC-300 certification is essential for professionals looking to tackle real-world identity and access management (IAM) scenarios.
SC-300 exam content has undergone significant changes, and this second edition aligns with the revised exam objectives. This updated edition gives you access to online exam prep resources such as chapter-wise practice questions, mock exams, interactive flashcards, and expert exam tips, providing you with all the tools you need for thorough exam preparation.
You’ll get to grips with the creation, configuration, and management of Microsoft Entra identities, as well as understand the planning, implementation, and management of Microsoft Entra user authentication processes. You’ll learn to deploy and use new Global Secure Access features, design cloud application strategies, and manage application access and policies by using Microsoft Cloud App Security. You’ll also gain experience in configuring Privileged Identity Management for users and guests, working with the Permissions Creep Index, and mitigating associated risks.
By the end of this book, you’ll have mastered the skills essential for securing Microsoft environments and be able to pass the SC-300 exam on your first attempt.
The managed domain you choose when provisioning a tenant remains integral to the Microsoft 365 tenant throughout its entire life cycle. It functions as a fully operational domain namespace, equipped with a Microsoft-managed publicly available domain name. However, most organizations prefer to use their own domain names for activities such as email communication and Microsoft Teams interactions.
Note
Custom Domain Name System (DNS) records cannot be added to the Microsoft-managed namespace.
Organizations can add any public domain name to their Microsoft 365 tenant. Microsoft supports the configuration of up to 5,000 domains within a single tenant. This includes both top-level domains (for example, contoso.com) and subdomains (for example, businessunit1.contoso.comor businessunit2.contoso.com).
Acquiring a Domain Name
Most organizations come to Microsoft 365 with existing domain names. Those domain names can easily be added to your tenant. In addition, you can purchase new domain names to be associated with your tenant.
Third-Party Registrar
Most large organizations have existing relationships with third-party domain registrars, such as Network Solutions or GoDaddy. You can use any ICANN-accredited registrar for your region to purchase domain names.
About ICANN
The Internet Corporation for Assigned Names and Numbers (ICANN) is a non-profit organization established in 1998 to provide guidance and policy for the internet’s unique identifiers, including domain names. Before ICANN’s formation, Network Solutions managed the global DNS registry under a subcontract from the United States Defense Information Systems Agency.
Some organizations may wish to use Microsoft as the registrar. Depending on your subscription, you may be able to purchase domains from within the Microsoft 365 admin center, as shown in Figure 1.25:
Figure 1.25: Purchasing a domain through the Microsoft 365 admin center
When purchasing a domain through the Microsoft admin center, you may be able to purchase directly from Microsoft or may be redirected to a traditional domain registrar partner. Also, if you’ve purchased Microsoft 365 through a partner, you may be redirected to the partner’s website, depending on their relationship with Microsoft. If purchasing directly from Microsoft, you can select from the following top-level domains:
.biz
.com
.info
.me
.mobi
.net
.tv
.co.uk
.org.uk
Domain purchases are billed separately from your Microsoft 365 subscription services. When purchasing a domain from Microsoft, you’ll have very limited ability to manage DNS records. If you require custom DNS record configuration (such as configuring a mail exchanger (MX) record to point to a third-party mail gateway), you’ll want to purchase your domains separately.
Configuring a Domain Name
Configuring a domain for your tenant is straightforward and requires access to your organization’s public DNS service provider. Some large organizations host and manage their own DNS, while others opt to use external service providers, such as domain registrars, to provide these services.
Tip
If you’re unsure of where the DNS for your domain is hosted, you can use a service such as https://www.whois.com.
In order to be compatible with Microsoft 365, a DNS service must support configuring the following types of records:
Canonical Name (CNAME): CNAME records are alias records for a domain, allowing a name to point to another name as a reference. For example, let’s say you build a site named www.contoso.com on a web server. That site resolves to an IP address of 1.2.3.4. Later, your organization decides to develop sites for each region and you build websites for na.contoso.com, eu.contoso.com, and ap.contoso.com on that same server. You might then implement a CNAME record for www.contoso.com to point to na.contoso.com.
Text (TXT): A TXT record is a DNS record used to store unstructured information. Request for Comments (RFC) 1035 (https://tools.ietf.org/html/rfc1035) specifies that the value must be text strings but gives no specific format for the data. Over the years, Sender Policy Framework (SPF), DomainKeys Identified Mail (DKIM), Domain-Based Message Authentication, Reporting, and Conformance (DMARC), and other authentication and verification data have used specially crafted TXT records to hold data. The Microsoft 365 domain verification process requires the administrator to place a certain value in a TXT record to confirm ownership of the domain.
Service Location (SRV): An SRV record is used to specify a combination of a hostname in addition to a port for a particular internet protocol or service.
MX: The MX record is used to identify which hosts (servers or other appliances, services, or endpoints) are responsible for processing mail for a domain.
In order to use a custom domain (sometimes referred to as a vanity domain) with Microsoft 365, you’ll need to add it to your tenant.
Expand Settings and select Domains, as shown in Figure 1.26:
Figure 1.26: The Domains page of the Microsoft 365 admin center
Click Add domain.
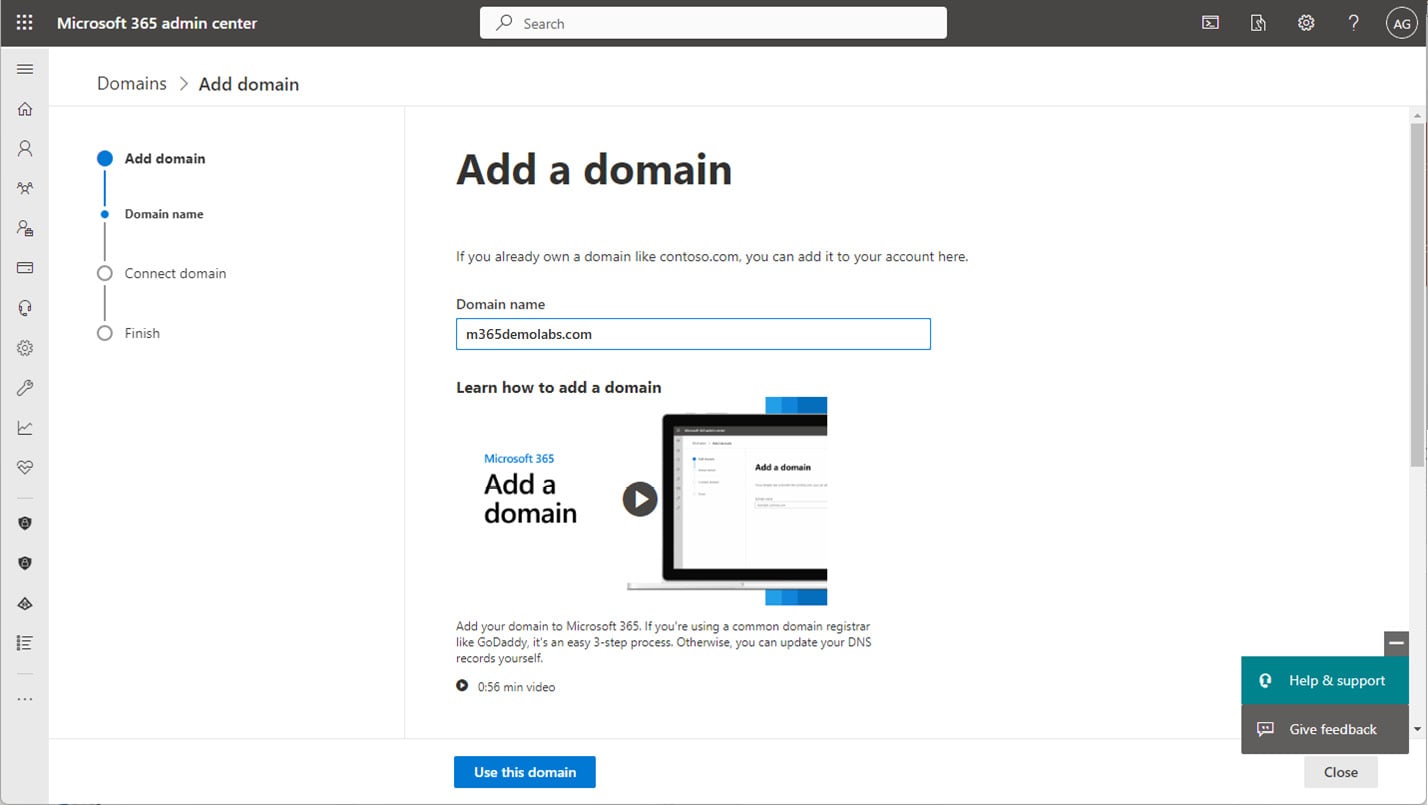
On the Add domain page, enter the custom domain name you wish to add to your tenant. Select Use this domain to continue. See Figure 1.27.
Figure 1.27: The Add a domain page
If your domain is registered at a host that supports Domain Connect, you can click Verify and then enter your registrar’s credentials, as shown in Figure 1.28. Microsoft will automatically configure the necessary domain records on your behalf.
Figure 1.28: Authorizing Domain Connect with GoDaddy to update DNS records
You can also select More options to see all the potential verification methods available:
If you are using a registrar that supports Domain Connect, you can enter the credentials for your registrar. When ready, click Connect.
If you select More options, you will be presented with manual configuration choices. The default option (if your domain supports Domain Connect) will be to have the Microsoft 365 wizard update your organization’s DNS records at the registrar. If you are going to be configuring advanced scenarios (such as Exchange Hybrid for mail coexistence and migration) or have other complex requirements, you may want to consider managing the DNS records manually or opting out of select services. If you choose to add your own domain records, you’ll be presented with the values you need to configure.
If you choose any of the additional verification options (such as Add a TXT record to the domain’s DNS records), you’ll need to manually add DNS records through your DNS service provider. Microsoft provides the values necessary for you to configure records with your own service provider. After configuring the entries with your service provider, you can come back to the wizard and select Verify, as shown in Figure 1.29:
Figure 1.29: Completing verification records manually
If you are creating records manually, it may take anywhere from 10 minutes to 48 hours for the wizard to be able to detect the records.
After the domain has been verified, proceed to the Connect domain page. Depending on your choices and whether you’re using a Domain Connect provider, you may have the option to apply the Let Microsoft add your DNS records setting to support your organization’s services. If you choose the default option for letting Microsoft handle the records, you’ll be presented with a series of choices. Each choice represents a service that Microsoft can configure. Click Advanced options (Figure 1.30) to expand the choices. The different options are described here:
The first checkbox, Exchange and Exchange Online Protection, manages DNS settings for Outlook and email delivery. If you have an existing on-premises Exchange Server deployment (or another mail service solution), you should clear this checkbox before continuing as you’ll need custom DNS settings. The default selected option means that Microsoft will make the following updates to your organization’s DNS:
Your organization’s MX record will be updated to point to Exchange Online Protection. If you have an existing mail service, this will break delivery to that service.
The Exchange Autodiscover record will be updated to point to autodiscover.outlook.com.
Microsoft will update your organization’s SPF record with v=spf1 include:spf.protection.outlook.com -all.
Figure 1.30: Adding DNS records
The second setting, Skype for Business, will configure DNS settings for Skype for Business. If you have an existing Skype for Business Online deployment or you’re using Skype for Business on-premises, you may need to clear this box until you verify your configuration to prevent external communication errors:
Microsoft will add two SRV records: _sip._tls.@<domain>and _sipfederationtls._tcp@<domain>.
Microsoft will also add two CNAMEs for Lync: sip.<domain> to point to sipdir.online.lync.com and lyncdiscover.<domain> to point to webdir.online.lync.com.
The third checkbox, Intune and Mobile Device Management for Microsoft 365, configures applicable DNS settings for device registration. It is recommended to leave this enabled:
Microsoft will add the following CNAME entries to support mobile device registration and management: enterpriseenrollment.<domain> to enterpriseenrollment.manage.microsoft.com and enterpriseregistration.<domain>to enterpriseregistration.windows.net.
The fourth option, DKIM, is not selected by default. If selected, Microsoft will add the following CNAME entries to support DKIM: selector1._domainkey to selector1-<domain>._domainkey.<tenant.onmicrosoft.com> and selector2._domainkeyto selector2-<domain>._domainkey.<tenant.onmicrosoft.com>.
Click Add DNS records.
If prompted, select Connect to authorize Microsoft to update your registrar’s DNS records. Click Done to exit the wizard.
You can continue adding as many domains as you need (up to the tenant maximum of 5,000 domains).
If you selected the DKIM option, you’ll be presented with a notification that you’ll need to go confirm the settings on the DKIM configuration page of the Microsoft 365 Defender portal (https://security.microsoft.com/dkimv2) once the DNS and service-side configuration changes have been completed.
If you attempt to enable the DKIM toggle before the configuration has been completed, you’ll receive a dialog box instructing you to make the necessary changes (see Figure 1.31).
Figure 1.31: DKIM configuration error message
If you receive this message, verify that the DNS records have been added to your DNS host.
If you’ve opted to add DNS records manually, you may need to go back to the Microsoft 365 admin center and view the settings. To do this, you can navigate to the Domains page in the Microsoft 365 admin center, select your domain, and then select Manage DNS:
Figure 1.32: Managing DNS settings for a domain
On the Connect domain page, click More options to expand the options, and then select Add your own DNS records. From here, you can view the specific DNS settings necessary for each service. You can also download a file that can be uploaded to your own DNS server.
Figure 1.33: Viewing DNS settings
The CSV output is formatted as columns, while the zone file output is formatted for use with standard DNS services and can be imported into BIND or Microsoft DNS servers.
Configuring a Default Domain
After adding a domain, Microsoft 365 automatically sets the first custom domain as the default domain, which will be selected when creating new users. However, if you have additional domains, you may choose to select a different domain to be used as the default domain when creating objects.
To manage which domain will be set as your primary domain, select the domain from the Domains page and then click Set as default to make the change:
Figure 1.34: Setting the default domain
The default domain will be selected by default when creating cloud-based users and groups. You cannot set a federated domain (for example, one that is used with Active Directory Federation Service) as the default domain.
Custom domains and synchronization
When creating new cloud-based objects, you can select from any of the domains available in your tenant. However, when synchronizing users from an on-premises directory, objects will be configured with the domain that matches the on-premises object. If the corresponding domain hasn’t been verified in the tenant, synchronized objects will be configured to use the tenant-managed domain.
Next, you will explore the core branding settings of a tenant.


 Free Chapter