Sign In Start Free Trial
Account

Add to playlist

Create a Playlist

Modal Close icon
You need to login to use this feature.
  • Godot Engine Game Development Projects
  • Toc
  • feedback
Godot Engine Game Development Projects

Godot Engine Game Development Projects

By : Chris Bradfield
3.9 (18)
close
Godot Engine Game Development Projects

Godot Engine Game Development Projects

3.9 (18)
By: Chris Bradfield

Overview of this book

Godot Engine Game Development Projects is an introduction to the Godot game engine and its new 3.0 version. Godot 3.0 brings a large number of new features and capabilities that make it a strong alternative to expensive commercial game engines. For beginners, Godot offers a friendly way to learn game development techniques, while for experienced developers it is a powerful, customizable tool that can bring your visions to life. This book consists of five projects that will help developers achieve a sound understanding of the engine when it comes to building games. Game development is complex and involves a wide spectrum of knowledge and skills. This book can help you build on your foundation level skills by showing you how to create a number of small-scale game projects. Along the way, you will learn how Godot works and discover important game development techniques that you can apply to your projects. Using a straightforward, step-by-step approach and practical examples, the book will take you from the absolute basics through to sophisticated game physics, animations, and other techniques. Upon completing the final project, you will have a strong foundation for future success with Godot 3.0.
Table of Contents (9 chapters)
close

Overview of the Godot UI

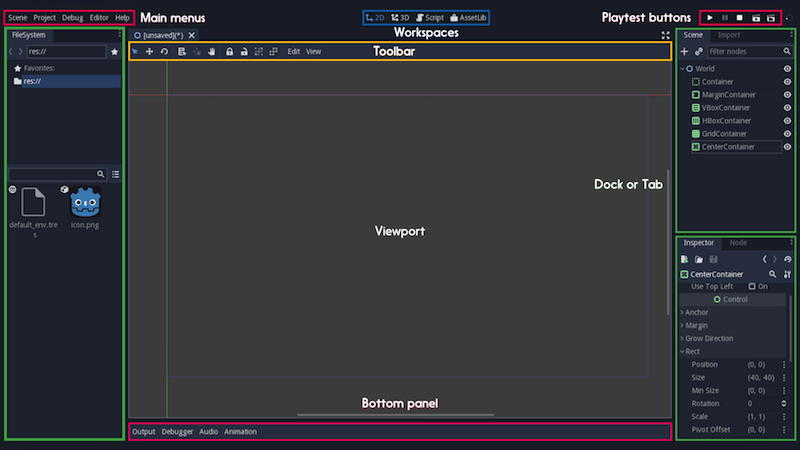
Like most game engines, Godot has a unified development environment. This means that you use the same interface to work on all of the aspects of your game—code, visuals, audio, and so on. This section is an introduction to the interface and its parts. Take note of the terminology used here; it will be used throughout this book when referring to actions you'll take in the editor window.

Project Manager

The Project Manager is the first window you'll see when you open Godot:

In this window, you can see a list of your existing Godot projects. You can choose an existing project and click Run to play the game or click Edit to work on it in the Godot Editor (refer to the following screenshot). You can also create a new project by clicking New Project:

Here, you can give the project a name and create a folder to store it in. Always try to choose a name that describes the project. Also keep in mind that different operating systems handle capitalization and spaces in filenames differently. It's a good idea to stick to lowercase and use underscores, _, instead of spaces for maximum compatibility.

Note the warning message—in Godot, each project is stored as a separate folder on the computer. All the files that the project uses are in this folder. Nothing outside of this project folder will be accessible in the game, so you need to put any images, sounds, models, or other data into the project folder. This makes it convenient to share Godot projects; you only need to zip the project folder and you can be confident that another Godot user will be able to open it and not be missing any necessary data.

Choosing filenames

When you're naming your new project, there are a few simple rules you should try and follow that may save you some trouble in the future. Give your project a name that describes what it is—Wizard Battle Arena is a much better project name than Game #2. In the future, you'll never be able to remember which game #2 was, so be as descriptive as possible.

You should also think about how you name your project folder and the files in it. Some operating systems are case-sensitive and distinguish between My_Game and my_game, while others do not. This can lead to problems if you move your project from one computer to another. For this reason, many programmers develop a standardized naming scheme for their projects, for example: No spaces in filenames, use "_" between words. Regardless of what naming scheme you adopt, the most important thing is to be consistent.

Once you've created the project folder, the Create & Edit button will open the new project in the Editor window.

Try it now: create a project called test_project.

If you're using a version of the Windows operating system, you'll also see a console window open when you run Godot. In this window, you can see warnings and errors produced by the engine and/or your project. This window doesn't appear under macOS or Linux, but you can see the console output if you launch the application from the command line using a Terminal program.

Editor window

The following is a screenshot of the main Godot editor window. This is where you will spend most of your time when building projects in Godot. The editor interface is divided into several sections, each offering different functionality. The specific terminology for each section is described as follows:

Godot Editor Window

The main portion of the editor window is the Viewport. This is where you'll see parts of your game as you're working on them.

In the upper-left corner is the Main menus, where you can save and load files, edit project settings, and get help.

In the center at the top is a list of the Workspaces you can switch between when working on different parts of your game. You can switch between 2D and 3D mode, as well Script mode, where you can edit your game's code. The AssetLib is a place where you can download add-ons and example projects. See Chapter 7, Additional Topics, for more information on using the AssetLib. Refer to the following screenshot:

The following screenshot shows the Workspaces buttons on the toolbar. The icons in the toolbar will change based on what kind of object you are editing. So will the items in the Bottom panel, which will open various smaller windows for accessing specific information such as debugging, audio settings, and more:

The buttons in the upper-right Playtest area are for launching the game and interacting with it when it's running:

Finally, on the left and right sides are the Docks you can use to view and select game items and set their properties. The left-hand dock contains the FileSystem tab:

All of the files inside the project folder are shown here, and you can click on folders to open them and see what they contain. All resources in your project will be located relative to res://, which is the project's root folder. For example, a file path might look like this: res://player/Player.tscn.

In the right-hand dock, you can see several tabs. The Scene tab shows the current scene you are working on in the Viewport. In the Inspector tab below it, you can see and adjust the properties of any object you select. Refer to the following screenshot:

Selecting the Import tab and clicking on a file in the FileSystem tab lets you adjust how Godot imports resources like textures, meshes, and sounds, as shown in the following screenshot:

As you work through the game projects in this book, you'll learn about the functionality of these items and become familiar with navigating the editor interface. However, there are a few other concepts you need to know about before getting started.

bookmark search playlist download font-size

Change the font size

margin-width

Change margin width

day-mode

Change background colour

Close icon Search
Country selected

Close icon Your notes and bookmarks

Delete Bookmark

Modal Close icon
Are you sure you want to delete it?
Cancel
Yes, Delete