Sign In Start Free Trial
Account

Add to playlist

Create a Playlist

Modal Close icon
You need to login to use this feature.
  • Book Overview & Buying Unity 2018 By Example
  • Table Of Contents Toc
  • Feedback & Rating feedback
Unity 2018 By Example

Unity 2018 By Example

3 (2)
close
close
Unity 2018 By Example

Unity 2018 By Example

3 (2)

Overview of this book

Unity is the most exciting and popular engine used for developing games. With its 2018 release, Unity has become the primary source of both game development and virtual reality content. In Unity 2018 By Example, you’ll learn how to use Unity in order to make amazing games from popular genres - from action shooters to mind-bending puzzle games to adventure and Virtual Reality (VR) games. Even if you have no previous experience of using Unity, this book will help you understand the toolsets it provides in depth. In addition to this, you'll understand how to create time-critical collection games, twin-stick space shooters, platformers, and action-fest games with intelligent enemies. Finally, you'll get to grips with creating VR games with the new toolsets introduced by Unity to help you develop amazing VR experiences. To make things easier, you will be provided with step-by-step tutorials for making five great games in Unity 2018, along with a detailed explanation of all the fundamental concepts. By the end of this book, you’ll have established a strong foundation in making games with Unity 2018.
Table of Contents (14 chapters)
close
close
13
Index

Terrain construction


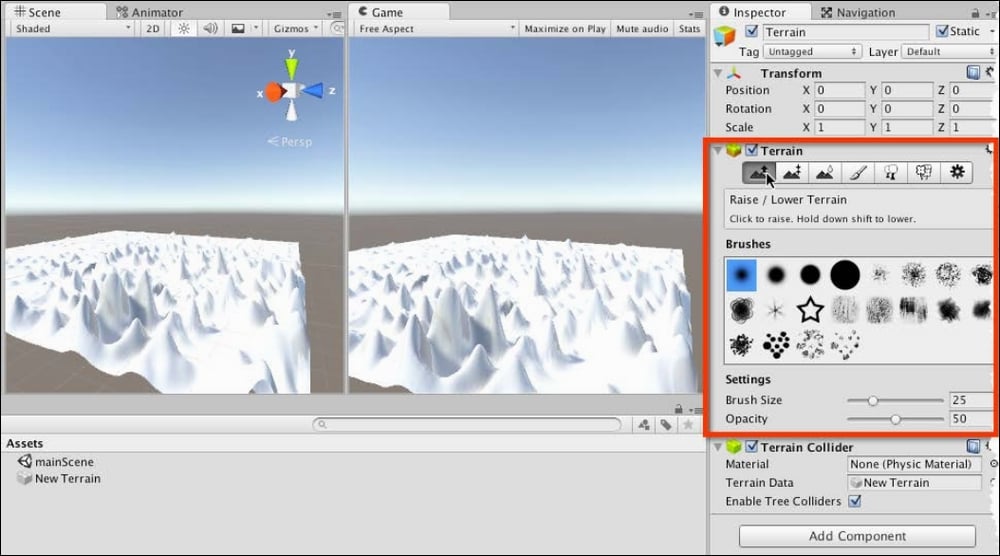
Now let's start sculpting the terrain. With the terrain object selected, click the leftmost palette icon from the Object Inspector (the Raise/Lower terrain tool), available from the Terrain component. This lets you select brush shapes to paint terrain details. Select a soft, round brush and use a large brush size (using the Brush Size slider), along with the Opacity setting to set brush strength. Click and drag over the terrain to paint landscape details. Create some hills and mountains for the landscape. See Figure 7.7. Remember, you can hold down the Shift key while clicking to reverse (or lower) the terrain painting, if needed:

Figure 7.7: Viewing and editing the terrain settings

If the terrain appears too rough to be natural, you can easily smooth out details by switching to the Smooth Height tool. To do this, click on the third button in the Terrain component. See Figure 7.8. When you select this tool, you can choose the Brush Shape, Brush Size, and Opacity as before...

Unlock full access

Continue reading for free

A Packt free trial gives you instant online access to our library of over 7000 practical eBooks and videos, constantly updated with the latest in tech

Create a Note

Modal Close icon
You need to login to use this feature.
notes
bookmark search playlist font-size

Change the font size

margin-width

Change margin width

day-mode

Change background colour

Close icon Search
Country selected

Close icon Your notes and bookmarks

Delete Bookmark

Modal Close icon
Are you sure you want to delete it?
Cancel
Yes, Delete

Delete Note

Modal Close icon
Are you sure you want to delete it?
Cancel
Yes, Delete

Edit Note

Modal Close icon
Write a note (max 255 characters)
Cancel
Update Note

Confirmation

Modal Close icon
claim successful

Buy this book with your credits?

Modal Close icon
Are you sure you want to buy this book with one of your credits?
Close
YES, BUY