-
Book Overview & Buying
-
Table Of Contents

-
Feedback & Rating

Beginning C++ Game Programming
By :
Beginning C++ Game Programming
By:
Overview of this book
Always dreamed of creating your own games? With the third edition of Beginning C++ Game Programming, you can turn that dream into reality! This beginner-friendly guide is updated and improved to include the latest features of VS 2022, SFML, and modern C++20 programming techniques. You'll get a fun introduction to game programming by building four fully playable games of increasing complexity. You'll build clones of popular games such as Timberman, Pong, a Zombie survival shooter, and an endless runner.
The book starts by covering the basics of programming. You'll study key C++ topics, such as object-oriented programming (OOP) and C++ pointers and get acquainted with the Standard Template Library (STL). The book helps you learn about collision detection techniques and game physics by building a Pong game. As you build games, you'll also learn exciting game programming concepts such as vertex arrays, directional sound (spatialization), OpenGL programmable shaders, spawning objects, and much more. You’ll dive deep into game mechanics and implement input handling, levelling up a character, and simple enemy AI. Finally, you'll explore game design patterns to enhance your C++ game programming skills.
By the end of the book, you'll have gained the knowledge you need to build your own games with exciting features from scratch.
Table of Contents (24 chapters)
Preface

 Free Chapter
Welcome to Beginning C++ Game Programming Third Edition!
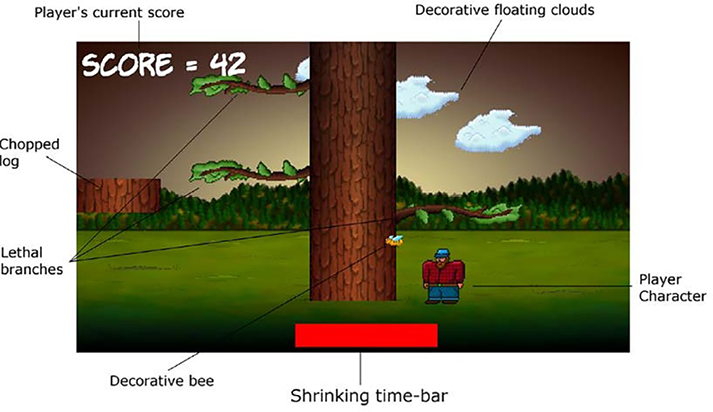
Variables, Operators, and Decisions: Animating Sprites
C++ Strings, SFML Time: Player Input and HUD
Loops, Arrays, Switch, Enumerations, and Functions: Implementing Game Mechanics
Collisions, Sound, and End Conditions: Making the Game Playable
Object-Oriented Programming – Starting the Pong Game
AABB Collision Detection and Physics – Finishing the Pong Game
SFML Views – Starting the Zombie Shooter Game
C++ References, Sprite Sheets, and Vertex Arrays
Pointers, the Standard Template Library, and Texture Management
Coding the TextureHolder Class and Building a Horde of Zombies
Collision Detection, Pickups, and Bullets
Layering Views and Implementing the HUD
Sound Effects, File I/O, and Finishing the Game
Run!
Sound, Game Logic, Inter-Object Communication, and the Player
Graphics, Cameras, Action
Coding the Platforms, Player Animations, and Controls
Building the Menu and Making It Rain
Fireballs and Spatialization
Parallax Backgrounds and Shaders
Other Books You May Enjoy
Index
Customer Reviews