Sign In Start Free Trial
Account

Add to playlist

Create a Playlist

Modal Close icon
You need to login to use this feature.
  • Hands-On Android UI Development
  • Toc
  • feedback
Hands-On Android UI Development

Hands-On Android UI Development

By : Jason Morris
3.8 (4)
close
Hands-On Android UI Development

Hands-On Android UI Development

3.8 (4)
By: Jason Morris

Overview of this book

A great user interface (UI) can spell the difference between success and failure for any new application. This book will show you not just how to code great UIs, but how to design them as well. It will take novice Android developers on a journey, showing them how to leverage the Android platform to produce stunning Android applications. Begin with the basics of creating Android applications and then move on to topics such as screen and layout design. Next, learn about techniques that will help improve performance for your application. Also, explore how to create reactive applications that are fast, animated, and guide the user toward their goals with minimal distraction. Understand Android architecture components and learn how to build your application to automatically respond to changes made by the user. Great platforms are not always enough, so this book also focuses on creating custom components, layout managers, and 2D graphics. Also, explore many tips and best practices to ease your UI development process. By the end, you'll be able to design and build not only amazing UIs, but also systems that provide the best possible user experience.
Table of Contents (15 chapters)
close
13
Activity Lifecycle

Creating SimpleLayout

Now that we've gone over the basics of an Android application structure, let's create a simple screen and see how things all fit together. We'll use Android Studio and one of its wonderful template activities. Just follow these easy steps:

  1. Start by opening Android Studio on your computer.
  2. Start a new project using the File menu, or the quickstart dialog (depending on which one shows up for you).
  3. Name the project as SimpleLayout, and leave any additional support (C++, Kotlin) off:
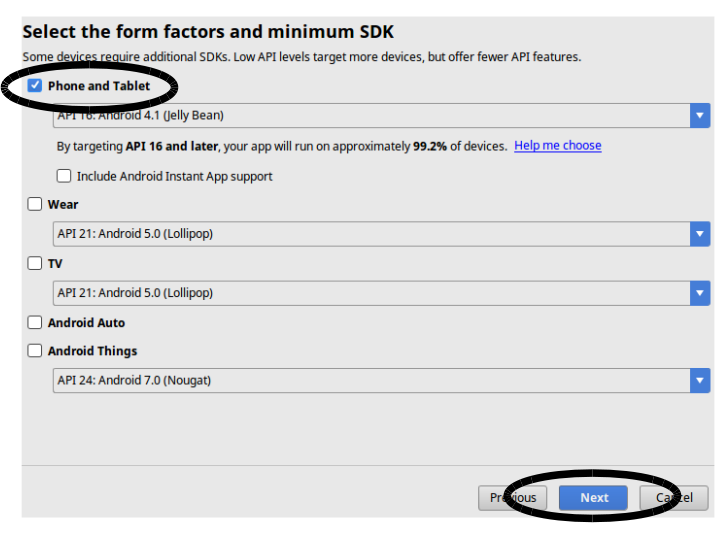
  1. On the next screen of the New Project wizard, ensure that you support Android 4.1 or higher, but leave only Phone and Tablet checked for this task:
  1. Android Studio comes with a fantastic selection of Activity templates available on the next screen. This will be the first Activity generated to get you started with your project. For this example, you'll want to scroll down the list and find Navigation Drawer Activity. Select it and click on Next:

Leave the Activity details as their defaults (MainActivity, and so on) and click on Finish to complete the New Project wizard. Android Studio now creates your project and runs a first build-sync over to get everything working.

  1. Once your project has finished being generated, you'll be presented with the Android Studio layout editor, looking something like this:

Congratulations, this template provides an excellent starting point to explore how Android applications and their user interfaces are built and fit together.

If you ever want to get back to the Activity templates screen, you can use the Gallery... option in the Android Studio File | New | Activity menu:
bookmark search playlist download font-size

Change the font size

margin-width

Change margin width

day-mode

Change background colour

Close icon Search
Country selected

Close icon Your notes and bookmarks

Delete Bookmark

Modal Close icon
Are you sure you want to delete it?
Cancel
Yes, Delete