The post-installation configuration steps are optional, depending on your needs and environment. If you set up Jira for evaluation purposes, you probably do not need to perform any of the following steps, but it is always good practice to be familiar with these as a reference.
You will need to restart Jira after making the changes that will be discussed in the next section.
Increasing Jira’s memory
The default memory setting for Jira is usually sufficient for a small to medium-sized deployment. As Jira’s adoption rate increases, you will find that the amount of memory allocated by default is no longer enough. If Jira is running as a Windows service, as we described in this chapter, you can increase the memory as follows:
- Find the service name for Jira. You can do this by going to the Windows Services console and double-clicking on the Atlassian Jira service. The service name will be shown in the General tab; for example,
JIRA150215215627.
- Open a new Command Prompt and change the current working directory to the
JIRA_INSTALL\bin directory.
- Run the following command by substituting the actual service name for Jira:
tomcat8w //ES//<JIRA Windows service name>
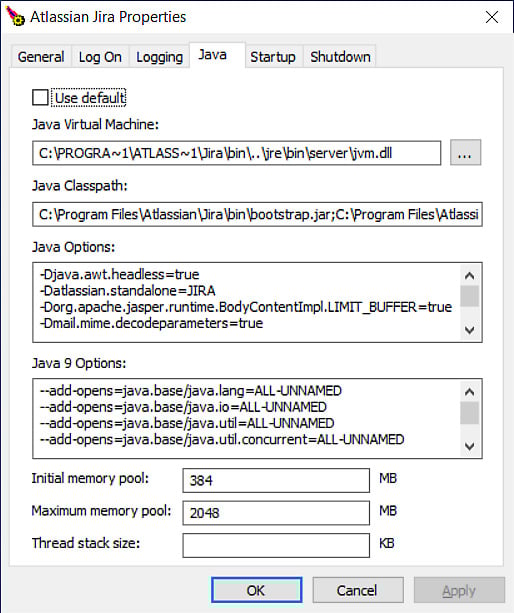
- Select the Java tab, update the Initial memory pool and Maximum memory pool sizes, and click on OK:
Figure 1.20 – Jira memory settings
- Restart Jira to apply the change.
If you are not running Jira as a Windows service, you need to open the setenv.bat file (for Windows) or the setenv.sh file (for Linux) in the JIRA_INSTALL\bin directory. Then, locate the following lines:
set JVM_MINIMUM_MEMORY="384m"
set JVM_MAXIMUM_MEMORY="768m"
Change the value for the two parameters and restart Jira. Normally, 4 GB (4,096 MB) of memory is enough to support a fairly large instance of Jira used by hundreds of users.
The initial memory pool or JVM_MINIMUM_MEMORY parameter determines the amount of memory Jira will start with. Usually, the smaller the amount, the faster Jira will start up. The maximum memory pool or JVM_MAXIMUM_MEMORY parameter determines the maximum amount of memory Jira can use. If the two values are not the same, Jira will start up with the minimum amount of memory and grow to the maximum as more and more users start to use Jira.
Important note
Make sure that you have sufficient physical RAM available before allocating instances to Jira.
Changing Jira’s port number and context path
As part of the installation process, the installation wizard prompted us to decide which port Jira should listen to for incoming connections. If you accepted the default value, then this will be port 8080. If you change your mind and want to change this setting later, you can do so by locating and opening the server.xml file in a text editor in the JIRA_INSTALL/conf directory. Let’s examine the relevant contents of this file:
<Server port="8005" shutdown="SHUTDOWN">
This preceding line specifies the port for the command to shut down Jira. By default, it is port 8005. If you already have an application that is running on that port (for example, another instance of Jira), you need to change this to a different port. The following line specifies which port Jira will be running on:
<Connector port="8080" protocol="HTTP/1.1">
By default, Jira will be running on port 8080. If you already have an application that is running on that port, or if the port is unavailable for some reason, you need to change it to another available port. The following line allows you to specify the context that Jira will be running under:
<Context path="/jira" docBase="${catalina.home}/atlassian-jira" reloadable="false" useHttpOnly="true">
By default, the value is empty, which means Jira will be accessible from http://hostname:portnumber. If you decide to specify a context, the URL will be http://hostname:portnumber/context. In our example, Jira will be accessible from http://localhost:8080/jira.
Configuring HTTPS
By default, Jira runs with a standard, non-encrypted HTTP protocol. This is acceptable if you are running Jira in a secured environment, such as an internal network. However, if you plan to open up access to Jira over the internet, you will need to tighten up security by encrypting sensitive data, such as usernames and passwords that are being sent, by enabling HTTPS (HTTP over SSL).
For a standalone installation, you will need to do the following, in order:
- Obtain and install a certificate
- Enable HTTPS on your application server (Tomcat)
- Redirect traffic to HTTPS
First, you need to get a digital certificate. This can be obtained from a certification authority, such as VeriSign (CA certificate), or a self-signed certificate that’s been generated by you. A CA certificate will not only encrypt data for you but also identify your copy of Jira to the users. A self-signed certificate is useful when you do not have a valid CA certificate and you are only interested in setting up HTTPS for encryption. Since a self-signed certificate is not signed by a certification authority, it is unable to identify your site to the public and users will be prompted with a warning that the site is untrusted when they first visit it. However, for evaluation purposes, a self-signed certificate will suffice until you can get a proper CA certificate.
For this exercise, we will create a self-signed certificate to illustrate the complete process. If you have a CA certificate, you can skip the following steps:
- Java comes with a handy tool for certificate management, called
keytool, which can be found in the JIRA_INSTALL\jre\bin directory if you are using the installer package. If you are using your own Java installation, then you can find it in JAVA_INSTALL\bin.
- To generate a self-signed certificate, run the following commands from Command Prompt:
keytool -genkey -alias tomcat -keyalg RSA
keytool -export -alias tomcat -file file.cer
- This will create a KeyStore (if one does not already exist) and export the self-signed certificate (
file.cer). When you run the first command, you will be asked to set the password for the KeyStore and Tomcat. You need to use the same password for both. The default password is changeit. You can specify a different password of your choice, but then you have to let Jira/Tomcat know, as we will see later.
Now that you have your certificate ready, you need to import it into your trust store for Tomcat to use. Again, you will use the keytool application in Java:
keytool -import -alias tomcat -file file.cer
JIRA_INSTALL\jre\lib\security\cacerts
This will import the certificate into your trust store, which can be used by JIRA/Tomcat to set up HTTPS.
To enable HTTPS on Tomcat, open the server.xml file in a text editor from the JIRA_INSTALL/conf directory. Locate the following configuration snippet:
<Connector port="8443" maxHttpHeaderSize="8192" SSLEnabled="true"
maxThreads="150" minSpareThreads="25" maxSpareThreads="75"
enableLookups="false" disableUploadTimeout="true"
acceptCount="100" scheme="https" secure="true"
clientAuth="false" sslProtocol="TLS"     useBodyEncodingForURI="true"/>
This enables HTTPS for Jira on port 8443. If you have selected a different password for your KeyStore, you will have to add the following line to the end of the preceding snippet before the closing tag:
keystorePass="<password value>"
The last step is to set up Jira so that it automatically redirects from a non-HTTP request to an HTTPS request. Find and open the web.xml file in the JIRA_INSTALL/atlassian-jira/WEB-INF directory. Then, add the following snippet to the end of the file before the closing </web-app> tag:
<security-constraint> <web-resource-collection> <web-resource-name>all-except-attachments</web-resource-name> <url-pattern>*.js</url-pattern> <url-pattern>*.jsp</url-pattern>
    <url-pattern>*.jspa</url-pattern>
    <url-pattern>*.css</url-pattern>
    <url-pattern>/browse/*</url-pattern>
  </web-resource-collection>
  <user-data-constraint>
    <transport-guarantee>CONFIDENTIAL</transport-guarantee>
  </user-data-constraint>
</security-constraint>
Now, when you access Jira with a normal HTTP URL, such as http://localhost:8080/jira, you will be automatically redirected to its HTTPS equivalent – that is, https://localhost:8443/jira.


 Free Chapter