In the previous recipe, we pushed the custom R container image to an Amazon ECR repository. In this recipe, we will perform the training and deployment steps in Amazon SageMaker using this custom container image. In the first chapter, we used the image URI of the container image of the built-in Linear Learner algorithm. In this chapter, we will use the image URI of the custom container image instead:
Figure 2.107 – The train and serve scripts inside the custom container make use of the hyperparameters, input data, and config specified using the SageMaker Python SDK
The preceding diagram shows how SageMaker passes data, files, and configuration to and from each custom container when we use the fit() and predict() functions in our R code, which we do with the reticulate package and the SageMaker Python SDK.
We will also look at how to use local mode in this recipe. This capability of SageMaker allows us to test and emulate the CPU and GPU training jobs inside our local environment. Using local mode is useful while we are developing, enhancing, and testing our custom algorithm container images and scripts. We can easily switch to using ML instances that support the training and deployment steps once we are ready to roll out the stable version of our container image.
Once we have completed this recipe, we will be able to run training jobs and deploy inference endpoints using R with custom train and serve scripts inside custom containers.
Getting ready
Here are the prerequisites for this recipe:
- This recipe continues from the Pushing the custom R algorithm container image to an Amazon ECR repository recipe.
- We will use the SageMaker Notebook instance from the Launching an Amazon SageMaker Notebook instance and preparing the prerequisites recipe of Chapter 1, Getting Started with Machine Learning Using Amazon SageMaker.
How to do it...
The first couple of steps in this recipe focus on preparing the Jupyter Notebook using the R kernel. Let's get started:
- Inside your SageMaker Notebook instance, create a new directory called
chapter02 inside the my-experiments directory if it does not exist yet:Figure 2.108 – Preferred directory structure
The preceding screenshot shows how we want to organize our files and notebooks. As we go through each chapter, we will add more directories using the same naming convention to keep things organized.
- Click the
chapter02 directory to navigate to /my-experiments/chapter02.
- Create a new notebook by clicking New and then clicking R:
Figure 2.109 – Creating a new notebook using the R kernel
The preceding screenshot shows how to create a new Jupyter Notebook using the R kernel.
Now that we have a fresh Jupyter Notebook using the R kernel, we will proceed with preparing the prerequisites for the training and deployment steps.
- Prepare the
cmd function, which will help us run the Bash commands in the subsequent steps:cmd <- function(bash_command) {
output <- system(bash_command, intern=TRUE)
last_line = ""
for (line in output) {
cat(line)
cat("\n")
last_line = line
}
return(last_line)
}Given that we are using the R kernel, we will not be able to use the ! prefix to run Bash commands. Instead, we have created a cmd() function that helps us perform a similar operation. This cmd() function makes use of the system() function to invoke system commands.
- Next, let's use the
cmd function to run the pip install command to install and upgrade sagemaker[local]:cmd("pip install 'sagemaker[local]' --upgrade")This will allow us to use local mode. We can use local mode when working with framework images such as TensorFlow, PyTorch, and MXNet and custom container images we build ourselves.
Important note
At the time of writing, we can't use local mode in SageMaker Studio. We also can't use local mode with built-in algorithms.
- Specify the values for
s3.bucket and s3.prefix. Make sure that you set the s3.bucket value to the name of the S3 bucket we created in the Preparing the Amazon S3 bucket and the training dataset for the linear regression experiment recipe of Chapter 1, Getting Started with Machine Learning Using Amazon SageMaker:s3.bucket <- "<insert S3 bucket name here>"
s3.prefix <- "chapter01"
Remember that our training_data.csv file should already exist inside the S3 bucket and that it should have the following path:
s3://<S3 BUCKET NAME>/<PREFIX>/input/training_data.csv
- Now, let's specify the input and output locations in
training.s3_input_location and training.s3_output_location, respectively:training.s3_input_location <- paste0('s3://', s3.bucket, '/', s3.prefix, '/input/training_data.csv')
training.s3_output_location <- paste0('s3://', s3.bucket, '/', s3.prefix, '/output/custom/')
- Load the
reticulate package using the library() function. The reticulate package allows us to use the SageMaker Python SDK and other libraries in Python inside R. This gives us a more powerful arsenal of libraries in R. We can use these with other R packages such as ggplot2, dplyr, and caret:library('reticulate')
sagemaker <- import('sagemaker')Tip
For more information on the reticulate package, feel free to check out the How it works… section at the end of this recipe.
- Check the SageMaker Python SDK version:
sagemaker[['__version__']]
We should get a value equal to or greater than 2.31.0.
- Set the value of the container image. Use the value from the Pushing the custom R algorithm container image to an Amazon ECR repository recipe. The
container variable should be set to a value similar to <ACCOUNT_ID>.dkr.ecr.us-east-1.amazonaws.com/chap02_r:1. Make sure that you replace <ACCOUNT_ID> with your AWS account ID:container <- "<insert container image URI here>"
Tip
To get the value of <ACCOUNT_ID>, run ACCOUNT_ID=$(aws sts get-caller-identity | jq -r ".Account") and then echo $ACCOUNT_ID inside a Terminal. Remember that we performed this step in the Pushing the custom R algorithm container image to an Amazon ECR repository recipe, so you should get the same value for ACCOUNT_ID.
- Import a few prerequisites, such as the role and the session. For
session, we will use the LocalSession class, which will allow us to use local mode in the training and deployment steps:role <- sagemaker$get_execution_role()
LocalSession <- sagemaker$local$LocalSession
session <- LocalSession()
session$config <- list(local=list(local_code=TRUE))
- Prepare the train input so that it points to the Amazon S3 path with
content_type="text/csv":TrainingInput <- sagemaker$inputs$TrainingInput
sagemaker.train_input <- TrainingInput(training.s3_input_location, content_type="text/csv")
Now that we have the prerequisites ready, we will proceed with initializing Estimator and using the fit() and predict() functions.
- Initialize
Estimator with the relevant arguments, as shown in the following code block. Take note that the container variable contains the Amazon ECR image URI of the custom R container image:Estimator <- sagemaker$estimator$Estimator
estimator <- Estimator(
container,
role,
instance_count=1L,
instance_type="local",
output_path=training.s3_output_location,
sagemaker_session=session)
- Set a few dummy hyperparameters using the
set_hyperparameters() function:estimator$set_hyperparameters(a=1L, b=2L, c=3L)
Behind the scenes, these values will be passed to the hyperparameters.json file inside the /opt/ml/input/config directory, which will be loaded and used by the train script when we run the fit() function later.
- Perform the training step by calling the
fit() function with the train argument set to the sagemaker.train_input variable value from the previous step:estimator$fit(list(train = sagemaker.train_input))
Compared to our experiment in Chapter 1, Getting Started with Machine Learning Using Amazon SageMaker, the fit() function in this recipe will run the training job inside the SageMaker Notebook instance because of local mode. Given that we are not using local mode, we are launching ML instances that support the training jobs. As we discussed in Chapter 1, these ML instances are normally deleted automatically after the training jobs have been completed.
Important note
Even if we are using local mode, the model files generated by the train script are NOT stored inside the SageMaker notebook instance. The model.tar.gz file that contains the model files is still uploaded to the specified output_path in Amazon S3. You can check the value of estimator$model_data to verify this!
- Deploy the model using the
deploy() function. We set instance_type to 'local' and initial_instance_count to 1L. Note that the L makes the number an explicit integer:predictor <- estimator$deploy(
initial_instance_count=1L,
instance_type="local",
endpoint_name="custom-local-r-endpoint"
)
Given that we are using local mode, the deploy() function will run the container and the serve script inside the SageMaker Notebook instance.
Important note
Note that if we change instance_type to a value such as "ml.m5.xlarge" (in addition to not using the LocalSession object), we will be launching a dedicated ML instance outside the SageMaker Notebook instance for the inference endpoint. Of course, the best practice would be to get things working first using local mode. Once we have ironed out the details and fixed the bugs, we can deploy the model to an inference endpoint supported by a dedicated ML instance.
- Finally, test the
predict() function. This triggers the invocations API endpoint you prepared in the previous step and passes "1" as the parameter value:predictor$predict("1")We should get a value similar or close to 881.342840085751 after invoking the invocations endpoint using the predict() function. Expect the predicted value here to be similar to what we have in the Building and testing the custom R algorithm container image recipe.
Now that we have a model and an inference endpoint, we can perform some post-processing, visualization, and evaluation steps using R and packages such as ggplot2, dplyr, and Metrics.
- Delete the endpoint:
predictor$delete_endpoint()
Given that we are using local mode in this recipe, the delete_endpoint() function will stop the running API server in the SageMaker Notebook instance. If local mode is not being used, the SageMaker inference endpoint and the ML compute instance(s) that support it will be deleted.
Now, let's check out how this works!
How it works…
In this recipe, we used the reticulate R package to use the SageMaker Python SDK inside our R code. This will help us train and deploy our machine learning model. Instead of using the built-in algorithms of Amazon SageMaker, we used the custom container image we prepared in the previous recipes.
Note
Feel free to check out the How it works… section of the Using the custom Python algorithm container image for training and inference with Amazon SageMaker Local Mode recipe if you need a quick explanation on how training jobs using custom container images work.
To help us understand this recipe better, here are a few common conversions from Python to R you need to be familiar with when using reticulate:
- Dot (
.) to dollar sign ($): estimator.fit() to estimator$fit()
- Python dictionary to R lists:
{'train': train} to list(train=train)
- Integer values:
1 to 1L
- Built-in constants:
None to NULL, True to TRUE, and False to FALSE
Why spend the effort trying to perform machine learning experiments in R when you can use Python instead? There are a couple of possible reasons for this:
- Research papers and examples written by data scientists using R may use certain packages that do not have proper counterpart libraries in Python.
- Professionals and teams already familiar with the R language and using it for years should be able to get an entire ML experiment to work from end to end, without having to learn another language, especially when under time constraints. This happens a lot in real life, where teams are not easily able to shift from using one language to another due to time constraints and language familiarity.
- Migrating existing code from R to Python may not be practical or possible due to time constraints, as well as differences in the implementation of existing libraries in R and Python.
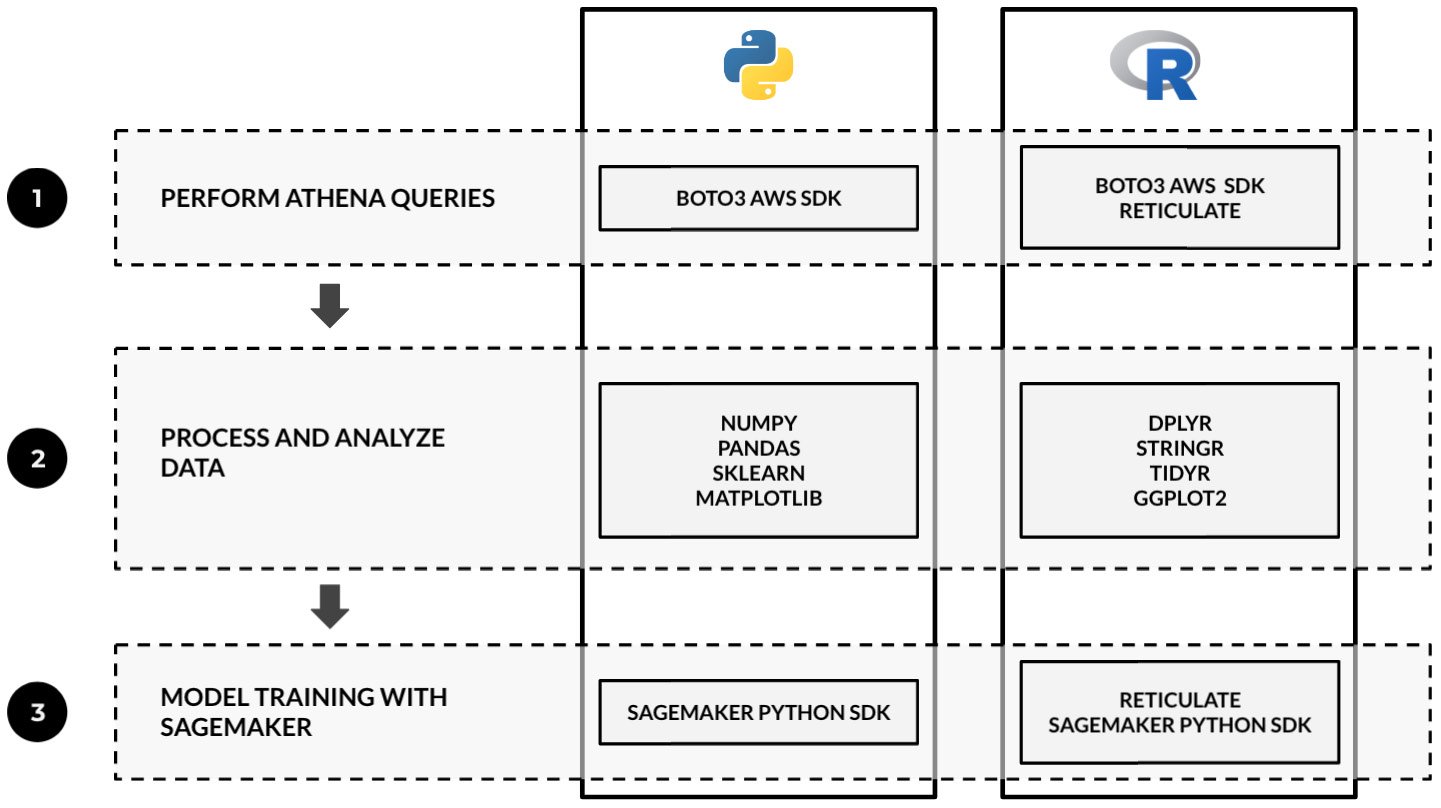
Other data scientists and ML engineers simply prefer to use R over Python. That said, it is important to be ready with solutions that allow us to use R when performing end-to-end machine learning and machine learning engineering tasks. Refer to the following diagram for a quick comparison of the tools and libraries that are used when performing end-to-end experiments in Python and R:
Figure 2.110 – Sample guide for tech stack selection when using Python and R in machine learning experiments
As we can see, we can use the reticulate package to use the Boto3 AWS SDK and the SageMaker Python SDK inside our R code. "Note that the diagram does NOT imply a one-to-one mapping of the presented sample libraries and packages in Python and R." between "As we can see, we can use the reticulate package to use the Boto3 AWS SDK and the SageMaker Python SDK inside our R code." We used Amazon Athena in this example as it is one of the services we can use to help us prepare and query our data before the training phase. With the reticulate package, we can seamlessly use boto3 to execute Athena queries in our R code.
Note
We will take a look at how we can use Amazon Athena with deployed models for data preparation and processing in the Invoking machine learning models with Amazon Athena using SQL queries recipe of Chapter 4, Preparing, Processing, and Analyzing the Data.
When using R, packages such as dplyr, tidyr, and ggplot2 can easily be used with reticulate and the AWS SDKs to solve machine learning requirements from start to finish. That said, machine learning practitioners and teams already using R in their workplace may no longer need to learn another language (for example, Python) and migrate existing code from R to Python.
Using the custom Python algorithm container image for
training and inference with Amazon SageMaker Local Mode
Using the custom Python algorithm container image for
training and inference with Amazon SageMaker Local Mode
Using the custom Python algorithm container image for
training and inference with Amazon SageMaker Local Mode
Using the custom Python algorithm container image for
training and inference with Amazon SageMaker Local Mode
Using the custom Python algorithm container image for
training and inference with Amazon SageMaker Local Mode
Using the custom R algorithm container image for training and inference
with Amazon SageMaker Local Mode
Using the custom R algorithm container image for training and inference
with Amazon SageMaker Local Mode
Using the custom R algorithm container image for training and inference
with Amazon SageMaker Local Mode
Using the custom R algorithm container image for training and inference
with Amazon SageMaker Local Mode
Using the custom R algorithm container image for training and inference
with Amazon SageMaker Local Mode


 Free Chapter