Introducing Genesis – a shapeshifter
If you have installed Studio as described in Appendix, Installing DAZ Studio, you should have several 3D assets ready to use. One of these assets is the Genesis figure. Genesis is a base humanoid figure that can be altered to assume all kinds of shapes. It can be a woman, a man, a giant, a monster, or a baby. It can even be altered to assume shapes that are radically different from the basic human form. For example, you can have a creature with the head of Anubis, the jackal-headed god of ancient Egypt. We'll see more of this in Chapter 4, Creating New Characters with Morphs, but for now let's locate Genesis and add it to our scene.
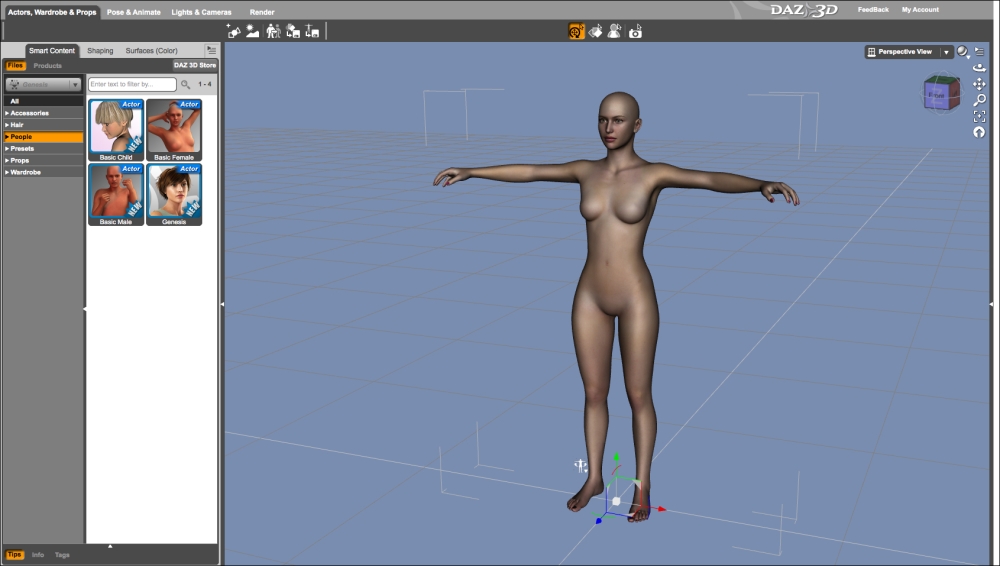
In the Smart Content tab, which should be at the left of your monitor, you can find a series of vertical labels that indicate the groups of 3D assets available in Studio.
Click on the People category, where there are four actors available: Basic Child, Basic Female, Basic Male, and Genesis. If this is a fresh installation, all the icons will have a New label to indicate that the asset has never been used before.
It would seem that the icon labeled Genesis would add a female figure to the scene, complete with hair. That icon actually loads the same androgynous gray figure that we deleted from the scene.
Instead, let's double-click on the Basic Female icon. This action will cause the 3D model of a woman to be added to your scene. The model will appear in the 3D Viewport. Notice that the Basic Female icon doesn't have the New label anymore.
The figure comes in the scene with the typical T pose, a neutral pose that is common to most characters. This pose is our starting point, and it can be modified to assume any pose that we want to apply to the model. The basic female character is fairly similar to the Victoria 4 model, the previous version of female characters made by DAZ. You can notice that it comes with no genitalia and no nipples. This is a feature of the skin—the texture—applied to the figure and something that can be changed easily, if the need for such features arises.
The Smart Content tab of DAZ Studio is context-sensitive to the context in which we are. This means that it changes to display different items depending on what object is selected in the scene. When the scene is empty or when there is nothing selected, the Smart Content tab shows the list of categories available, and it presents items that can be added to the scene. If we click on the Basic Female figure to select it, the Smart Content tab will change to show us what we can do with it; for example, it will show us materials or poses that we can apply to the figure. This feature will become more obvious as we progress with more complex scenes.
Click on the disclosure triangle next to the Wardrobe category. Then, click on the Outerwear subcategory; you will see two items: Jacket and Leggings.
While you make sure that the figure in the Viewport is selected, double-click on the Jacket icon. This operation adds the jacket to the scene and then binds it to the character so that the two will move together.
This is called conforming the clothing to the character. Without conforming the two objects, the figure and the jacket would be simply two independent items in the scene.
Now click on the Pants subcategory in the Smart Content tab. In there you will find two other items: JS Pants and Shorts. Make sure that the female figure is selected and then double-click on the JS Pants icon. That will add and conform the pants to the figure.
Now, click on the Shoes subcategory and add JS Boots to the figure as we did for the other items.
Studio can give you access to hundreds of hairdos that you can customize with colors and styles. The default installation of Studio has a few hair models available. Let's pick one and work with it. In the Smart Content pane, click on the Hair category. You will see four models of hair; let's add the one called Aldora. The procedure is the same as we saw before, but now that the figure is fully clothed, it's not easy to click on a part of the body to select it.
Tip
The fact is you can select the figure by double-clicking on any part of the body, for example, the head. I suggested to use the pelvis because sometimes small movements of the mouse, while double-clicking, can actually move the body part by mistake. I find the center of the body just less sensitive to small mistakes. Call it a good habit.
So, now we can double-click on the head to select the whole figure, and then add the hair by double-clicking on the Aldora icon.
It's now time to take a break and enjoy the fruit of this work. Studio is a 3D environment, so let's start taking advantage of this fact and see how we can take a look at our figure from a different point of view. Look at the top-right of the 3D Viewport, you should see a cube with faces painted in green, red, and blue. That cube controls the position of your camera.
Click-and-drag on that cube to change your camera's point of view. You can now see that we are actually using 3D objects, and that we can place our camera in any place of the scene to take a snapshot in any way we want.
Restore the position of the camera to the default by clicking on the camera reset button.
To change the pose from the uninspiring "T" default, let's apply a predefined pose. This is one of the strengths of Studio, the ability to save and apply poses to our characters. Luckily for us, Studio comes with a set of predefined poses so we can change our scene with a point-and-click approach.
In the Smart Content pane, click on the disclosure triangle next to the Presets category. This will reveal three subcategories: Animations, Materials, and Poses. Click on the Poses subcategory. This last operation will show you a list of icons representing several poses for our character. While making sure that the Basic Female character in the 3D Viewport is selected, double-click on the pose labeled Female Running 01.
If everything went well, you should have the same result that you can see in the following image. As we can see, all the garments are following the pose of the main figure. The sleeves bend, the boots adapt to the position of the feet, and everything works perfectly. This is no small feat, as conforming and fitting clothes to a 3D figure is a very complex operation, as we will see in the chapter dedicated to creating clothing. Studio makes this operation very simple, and this is one of the advantages of using this application.
Fixing nonconforming clothing
If you see something different with your scene, like clothing out of place or not following the main figure, it could be that you didn't conform the garment to the figure when the garment was added to the scene. To fix this there is an easy procedure that can be followed, but it uses a part of the UI that we haven't explored yet.
On the right-hand side of the Studio screen, there is a pane that collapsed when we arranged the tabs to be shown horizontally. You can now reveal that pane by clicking on the disclosure triangle for it. Refer to the following screenshot to see where the disclosure triangle is:
Once you do that, you will see a series of additional tabs: Scene, Parameters, Content Library, and Tool Settings. Let's not worry about those for now and just click on the Parameters tab. Let's assume that Jacket is the item that didn't conform to the figure. So, to correct the problem, follow these easy steps:
- Click on the drop-down list just below the Parameters tab and select Jacket.
- Click on the General category.
- From the right-hand side of the pane, find the Fit to drop-down list and click on it.
- Select Genesis.
That's all there is to it. The jacket should now fit the character perfectly.
Once you are done with the fix, you can click on the disclosure triangle to hide the pane again and have more screen surface available for the 3D Viewport.
With so many actions performed at this point, it would be a pity if something happened to our scene. Better save it so that we don't risk losing data. From the Studio menu click on the File menu and then select Save…. As it usually happens for this operation, you will be asked to select a folder where to save the file and a name for the file. Let's select Chapter_01_01 to indicate that this is the scene for chapter 1 and this is the first version of the file. You can use, of course, any filename of your choice. Just be sure to remember what name you used and in which folder you stored the file because Studio, strangely enough, doesn't provide an Open Recent menu option. Studio will save the scene into a file named with the name that you selected and with the extension .duf, which is the default used by the application. DUF stands for DSON User File and it's the normal format for Studio scenes since Studio 4.5.
As nice as our character is, she is standing in the middle of nothing and that is not right. We need to add an environment. To do so follow these easy steps:
- Click away from the figure in an empty area of the scene to clear your selection.
- With no active selection, the Smart Content pane now shows all the items installed in Studio.
- Click on the Sets category.
- Double-click on the !Preload icon to add that environment to the scene. Refer to the following screenshot to verify your steps:
- The environment is much larger than what we can see with our camera. Use the mouse wheel to zoom out and see more of the scene. You will need to roll the wheel toward the screen to zoom out. Rolling the wheel in the opposite direction zooms in. Chapter 7, Navigating the Studio Environment, explains in detail how to move the camera in the scene.
The environment has been added to the scene with a position that places the floor at a point that is much higher than where our figure stands. We need to move the figure so that it looks like she is touching the floor. For this, follow these steps:
- Select Genesis by right-clicking on the face and then choosing Select Genesis – Dbl Click from the menu.
- You should see the indicator of the Universal tool at the base of the figure. The Universal tool has the ability to move, rotate, and scale any object in the scene. If the Universal Tool is not enabled, use the switch in the toolbar to enable it.
- Move your mouse to the top of the green arrow, which is pointing up. This arrow allows us to move the selected object up or down. When the arrow is highlighted, click-and-drag up to move the figure until the upper half of it is beyond the camera's frame. The following image shows how the Universal tool appears in the Viewport:
- Click on the Frame Object camera tool to reframe Genesis. Refer to the following screenshot to see how to find the Frame Object tool:
- Now hover above the tip of the blue arrow of the Universal Tool. This part of the tool allows you to move the selected object in the depth direction. Click-and-drag until you see Genesis standing above the floor. Use the following image for reference:
- Now use the green axis again to move the figure toward the floor. Keep an eye on the sole of the right boot. When you see that the boot sinks inside the floor, move the figure back up. We want to have our character rest on the floor. There should be just a bit of contact with the floor. For now don't worry too much about it. Just use your best judgment; later on, we will learn how to make precise adjustments.
- Using the camera cube, adjust the camera angle to make the image a bit more dramatic. A low camera angle, with the camera below the subject's waist, looking slightly up, gives a bit more tension to the scene.
- If you want to explore some rules of image composition, you can look in your public library for a good, introductory book about photography. There is also a nice article available online at the Digital Camera World website, http://www.digitalcameraworld.com/2012/04/12/10-rules-of-photo-composition-and-why-they-work/.


 Free Chapter