Deploying Microsoft Dynamics NAV 2016 database on Azure SQL database
Microsoft Dynamics NAV on Azure VM is more like an on-premise installation. Here we can create a SQL Server for hosting the NAV Database.
Following is a list of prerequisites for this deployment process:
- A Microsoft Azure subscription and access to the Azure Management Portal.
- Microsoft Dynamics NAV database is installed on an SQL Server Database Engine instance. SQL Server Manager is also installed on the same computer.
- Access to the Microsoft Dynamics NAV installation media (DVD).
To deploy a Microsoft Dynamics NAV database to an Azure SQL Database, the database must be exported as a data-tier application (DAC) file, which is known as a .bacpac file. This can be done using SQL Server Manager.
Creating a database in Azure
Creating a new database in the Microsoft Azure online portal includes some easy steps, which are explained as follows:
- Click on the database link form on the left side of the page, fill in the information, and select an appropriate size of the SQL database:
- After you have entered the required values and created the database, you will be presented with a page displaying a list of SQL databases. In the following screenshot, you can see that both the databases are created under the same server:
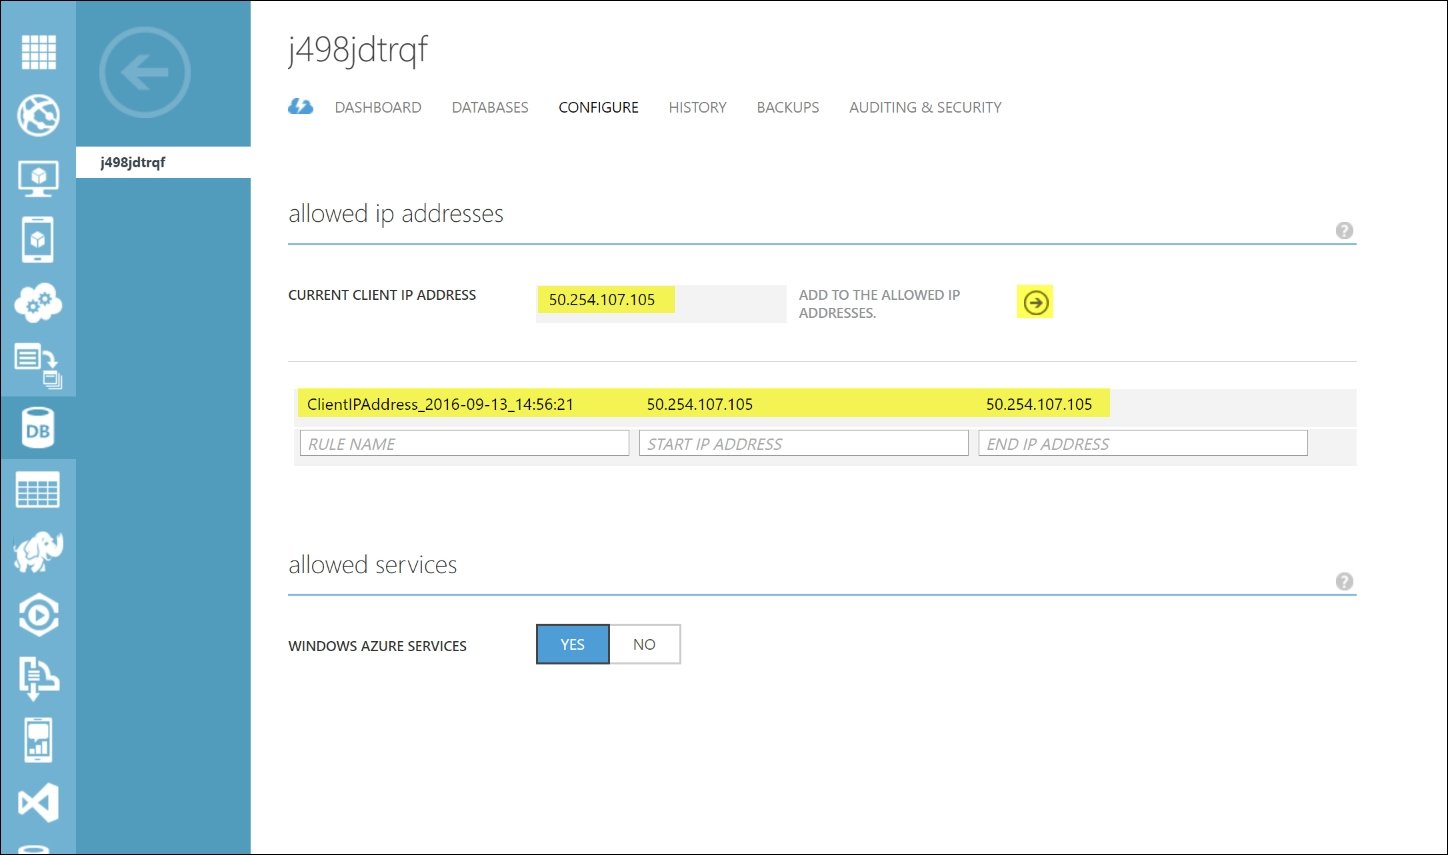
- Click on the server, and then go to the CONFIGURE tab. Click on the ADD TO THE ALLOWED IP ADDRESSES arrow, and save the changes. Now only the IP is published on the Web, and we can access the database from any supporting management studio:
Let's test the connection from our local Microsoft SQL Management Studio. Before we start the connection, let's note down the information that will be needed for the connection. Go to the DASHBOARD tab of the server (similar to the CONFIGURE tab in the last step), and note down the administrator login information; this is the user name. From the dashboard of the database, note down the server name. In this case, the server name is j498jdtrqf.database.windows.net. Now let's use this information for the connection of the database engine. Use the password that we used while creating the database:
After successful connection, you can see the Azure SQL database on your SQL Management Studio Object Explorer. Now we can treat this database as any local database. But if we want to add any database to this server, then we will have to follow the steps which will satisfy certain criteria set by Azure Server.
Now, let's see how to replicate a database to the Azure SQL database:
- Right-click on the database you want to replicate.
- Select the Tasks option.
- Now select Deploy Database to SQL Azure...:
This will deploy a local database to SQL Azure and a connection is established between the local DB and the SQL Azure Database Server:
Now you just need to click the Next button, and you will be presented with the Deployment Settings page, which is an important one, because here you will have to connect to the Azure SQL database with your credentials, as shown in the following screenshot:
It takes a while depending on the size of the database.
After the process is sucessfully completed, we can see the same database in the SQL Azure database, as can be seen in the next screenshot.
Here, we have successfully connected an Azure SQL database using our SQL Server Management Studio, which is a local entity. You can see a database named Demo Database NAV (9-0) inside the database server, j498jdtrqqf.database.windows.net(SQL Server 13.0.81 - rabins):
In case of an error, try to find the error, resolve it, and repeat the same process.
Creating a virtual machine
We will now create a virtual machine which will be used to host the Microsoft Dynamics NAV system. Follow the following steps:
- From the VIRTUAL MACHINE icon, Create a new virtual machine from the FROM GALLERY option.
- There are two options, QUICK CREATE and FROM GALLERY; use FROM GALLERY if you want to create a VM with the inbuilt Microsoft Dynamics NAV:
- Select the appropriate Microsoft Dynamics NAV option from the list.
- Select Microsoft Dynamics NAV 2016 for this example, as shown in the next screenshot:
Generate the credentials for the login, and note down the password and user name, as this will be needed while connecting to this VM:
- In the third step, we can change the port numbers if we want to. Also, we have to define the name of the Cloud Service DNS. Choose the best one that is available, as shown in the following screenshot:
Just follow the steps and finish the process of creation of virtual machine with Microsoft Dynamics NAV installed in it.
- In the following screenshot, I have created two virtual machines: one for testing purpose, which is just a plain VM without Microsoft Dynamics NAV, and one for using the gallery. We will be restricted as per the permission granted per subscription:
- Now let the Azure System provision our virtual machine. These are straight-forward steps and should not be confusing.
- After the virtual machine is running, click on the Connect option on the bottom tab, and it will get downloaded with an RDP, which can be used to log in to the virtual machine just like any remote server:
It is very fast and reliable.
- Use the log-in credentials we used while creating the virtual machine:
And that's it. We have a brand new virtual machine up and running. Explore the properties and Firewall settings to ensure everything is perfect:
- Go to the Apps section, and verify the presence of Microsoft Dynamics NAV, as shown in the following screenshot:
The NAV System should run its local database quite easily, since it is internally configured by the Azure Server while creating a virtual machine.
- Let's connect the SQL Azure database which we created by replicating our local database, as explained in the following screenshot:
- Use the credentials as shown earlier, and we should be good to go with the connection.
Now we can configure the instance setting in the Microsoft Dynamics NAV Administration tool, as shown in this screenshot:
We can easily connect to the Role Tailored Client after the services are restarted.


 Free Chapter