To develop AR applications with Unity, you need to install Unity on your development machine. In this section, we'll step through the installation process using Unity Hub, create a new Unity project, and introduce the basics of using the Unity Editor interface.
Installing Unity Hub
Unity Hub is a desktop application that serves as a portal to many of the resources developers may need to use Unity in their workflows. For now, we'll be using the Installs menu to install a version of the Unity Editor. Then, we'll use the Projects menu to create and manage our Unity projects. To do this, follow these steps:
- Please download and install the Unity Hub program from https://unity3d.com/get-unity/download. Generally, you'll always want to use Unity Hub to install versions of Unity rather than downloading a Unity version installer directly.
- If you haven't already, you may need to activate a Unity User License. This is free for the Student and Community plans; you can decide to upgrade to Plus or Pro at a later time. All license plans include the same versions of Unity; no features are disabled for free plans. The paid plans add access to professional cloud services that are very useful but not necessary for project development.
- Use the Download Unity Hub button, as shown in the following screenshot (you may need to agree to the Terms of Service first):
Figure 1.2 – Installing Unity Hub instead of downloading Unity directly
- With Unity Hub installed and open, you'll see menus for Learn and Community.
Clicking Learn takes you to Unity Learn projects and tutorials (including downloads for the various project assets). These can range from 5-minute tutorials to projects that take 15 hours to complete!
The Community menu provides links to many other Unity-hosted resources, including Unity Now conference talks, Unity Blog, Answers, Q&As, and Forums.
Now, let's install a version of the Unity Editor.
Installing a Unity Editor
When starting a new project, I like to use the latest Official Release, which has a leading edge without being a Beta or Alpha prerelease. If you are more cautious or have requirements to use the most stable release, choose the long-term support (LTS) version. These can be found under the Recommended Release heading in Unity Hub. Unity versions that are compatible with the writeups in this book are noted in the current .README file of this book's GitHub repository. Install a copy of the Unity Editor now, as follows:
- Select the Installs tab, then press ADD to open the Add Unity Version box.
- From here, you can select a version of Unity to install.
Note – Unity Versions
In the current Unity version numbering system, the major release number (for example, Unity 2020.x.x) loosely correlates with calendar years. The most stable versions are ones designated LTS, for Long-Term Support; for example, Unity 2020.3.14f1 (LTS). LTS versions receive periodic maintenance and security updates but no new features. Point releases lower than LTS (for example, Unity 2021.1.15f1) are considered technical releases, which are reasonably stable while new features and bug fixes are currently in development. For the more adventurous, Beta and Alpha prereleases include cutting-edge features but with added risks.
- Once you've selected the version of Unity you wish to install, click Next to see the Add modules to your install options. Here, you want to know what platforms and devices you expect to target with your projects.
Module software can be quite large and may take time to install, so only pick what you know you will need soon. You can always come back later and add (or remove) modules as needed. Specifically, if you are developing your AR project for Android and ARCore, choose Android Build Support. If you are targeting iOS and ARKit, choose iOS Build Support. Likewise, if you are targeting other devices such as HoloLens or Magic Leap, choose the corresponding modules.
- Depending on the modules you selected, you may need to press Next and accept an additional user license agreement. Then, press Done to download and install the software.
Tip – Where to Install Unity
Using the gear icon in the top-right of the Unity Hub window opens a Preferences window. Under the General preference tab, you can select the folder where your User Editors are installed on your computer. Since these can take up a considerable amount of disk space, you may not want to use the default location.
If you have any problems with Unity Hub or otherwise want to join in with discussions, visit the relevant section of the Unity community discussion forum at https://forum.unity.com/forums/unity-hub.142/.
Now, you're ready to create your first Unity project.
Creating and managing Unity projects
You will use Unity Hub to create new Unity projects. Projects are created in a specific folder on your system, with a set of subfolders populated with default settings and content based on the starting template you choose. Projects are opened with a specific version of Unity and continue to be associated with that specific version. To start a new project, complete the following steps:
- Open the Unity Hub, select the Projects tab, and then click the New button. Notice the down arrow of the New button, which lets you select a Unity version to use for the new project that's different from the one you currently have installed.
- The Create New Project box gives you the option to choose a Project Name, a Location where it should be created, and a starting Template. As shown in the following screenshot, I am selecting the Universal Render Pipeline template, in a folder named
D:\Documens\UnityProjects: Figure 1.3 – Creating a new project with the URP template in Unity Hub
Note – We're Using the Universal Render Pipeline
Unity offers multiple alternative render pipelines. The legacy "built-in" render pipeline sports better support from older third-party assets as it came before the newer Scriptable Render Pipeline (SRP) system (https://unity.com/srp), but the newer SRP-based pipelines are more performant and flexible. These include the High Definition Render Pipeline (HDRP) for high-quality rendering using high-end graphics hardware. There's also the Universal Render Pipeline (URP), which is very fast, even on mobile devices, while providing excellent rendering quality. I recommend starting new AR projects with URP.
Tip – Avoid Spaces in Project Names
At the time of writing, there's a bug in some ARCore features that require that your project pathname contains no spaces, including the project name and all folder names up the tree.
- After pressing Create, it may take a few moments for Unity to create your new project, import the default assets, and perform other setup steps before opening the Unity Editor window.
Tip – Upgrading Unity Projects
A great thing about Unity Hub is its ability to manage multiple versions of Unity and all your Unity projects. I tend to start new projects with the latest official release, though inevitably, new versions of the Unity Editor will be released. In general, it's best to stick with the version of Unity you used to create your project. If you need to upgrade to a newer version, do so cautiously and deliberately.
Generally, going to a new minor update (for example, Unity 2021.2.3 to 2021.2.16) is safe. Going to a point release (for example, Unity 2021.2.x to 2021.3.x) is usually OK but you may encounter unexpected problems. Upgrading to a new major release is an unusual event for me in my projects. In any of these cases, be sure that your project has been backed up (for example, on GitHub) before opening the project in a different version of Unity, and schedule time to resolve unforeseen problems.
Unity includes automated tools to facilitate upgrading a project to a new version when it's opened in Unity. Your assets will be reimported. While upgrading to newer versions is supported, downgrading to a previous version is not.
When I create a new project in Unity, one of the first things I do is set Target Platform in Build Settings to the first platform that I know I will be using to develop and test my project. There are advantages to doing this as early as possible, as any new assets you add to the project will be imported and processed for your target platform. You are not required to do this now, but I do recommend that you perform the following steps. We will go into more detail later in this chapter (in the platform-specific topic sections).
With your project opened in Unity, follow these steps:
- Open the Build Settings window by going to File | Build Settings.
- In the Platform selection panel, choose your target platform. For example, if you're developing for Android ARCore, select Android, while if you're developing for Apple ARKit, choose iOS.
If the platform you require is not listed or is disabled, you may have forgotten to add the platform build module when you installed this version of Unity. Use Unity Hub to add the module now.
Tip – You Can Add Target Platform Modules via Unity Hub
If you are missing support for a target platform, open Unity Hub, click Installs, and then, for the specific Unity version you're using, click the 3-dot context menu and choose Add Modules. From there, you can use the checkboxes to add new modules.
- You don't need to worry about the other build settings right now. Press the Switch Platform button. It may take a few minutes to reimport your project's assets.
At this point, your Unity Editor should have opened a new Unity project, showing a default URP SampleScene. Feel free to explore the editor windows and scene objects. It may look daunting at first, but we'll review the user interface next to help you get more comfortable.
Introducing the Unity Editor interface
When you open the Unity Editor for the first time, you will notice that it has a lot of separate window panels that contain different content. Let's explore these together.
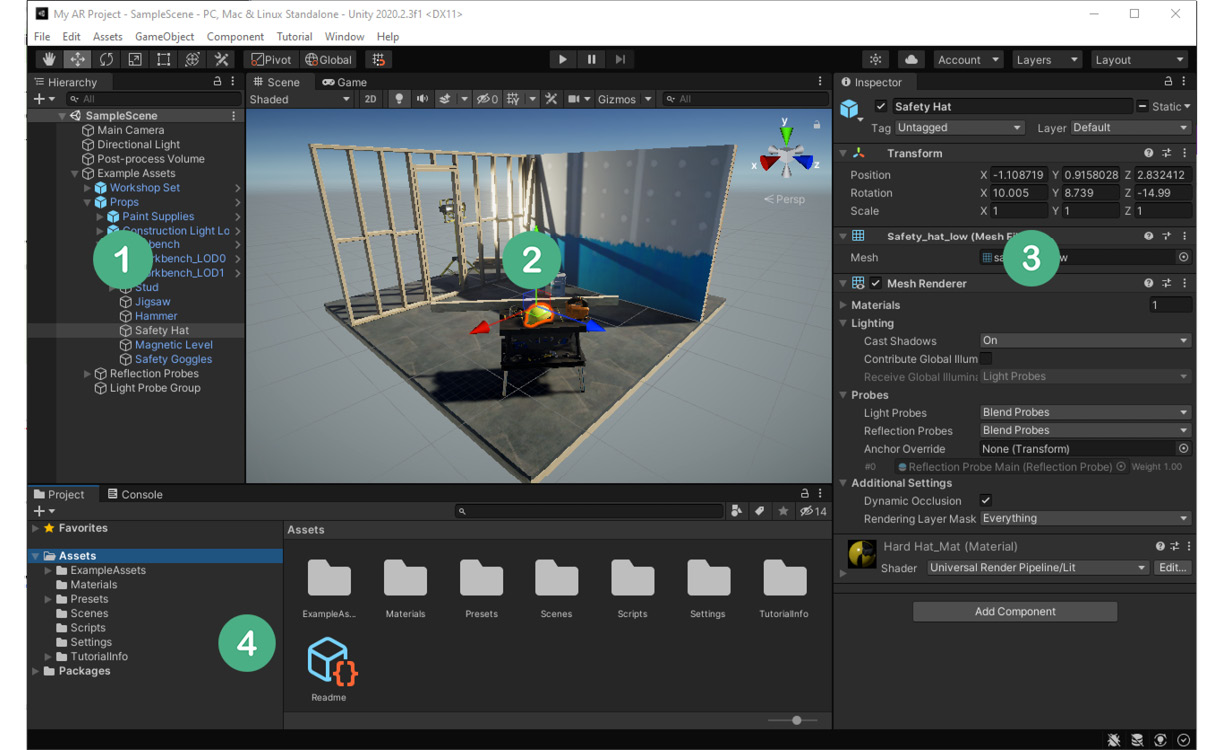
The following screenshot shows Unity Editor with the Universal Render Pipeline template's SampleScene. The windows are arranged in a default layout. This "under construction" scene demonstrates many of the awesome rendering features of Unity that may or may not be relevant in an AR project. But let's focus on Unity itself for a moment:
Figure 1.4 – Unity Editor with the URP sample scene open
The Unity Editor is arranged in a layout of separate tabbed windows. An Editor window is a UI panel containing specific types of information and controls. More windows can be opened via the Window main menu. Let's review each window in the preceding screenshot and introduce some other fundamental terminology since you're getting to know Unity:
- Hierarchy window (1): The tree view of the current scene's GameObjects. Shows the same content as the scene in a hierarchical tree view of parent-child objects.
You may have noticed in the preceding screenshot that, while examining both the Scene and Hierarchy windows, the Safety Hat GameObject is currently selected and highlighted. A Unity GameObject is an object that is part of a scene.
- Scene view window (2): This shows a 3D view of the current scene. Along the top of the scene window is an icon toolbar for controlling your working view of the scene.
- Inspector window (3): The components and properties of the selected GameObject.
GameObjects have components attached that define the runtime behavior of a GameObject. Unity includes many built-in components, and you can write your own using the C# programming language. Each component may have individual properties; that is, settings that control the component.
You can see that the Safety Hat has Transform and Mesh Renderer components, for instance.
GameObjects always have one Transform component. GameObjects may also have a 3D mesh, renderer, and materials that determine how it's rendered in the scene. There are many other components you can add that extend an object's behavior, physics, and interactions.
- Project assets window (4): In this window, you'll find the files stored on the hard drive in your project's
Assets/ folder, located under the project's root directory.Assets include files that may be added to objects in a scene, such as images, audio, video, materials, and scripts. Scenes themselves are saved as assets. Complex predefined GameObjects can also be saved as assets, called prefabs.
- Console window (4, hidden behind Project tab): This shows error and information messages from your application.
- Game view window (2, hidden behind Scene tab): This shows the user's view, as rendered by the in-scene camera GameObject.
- Main Menu: At the top of the Editor window is a menu where you can access many features of Unity. Adding additional packages to your project may add more menu items.
- Main Toolbar: At the top of the Editor window and below the Main menu is an icon toolbar organized into three sections. On the left-hand side, there are tools for editing the Scene view (including Move Tool, Rotate Tool, and Scale Tool). In the center, there are the play mode controls (including Play and Pause). Finally, on the right, there are additional controls, including some that allow you to access your Unity account and cloud services.
Take a moment to explore the main menu items:
- The File menu is for creating, saving, and loading scenes and accessing your build settings.
- The Edit menu is for selecting and editing objects in the project, accessing project-specific settings and preferences, and other editor-related tools.
- The Assets menu provides tools for importing and managing project assets (as found in the Project window's
Assets/ folder).
- The GameObject menu lets you add new objects to the current scene.
- The Component menu provides a categorized list of components that you can add to the currently selected GameObject in the scene.
- The Window menu is where you can find and open additional windows that provide more features. Importing new packages into Unity may add new menu bar items.
Information – Using Play Mode in AR Projects
In most Unity projects, you can press the Play button (in the main toolbar) to go into play mode and run your scene in the Editor, running on your desktop rather than on the device. This is not so simple with an augmented reality scene since it requires an onboarding phase, where the software scans the environment for physical world features and then uses the physical device sensors for positional tracking. There are several solutions to facilitate your iterative developer workflow, all of which we will discuss in Chapter 3, Improving the Developer Workflow.
You can personalize and rearrange the editor's window layout to suit your needs and preferences. Layouts can be saved and loaded using the Layout selection menu in the top-right corner of the editor. The screenshots in this book use layouts that are different from Unity's default layout.
OK, enough talk – this is a hands-on book, so let's get hands-on right away and try out the Unity Editor.
Basics of using the Unity Editor
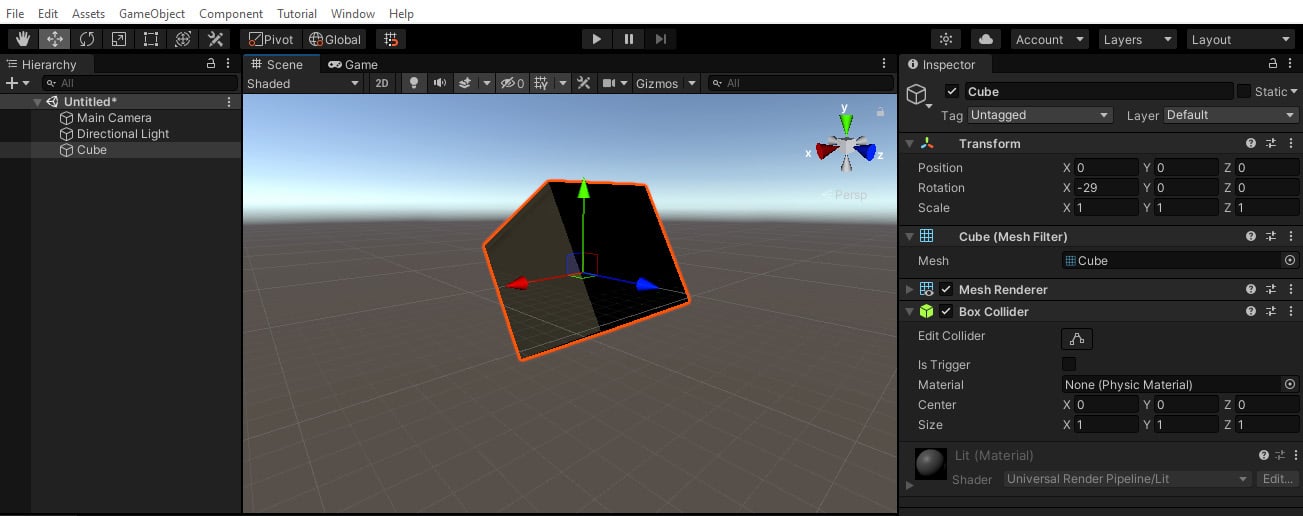
In this section, we'll build a trivial scene with a 3D cube that gives us more context to explain how to use Unity:
- Create a new scene from the main menu by selecting File | New Scene.
- A New Scene window will appear (Unity 2020+ only) that lets you select a scene template. Choose the one named Basic (Built-in). Then, press Create.
You will notice right away that the new scene contains two default GameObjects: a Main Camera and a Directional Light.
- Add a 3D cube to the scene by clicking GameObject | 3D Object | Cube. With that, the Cube will be added to the scene and be visible in both the Scene and Hierarchy windows.
- Ensure the Cube rests at the origin of our scene; that is, the
(0, 0, 0) X-Y-Z coordinates. With Cube selected in the Hierarchy window, look in the Inspector window and set its Transform | Position | X, Y, and Z values to zero.
- Let's rotate the Cube. In the same Inspector Transform component, set its X-Rotation value to
-20.The scene may now look as follows:
Figure 1.5 – New scene with a 3D cube
At this point, I encourage you to get familiar with the Scene view controls. Using a 3-button mouse on Windows, for example, right-click in the window to pivot the view, Alt + left-click to orbit the view around the "center" of the view, and center-click the mouse to move the view. To move closer or further out (zoom), use Alt + right-click or use the scroll wheel. Note that the directional gizmo in the top right of the Scene window indicates the current view showing the X, Y, and Z axes. For further information (including one- or two-button mice), see https://docs.unity3d.com/Manual/SceneViewNavigation.html.
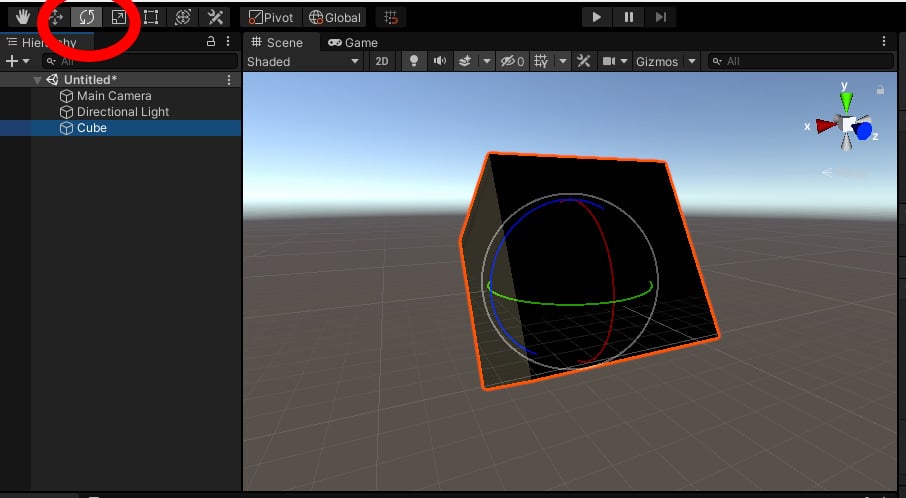
Tip – RGB == XYZ
It's handy to remember that the red, green, and blue colors in gizmos correspond to the X, Y, and Z axes, respectively.
We modified the Cube's transform by editing its numerical values in the Inspector window. You can also transform an object by directly manipulating it in the Scene window. For example, in the main toolbar, select Rotate Tool. With the Cube currently selected, you should now see the rotate gizmo rendered on the object in the scene. You can grab one of the gizmo handles (X, Y, or Z) and drag it to rotate the object around that axis, as shown in the following screenshot:
Figure 1.6 – Rotate tool selected
For more on transforming objects directly in the Scene window, see the Unity Manual (https://docs.unity3d.com/Manual/PositioningGameObjects.html).
This was a very brief introduction to get you started. As a matter of habit, you should always save your work after accomplishing something. Let's save the scene, as follows:
- From the main menu, select File | Save As, which will open the Save Scene window.
- Navigate to the
Scenes/ subfolder (in your project's Assets folder).
- Give the scene a name, such as
My Cube, and press Save.Tip – Confused or Overwhelmed? Take it a Step at a Time
As with any professional development and creative application, there's a huge assortment of things you can do with Unity, and it provides many tools to help you achieve your objectives. If you are confused or overwhelmed, a great strategy is to try and focus only on the menu items and windows you need right now and ignore the rest. We'll walk you through this with simple step-by-step instructions. As you gain experience and confidence, you'll expand your radius of familiarity and see how it all fits together. To be honest, I still learn new things about Unity each time I work on a project.
Of course, this was just a brief introduction to Unity. If you need to find out more, please head over to Unity Learn, where there are some excellent beginner tutorials (using the https://unity.com/learn/get-started link or the Learn tab in Unity Hub).
Also, take a look at the Unity Manual introductory topics (https://docs.unity3d.com/Manual/UnityOverview.html).
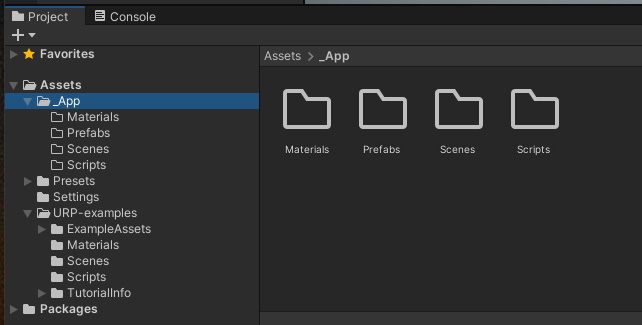
Organizing your project assets
You have access to your project assets in the Project window. I like to keep the project assets that I create in their own top-level folder, separate from other assets I might import from third-party sources such as the Unity Asset Store.
Likewise, Unity's URP project template includes SampleScene and example assets. I suggest moving the URP example assets into their own folder to keep them separate from your own application assets. You can do this by following these steps:
- Create an
Assets folder named URP-examples. In the Project window, click the + icon in the top left, select Folder, and name it URP-examples.
- Drag each of the example folders into the
URP-examples one, namely ExampleAssets, Materials, Scenes, Scripts, TutorialInfo, and the Readme file.
- Leave the
Presets and Settings folders in the root Assets/ folder.
- Create an
Assets folder named _App. I like to prepend an underscore to this folder's name so that it remains at the top of the list.
- Create child folders inside
_App/ named Materials, Prefabs, Scenes, and Scripts. These subfolders will remain empty for now, but we'll add to them as we work through this book.
Organizing your assets by file type is a common convention in Unity, but you may have your own way of doing things. Unity does not depend on these folder names or asset file locations. (That said, there are a few reserved folder names with special meanings to Unity; see https://docs.unity3d.com/Manual/SpecialFolders.html). Your Project window may now look as follows:
Figure 1.7 – Reorganized Project Assets folders
I think we're now ready to move on and continue setting up your system and installing the packages you need for AR development. We'll start by adding an AR device plugin to your project, and then do the same for the Foundation package.


 Free Chapter