-
Book Overview & Buying
-
Table Of Contents
-
Feedback & Rating

Android Programming for Beginners
By :

A development environment is a term that refers to having everything you need in order to develop, set up, and be ready to go in one place. We need the following two things to get started:
Android Studio is an integrated development environment (IDE) that takes care of all the complexities of compiling our code and linking with the JDK and the Android API. Once we have installed the JDK and Android Studio, we can do everything we need inside this application.
What could possibly go wrong?
I got a lot of feedback via my website http://gamecodeschool.com about a previous book of mine that showed how to install an Android development environment. People said that setting this up can be the hardest part. So I've written this section to be as thorough as possible because not everybody has a smooth setup experience.
Hopefully, you won't need all the extra tips and detailed figures, but there are a few vagaries that can trip us up while setting up the development environment.
Most likely, these instructions will get you up and running quickly and cover all your issues. If there is an issue that I haven't managed to anticipate, don't let it beat you! I guarantee that you are not the first to have that exact issue. Perform a web search (use Google), be really specific in your search criteria, and I am confident you will be coding in no time at all.
This guide will get around 99% of the Windows user's setup in a couple of hours. All the coding and development information you need will be covered 100% step by step.
For Mac and Linux users, most of these instructions can be easily interpreted as the key points of the tutorial are more about what we do inside of the setup programs and less about the specific environment we are using. My apologies for not providing comprehensive instructions for every operating system.
There are multiple options regarding which software to use when developing Android apps. In the early days of developing Android, an IDE called Eclipse was most commonly used. A few years ago, a new "official" contender for the best Android IDE was released. This was Android Studio. The problem after its first release was that it was still in the beta (not finished) stage. It had numerous bugs, including some quite awkward ones. However, even then it was the preferred IDE for many because of its smooth operation, cool looks, official status, and prestigious heritage.
Now that Android Studio has exceeded version 1, there is virtually no reason to use anything else, especially if you are just getting started with Android. If you already have Eclipse set up for Android development and really don't want to change, that's fine, the code in this book will work. However, there will be significant differences in the instructions, especially regarding the user interface (UI) designer. Also, the code in this book has been thoroughly tested by others and me in Android Studio.
The sections that follow will set up a development environment with the JDK and Android Studio as our IDE of choice.
This can be as simple as downloading, double-clicking on the downloaded file, and following the installation instructions. However, sometimes it isn't. So, it is probably worth running through the installation process step by step and pointing out along the way a few options that can make things easier.
Most PC/Mac computers already have Java installed. Many modern apps require Java, and a classic example of this is the game Minecraft. Java is subtly, but significantly, different from the JDK. Java on its own just runs programs that have been written in Java for PC. This is the PC equivalent to the DVM. Java on its own, however, will not compile our code or make other people's code that we need available. This more common version of Java is called the
Java Runtime Environment (JRE). When we install the JDK, it will also install the JRE, whether you already have it or not. So, if you are conscientious about keeping your hard drive in order, you could uninstall the JRE using the Windows Control Panel in the usual way before proceeding. Then find and delete your existing Java
folder.
This tutorial will then reinstall the latest version of the JRE as well as the JDK. If, however, you know that you have a program that uses Java and you don't want to mess with its configuration, then go ahead with this tutorial, but just be aware that there will be a JRE and an associated Java
folder in two places on your hard drive.
To summarize the preceding in case anything is unclear: this tutorial assumes that you don't have an existing folder named Java
, but will work just fine even if you do.
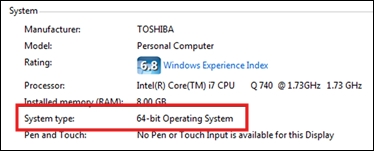
As a little bit of preparation before we install the JDK, you need to know which operating system you have and whether it is 32 or 64 bit. If you are unsure, use this little tip to find out.
Do I have a 32-bit or 64-bit Windows system?
To find out, right-click on My Computer (This PC on Windows 8) icon, left-click on the Properties option, and look under the System heading of the System type entry like this:
Now we are ready to install the JDK. This fairly simple set of steps will set up the JDK quickly. The only slight delay is the download itself, which could take a while on slower Internet connections. The actual installation process should be fast and trouble free:
jdk-8u51-windows-x64.exe
file and select Run as administrator. The precise name of the file you have will vary based on whether you have 32-bit or 64-bit Windows and what the current version of the JDK happens to be at the time.Java\JDK\
. As you can see in the next screenshot, I have also switched to my D:\
drive, as I have more space there:Java
folder from step 8 and then click on Next.JAVA_HOME
in Variable name and enter D:\Java\JDK
in the Variable value field. If you've installed the JDK somewhere else, then the file path you enter in the Variable value field will need to point to where you've placed it. Be sure to type it correctly, make sure that the slashes \
are the right way around, and don't add any extra slashes.We have successfully installed the JDK, which we need to develop Android apps with Android Studio, and we have also installed the JRE, if it wasn't installed already, which we won't be using, but this won't cause us any problems either.
Now that the JDK is installed and ready to go, we are only one step away from building our first Android app. Installing Android Studio can take a bit longer than the JDK and is a little more nuanced, but it is nothing a determined, aspiring, developer won't be able to handle with ease.
What could possibly go wrong?
This whole process could take an hour or two. Not because there is lots of work for us to do, but because we need to initiate some fairly large downloads. Also, at several different stages in the process, Android Studio will connect to the internet and update itself. If you have a fast internet connection, then you can probably knock a good percentage off of my rough estimate of the time required.
Now that we know what to expect, we can get on with the installation of Android Studio. Follow the given steps to do so. There is nothing especially tricky about this, and the few aspects that might need some consideration will be discussed as they arise:
Download Android Studio
.android-studio-bundle-141.1980579-windows.exe
file and select Run as administrator. Your file will most likely have a different name based on whichever is the current version of Android Studio at the time.\Android Studio
. So in my case, this will be D:\Android Studio
. For Android SDK Installation Location, choose the same hard drive and simply add Android\sdk
as the location. So if, like me, you've installed the JDK on D:
, then choose D:\Android\sdk
. The next screenshot makes this clear:This was a fairly lengthy tutorial but, hopefully, it wasn't too tough. Android Studio and the supporting tools that we need are installed and ready to go. We are really close now to building our first app.
First, let's look at the composition of an Android app a little.
Change the font size
Change margin width
Change background colour