Sign In Start Free Trial
Account

Add to playlist

Create a Playlist

Modal Close icon
You need to login to use this feature.
  • Learn Arduino Prototyping in 10 days
  • Toc
  • feedback
Learn Arduino Prototyping in 10 days

Learn Arduino Prototyping in 10 days

By : Bosu Roy Choudhuri
4.8 (13)
close
Learn Arduino Prototyping in 10 days

Learn Arduino Prototyping in 10 days

4.8 (13)
By: Bosu Roy Choudhuri

Overview of this book

This book is a quick, 10-day crash course that will help you become well acquainted with the Arduino platform. The primary focus is to empower you to use the Arduino platform by applying basic fundamental principles. You will be able to apply these principles to build almost any type of physical device. The projects you will work through in this book are self-contained micro-controller projects, interfacing with single peripheral devices (such as sensors), building compound devices (multiple devices in a single setup), prototyping standalone devices (powered from independent power sources), working with actuators (such as DC motors), interfacing with an AC-powered device, wireless devices (with Infrared, Radio Frequency and GSM techniques), and finally implementing the Internet of Things (using the ESP8266 series Wi-Fi chip with an IoT cloud platform). The first half of the book focuses on fundamental techniques and building basic types of device, and the final few chapters will show you how to prototype wireless devices. By the end of this book, you will have become acquainted with the fundamental principles in a pragmatic and scientific manner. You will also be confident enough to take up new device prototyping challenges.
Table of Contents (13 chapters)
close

Compiling, loading and running a sketch

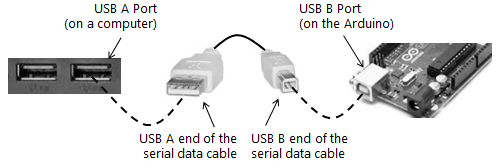
The first step in the process is to connect the Arduino Uno development board to the Computer using the USB-A to USB-B cable. The USB-A end of the cable will go into the computer's USB-A port. While the USB-B end of the cable will get plugged into the USB-B port on the Arduino board.

Figure 6: USB A to USB B Connector

After the Arduino board has been firmly connected to the computer, launch (or re-launch if already open) the Arduino IDE so that the Arduino board get auto detected by the IDE.

Navigate to the menu, Tools | Port, there should be an auto detected port, COM6 (in the picture shown next). If the port is not selected by default, then go ahead and select it manually.

Sometimes it may take a few extra seconds for the board to get auto detected. If the board fails to get detected try to close the IDE and re-launch the IDE again...

Unlock full access

Continue reading for free

A Packt free trial gives you instant online access to our library of over 7000 practical eBooks and videos, constantly updated with the latest in tech
bookmark search playlist download font-size

Change the font size

margin-width

Change margin width

day-mode

Change background colour

Close icon Search
Country selected

Close icon Your notes and bookmarks

Delete Bookmark

Modal Close icon
Are you sure you want to delete it?
Cancel
Yes, Delete