Let’s see how easy it is to publish your edited video directly from Resolve onto social media platforms such as YouTube or Vimeo.
First, we will need to set up Resolve with our social media accounts to enable it to publish directly through them. You will only need to do this once, but it can save a lot of time compared to exporting your video to your computer and then uploading and publishing it to social media separately.
Setting up your social media accounts in Resolve
Resolve has the ability to publish videos directly to your YouTube, Vimeo, and Twitter accounts. First, you need to sign in to your social media accounts in the Quick Export menu:
- Click on the Quick Export button in the upper-right corner of the Viewer window.
- From the Quick Export screen, select one of the following:
- Click on the Manage Account button. This will take you to the Internet Accounts page.
- Click on the Sign In button for one of the following:
- Sign in to your social media account using your usual login details and authorize Resolve to have access to your account.
- Click on the Save button in the bottom-right corner of the Internet Accounts page.
- Repeat steps 1 to 6 for your other social media accounts.
Top tip
If you want to access the Internet Accounts page again to sign Resolve out of your accounts, you can access it from the DaVinci Resolve menu: Preferences > System > Internet Accounts.
You now have your social media accounts set up and ready to quickly publish your videos to social media.
Publishing to social media within Resolve
Publishing directly to social media is as easy as selecting some options on the Quick Export page.
Publishing directly to YouTube
Let’s look at the YouTube options first:
- Click on Quick Export.
- Select YouTube.
- Check the Upload Directly to YouTube box.
- Select the YouTube Privacy option from the drop-down list:
- Select the playlist options from the drop-down list:
Film & Animation, Auto & Vehicles, Music, Pets &Animals, Sports, Travel & Events, Gaming, People & Blogs, Comedy, Entertainment, News & Politics, Howto & Style, Education, Science & Technology, or Nonprofits & Activism
- Type the title of your video into the Title textbox.
- Type the description of your video into the Description textbox.
- Click on the Export button in the bottom-right corner of the Quick Export page.
- Choose a file location for your exported video.
- Click on the Save button.
Resolve has now saved a copy of your exported video to the location you specified on your computer and uploaded and published a copy of the video directly to YouTube using the settings you specified on the Quick Export page.
Publishing directly to Vimeo
Now, let’s look at the Vimeo options:
- Click on Quick Export.
- Select Vimeo.
- Check the Upload Directly to Vimeo box.
- Select the Vimeo Privacy option from the drop-down list:
- Anyone
- Only Me
- People I follow
- People with the password
- Type the title of your video into the Title textbox.
- Type the description of your video into the Description textbox.
- Click on the Export button in the bottom-right corner of the Quick Export page.
- Choose a file location for your exported video.
- Click on the Save button.
Again, Resolve has saved a copy of your exported video to the location you specified on your computer and uploaded and published a copy of the video directly to Vimeo using the settings you specified on the Quick Export page.
Publishing directly to Twitter
Finally, let’s look at the Twitter export options:
- Click on Quick Export.
- Select Twitter.
- Check the Upload Directly to Twitter box.
- Type the description of your video into the Description textbox.
- Click on the Export button in the bottom-right corner of the Quick Export page.
- Choose a file location for your exported video.
- Click on the Save button.
Yet again, Resolve has saved a copy of your exported video to the location you specified on your computer and uploaded and published a copy of the video directly to Twitter using the description you specified on the Quick Export page.
Top tip
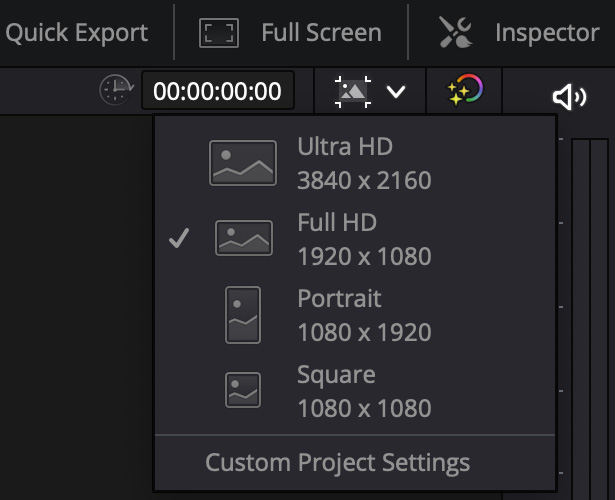
On the Quick Export page, Resolve uses common video settings for social media accounts. However, you can change these settings in the Timeline Resolution drop-down list (Figure 1.16).
Once you change the timeline resolution, you will notice that the export file settings on the Quick Export page will change accordingly. This is useful if you want to, for example, upload your videos in 4K rather than 1080p.
Figure 1.16: Timeline Resolution drop-down menu
We now know how to publish videos directly to three commonly used social media accounts directly from Resolve. However, we can also export our videos and upload them separately to other social media accounts. Let us look at how to do that next.
Preparing a video to upload to social media outside Resolve
Of course, there are more social media accounts than just YouTube, Vimeo, and Twitter. The list keeps on growing, along with their different formatting and aspect ratio requirements. Thankfully, in Resolve, you can quickly reframe and repurpose existing videos to use for different social media platforms, both current and future ones.
For example, let’s take the video you have just edited and prepared for uploading to Instagram. According to Facebook, which owns Instagram, their video requirements are as follows:
“Video Resolution and Size:
- You can upload a video with an aspect ratio between 1.91:1 and 9:16.
- Videos should have a minimum frame rate of 30 FPS (frames per second) and minimum resolution of 720 pixels.
- The maximum file size for videos that are 10 minutes or less is 650MB. The maximum file size for videos up to 60 minutes is 3.6GB.”
Of course, these requirements can always change, so it is best to check for yourself on a regular basis to be sure.
Source: www.facebook.com/help/instagram/1038071743007909/?helpref=uf_share
Duplicating your Timeline
First, let’s create a copy of our Timeline so that we can make changes to it without losing our original edit:
- In the Media Pool, right-click on your Timeline and select Duplicate Timeline.
- Rename the duplicated Timeline to something suitable, such as
IGTV Edit, by performing the following:- Click on the title below the thumbnail by clicking on it twice and entering a new name
- Alternatively, if in the List view, type directly into the Clip Name field
- Double-click on the new Timeline thumbnail or icon (if in the List view) to open the new Timeline.
Now that we have a copy of our Timeline, let’s reframe our video for the new aspect ratio.
Checking your content for a different aspect ratio
First, let’s check our content for our new video’s aspect ratio:
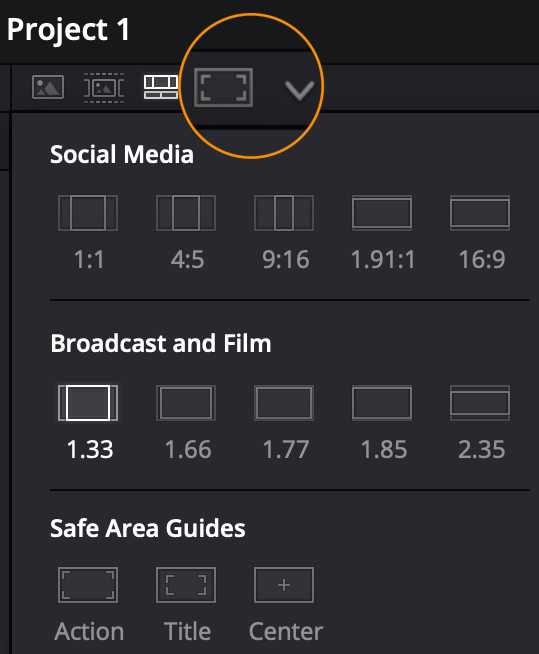
- Click on the Safe Area button in the upper-left corner of the Viewer (Figure 1.17):
Figure 1.17: The Safe Area button
- You will see a Social Media heading under which you have the following options:
- Select the one you prefer. In this case, we are going to select 9:16 as that is a popular format for Instagram TV (IGTV) and can also be used for Facebook and TikTok.
- You will now see a white box on the Viewer that shows the safe area of our content for it to be seen in the 9:16 vertical format.
- Scroll through the video on your Timeline, and you should notice that some of your content will suit the new frame; however, some will not.
You can either use Ripple Overwrite to replace the shots that are not framed well for the new aspect ratio or you can reframe the existing footage to suit.
Let’s change the framing of the existing clips.
Reframing our video using the Transform controls
Let’s reframe our video to suit the new aspect ratio:
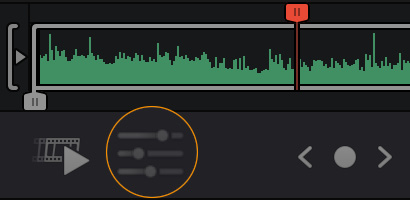
- Click on the Tools button (Figure 1.18) in the bottom-left corner of the Viewer. This reveals additional tools that we can use to enhance each clip:
Figure 1.18: The Tools button
- Select the Transform tool (the first button; see Figure 1.19). It will be underlined in red to show it has been selected, and the transform controls will be shown underneath.
- Click and drag the X position control (the third transform control from the left) to change the X position value of the clip to move it to the left or right until the subject of the clip is inside the white Safe Area box:
Figure 1.19: The Transform button and controls
Top tip
To see before and after any effect, you can toggle the effect on and off by clicking on the red switch to the left of the controls. Anywhere you see this red toggle switch, you can use it to preview what an effect will look like on the video or even disable an effect without deleting it.
Feel free to go through each clip and use the Transform tool to reframe your video to suit your new aspect ratio.
Now, let’s crop your video to suit the new aspect ratio by changing the Timeline Resolution.
Changing the timeline resolution
We now need to change your Timeline Resolution, which will also change the aspect ratio:
- Click on the Timeline Resolution button (Figure 1.16) in the top-right corner of the Viewer to see a drop-down list of common Timeline presets:
- Ultra HD 3840 x 2160
- Full HD 1920 x 1080
- Portrait 1080 x 1920
- Square 1080 x 1080
- Select Portrait 1080 x 1920 for our 9:16 vertical format.
You will notice that the video has now been resized down to fit the 9:16 vertical aspect ratio, but Resolve has added black bars above and below the original footage. We don’t want this, but it is an easy fix:
- Select Custom Timeline Settings from the bottom of the Timeline Resolution drop-down list
- Under the Format tab, next to the Mismatched Resolution options, change the option selected from Scale entire image to fit to Scale full frame with crop
Resolve has now rescaled and cropped the video on the Timeline to suit the new aspect ratio. It is now time to export our newly reframed video ready to be uploaded separately to IGTV.
Exporting video using Quick Export
Quick Export can be used not only for directly uploading your videos to social media, but also to quickly export videos to your computer.
Quick Export has three main Video Codecs presets, H.264, H.265, and ProRes.
- ProRes is a Video Codec mainly used by professional video editors to edit with, as it has a bigger size and is less compressed to retain quality, but due to its large size, it is not so great for social media.
- H.264 is a universally accepted Video Codec that efficiently compresses video into smaller file sizes while retaining quality.
- H.265 is a newer version of
H.264, so is not as universally accepted. But it is more efficient at compressing video for the same quality as H.264, so the file sizes can be smaller.
Let us choose H.264 for our social media uploads:
- Click on the Quick Export button.
- Select H.264.
- Click on the Export button.
- Navigate to a folder on your computer where you want to save your video.
By default, Resolve will name your video after the Timeline name. However, you can rename your video before saving it to your computer.
- Click on the Save button to save the file to your computer.
You have now repurposed an existing edited video for another social media platform by recomposing shots, cropping the video, changing its aspect ratio, and exporting it to your computer ready for separate upload at another time.
Top tip
You can add more presets to the Quick Export menu by creating them on the Media page. We will cover this in a later chapter.


 Free Chapter