This latest edition of the bestselling Packt series will give you a solid foundation to start building projects using modern C# and .NET with confidence.
You'll learn about object-oriented programming; writing, testing, and debugging functions; and implementing interfaces. You'll take on .NET APIs for managing and querying data, working with the fi lesystem, and serialization. As you progress, you'll explore examples of cross-platform projects you can build and deploy, such as websites and services using ASP.NET Core.
This latest edition integrates .NET 8 enhancements into its examples: type aliasing and primary constructors for concise and expressive code. You'll handle errors robustly through the new built-in guard clauses and explore a simplified implementation of caching in ASP.NET Core 8.
If that's not enough, you'll also see how native ahead-of-time (AOT) compiler publish lets web services reduce memory use and run faster. You'll work with the seamless new HTTP editor in Visual Studio 2022 to enhance the testing and debugging process. You'll even get introduced to Blazor Full Stack with its new unified hosting model for unparalleled web development flexibility.
We have already created and used basic console apps, but we’re now at a stage where we should delve into them more deeply.
Console apps are text-based and are run at the command prompt. They typically perform simple tasks that need to be scripted, such as compiling a file or encrypting a section of a configuration file.
Equally, they can also have arguments passed to them to control their behavior.
An example of this would be to create a new console app using the F# language with a specified name instead of using the name of the current folder, as shown in the following command:
dotnet new console -lang "F#" --name "ExploringConsole"
Displaying output to the user
The two most common tasks that a console app performs are writing and reading data. We have already used the WriteLine method to output, but if we didn’t want a carriage return at the end of a line, for example, if we later wanted to continue to write more text at the end of that line, we could have used the Write method.
If you want to write three letters to the console without carriage returns after them, then call the Write method, as shown in the following code:
Write("A");
Write("B");
Write("C");
This would write the three characters on a single line and leave the cursor at the end of the line, as shown in the following output:
ABC
If you want to write three letters to the console with carriage returns after them, then call the WriteLine method, as shown in the following code:
WriteLine("A");
WriteLine("B");
WriteLine("C");
This would write three lines and leave the cursor on the fourth line:
A
B
C
Formatting using numbered positional arguments
One way of generating formatted strings is to use numbered positional arguments.
This feature is supported by methods like Write and WriteLine. For methods that do not support the feature, the string parameter can be formatted using the Format method of string.
Let’s begin formatting:
Use your preferred code editor to add a new Console App / console project named Formatting to the Chapter02 solution.
In Program.cs, delete the existing statements and then type statements to declare some number variables and write them to the console, as shown in the following code:
int numberOfApples = 12;
decimal pricePerApple = 0.35M;
Console.WriteLine(
  format: "{0} apples cost {1:C}",
  arg0: numberOfApples,
  arg1: pricePerApple * numberOfApples);
string formatted = string.Format(
  format: "{0} apples cost {1:C}",
  arg0: numberOfApples,
  arg1: pricePerApple * numberOfApples);
//WriteToFile(formatted); // Writes the string into a file.
The WriteToFile method is a nonexistent method used to illustrate the idea.
The Write, WriteLine, and Format methods can have up to three numbered arguments, named arg0, arg1, and arg2. If you need to pass more than three values, then you cannot name them.
In Program.cs, type statements to write three and then five arguments to the console, as shown in the following code:
// Three parameter values can use named arguments.
Console.WriteLine("{0} {1} lived in {2}.",
  arg0: "Roger", arg1: "Cevung", arg2: "Stockholm");
// Four or more parameter values cannot use named arguments.
Console.WriteLine(
  "{0} {1} lived in {2} and worked in the {3} team at {4}.",
  "Roger", "Cevung", "Stockholm", "Education", "Optimizely");
Good Practice: Once you become more comfortable with formatting strings, you should stop naming the parameters, for example, stop using format:, arg0:, and arg1:. The preceding code uses a non-canonical style to show where the 0 and 1 came from while you are learning.
JetBrains Rider and its warnings about boxing
If you use JetBrains Rider and you have installed the Unity Support plugin, then it will complain a lot about boxing. A common scenario when boxing happens is when value types like int and DateTime are passed as positional arguments to string formats. This is a problem for Unity projects because they use a different memory garbage collector to the normal .NET runtime. For non-Unity projects, like all the projects in this book, you can ignore these boxing warnings because they are not relevant. You can read more about this Unity-specific issue at the following link: https://docs.unity3d.com/Manual/performance-garbage-collection-best-practices.html#boxing.
Formatting using interpolated strings
C# 6 and later have a handy feature named interpolated strings. A string prefixed with $ can use curly braces around the name of a variable or expression to output the current value of that variable or expression at that position in the string, as the following shows:
Enter a statement at the bottom of the Program.cs file, as shown in the following code:
// The following statement must be all on one line when using C# 10// or earlier. If using C# 11 or later, we can include a line break// in the middle of an expression but not in the string text.
Console.WriteLine($"{numberOfApples} apples cost {pricePerApple * numberOfApples:C}");
Run the code and view the result, as shown in the following partial output:
12 apples cost £4.20
For short, formatted string values, an interpolated string can be easier for people to read. But for code examples in a book, where statements need to wrap over multiple lines, this can be tricky. For many of the code examples in this book, I will use numbered positional arguments. Another reason to avoid interpolated strings is that they can’t be read from resource files to be localized.
The next code example is not meant to be entered in your project.
Before C# 10, string constants could only be combined by using concatenation with the + operator, as shown in the following code:
This only works for combining string constant values. It cannot work with other types like numbers, which would require runtime data type conversions. You cannot enter private const declarations in a top-level program like Program.cs. You will see how to use them in Chapter 5, Building Your Own Types with Object-Oriented Programming.
Good Practice: If you are writing code that will be part of a Unity project, then interpolated string formats is an easy way to avoid boxing.
Understanding format strings
A variable or expression can be formatted using a format string after a comma or colon.
An N0 format string means a number with thousand separators and no decimal places, while a C format string means currency. The currency format will be determined by the current thread.
For instance, if you run code that uses the number or currency format on a PC in the UK, you’ll get pounds sterling with commas as the thousand separators, but if you run it on a PC in Germany, you will get euros with dots as the thousand separators.
The full syntax of a format item is:
{ index [, alignment ] [ : formatString ] }
Each format item can have an alignment, which is useful when outputting tables of values, some of which might need to be left- or right-aligned within a width of characters. Alignment values are integers. Positive integers mean right-aligned and negative integers mean left-aligned.
For example, to output a table of fruit and how many of each there are, we might want to left-align the names within a column of 10 characters and right-align the counts formatted as numbers with zero decimal places within a column of six characters:
At the bottom of Program.cs, enter the following statements:
Run the code and note the effect of the alignment and number format, as shown in the following output:
Name          Count
Apples        1,234
Bananas      56,789
Custom number formatting
You can take complete control of number formatting using custom format codes, as shown in Table 2.8:
Format code
Description
0
Zero placeholder. Replaces the zero with the corresponding digit if present; otherwise, it uses zero. For example, 0000.00 formatting the value 123.4 would give 0123.40.
#
Digit placeholder. Replaces the hash with the corresponding digit if present; otherwise, it uses nothing. For example, ####.## formatting the value 123.4 would give 123.4.
.
Decimal point. Sets the location of the decimal point in the number. Respects culture formatting, so it is a . (dot) in US English but a , (comma) in French.
,
Group separator. Inserts a localized group separator between each group. For example, 0,000 formatting the value 1234567 would give 1,234,567. Also used to scale a number by dividing by multiples of 1,000 for each comma. For example, 0.00,, formatting the value 1234567 would give 1.23 because the two commas mean divide by 1,000 twice.
%
Percentage placeholder. Multiplies the value by 100 and adds a percentage character.
\
Escape character. Makes the next character a literal instead of a format code. For example, \##,###\# formatting the value 1234 would give #1,234#.
;
Section separator. Defines different format strings for positive, negative, and zero numbers. For example, [0];(0);Zero formatting: 13 would give [13], -13 would give (13), and 0 would give Zero.
Others
All other characters are shown in the output as is.
You can apply standard number formatting using simpler format codes, like C and N. They support a precision number to indicate how many digits of precision you want. The default is two. The most common are, as shown in Table 2.9:
Format code
Description
C or c
Currency. For example, in US culture, C formatting the value 123.4 gives $123.40, and C0 formatting the value 123.4 gives $123.
N or n
Number. Integer digits with an optional negative sign and grouping characters.
D or d
Decimal. Integer digits with an optional negative sign but no grouping characters.
B or b
Binary. For example, B formatting the value 13 gives 1101 and B8 formatting the value 13 gives 00001101.
X or x
Hexadecimal. For example, X formatting the value 255 gives FF and X4 formatting the value 255 gives 00FF.
E or e
Exponential notation. For example, E formatting the value 1234.567 would give 1.234567000E+003 and E2 formatting the value 1234.567 would give 1.23E+003.
We can get text input from the user using the ReadLine method. This method waits for the user to type some text. Then, as soon as the user presses Enter, whatever the user has typed is returned as a string value.
Let’s get input from the user:
Type statements to ask the user for their name and age and then output what they entered, as shown in the following code:
Console.Write("Type your first name and press ENTER: ");
string firstName = Console.ReadLine();
Console.Write("Type your age and press ENTER: ");
string age = Console.ReadLine();
Console.WriteLine($"Hello {firstName}, you look good for {age}.");
By default, with .NET 6 and later, nullability checks are enabled, so the C# compiler gives two warnings because the ReadLine method could return a null value instead of a string value. But there is no scenario where this method would actually return null, so instead we will see how to switch off these specific warnings in this scenario.
For the firstName variable, append a ? after string, as shown highlighted in the following code:
string? firstName = Console.ReadLine();
This tells the compiler that we are expecting a possible null value, so it does not need to warn us. If the variable is null then when it is later output with WriteLine, it will just be blank, so that works fine in this case. If we were going to access any of the members of the firstName variable, then we would need to handle the case where it is null.
For the age variable, append a ! before the semi-colon at the end of the statement, as shown highlighted in the following code:
string age = Console.ReadLine()!;
This is called the null-forgiving operator because it tells the compiler that, in this case, ReadLine will not return null, so it can stop showing the warning. It is now our responsibility to ensure this is the case. Luckily, the Console type’s implementation of ReadLine always returns a string even if it is just an empty string value.
Run the code, and then enter a name and age, as shown in the following output:
Type your name and press ENTER: Gary
Type your age and press ENTER: 34
Hello Gary, you look good for 34.
You have now seen two common ways to handle nullability warnings from the compiler. We will cover nullability and how to handle it in more detail in Chapter 6, Implementing Interfaces and Inheriting Classes.
Simplifying the usage of the console
In C# 6 and later, the using statement can be used not only to import a namespace but also to further simplify our code by importing a static class. Then, we won’t need to enter the Console type name throughout our code.
Importing a static type for a single file
You can use your code editor’s Find and Replace feature to remove the times we have previously written Console:
At the top of the Program.cs file, add a statement to statically import the System.Console class, as shown in the following code:
usingstatic System.Console;
Select the first Console. in your code, ensuring that you select the dot after the word Console too.
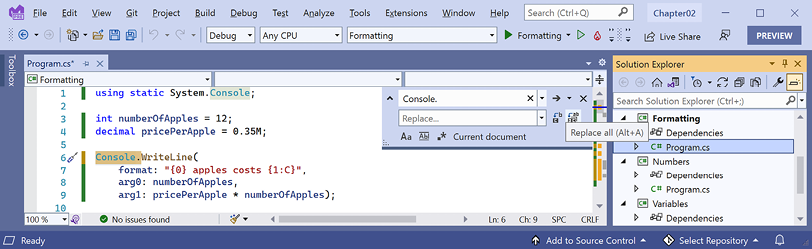
In Visual Studio 2022, navigate to Edit | Find and Replace | Quick Replace; in Visual Studio Code, navigate to Edit | Replace; or in JetBrains Rider, navigate to Edit | Find | Replace, and note that an overlay dialog appears ready for you to enter what you would like to replace Console. with, as shown in Figure 2.9:
Figure 2.9: Using the Replace feature in Visual Studio to simplify your code
Leave the Replace box empty, click on the Replace all button (the second of the two buttons to the right of the replace box), and then close the replace box by clicking on the cross in its top-right corner.
Run the console app and note the behavior is the same as before.
Importing a static type for all code files in a project
Instead of statically importing the Console class just for one code file, it would probably be better to import it globally for all code files in the project:
Delete the statement to statically import System.Console.
Open Formatting.csproj, and after the <PropertyGroup> section, add a new <ItemGroup> section to globally and statically import System.Console using the implicit using .NET SDK feature, as shown in the following markup:
Run the console app and note the behavior is the same as before.
Good Practice: In the future, for all console app projects you create for this book, add the section above to simplify the code you need to write in all C# files to work with the Console class.
Getting key input from the user
We can get key input from the user using the ReadKey method. This method waits for the user to press a key or key combination, which is then returned as a ConsoleKeyInfo value.
Let’s explore reading key presses:
Type statements to ask the user to press any key combination and then output information about it, as shown in the following code:
Run the code, press the K key, and note the result, as shown in the following output:
Press any key combination: k
Key: K, Char: k, Modifiers: 0
Run the code, hold down Shift and press the K key, and note the result, as shown in the following output:
Press any key combination: K
Key: K, Char: K, Modifiers: Shift
Run the code, press the F12 key, and note the result, as shown in the following output:
Press any key combination:
Key: F12, Char: , Modifiers: 0
Warning! When running a console app in a terminal within Visual Studio Code, some keyboard combinations will be captured by the code editor before they can be processed by your console app. For example, Ctrl + Shift + X in Visual Studio Code activates the Extensions view in the sidebar. To fully test this console app, open a command prompt or terminal in the project folder and run the console app from there.
Passing arguments to a console app
When you run a console app, you often want to change its behavior by passing arguments. For example, with the dotnet command-line tool, you can pass the name of a new project template, as shown in the following commands:
dotnet new console
dotnet new mvc
You might have been wondering how to get any arguments that might be passed to a console app.
In every version of .NET prior to version 6, the console app project template made it obvious, as shown in the following code:
The string[] args arguments are declared and passed in the Main method of the Program class. They’re an array used to pass arguments into a console app. But in top-level programs, as used by the console app project template in .NET 6 and later, the Program class and its Main method are hidden, along with the declaration of the args array. The trick is that you must know it still exists.
Command-line arguments are separated by spaces. Other characters like hyphens and colons are treated as part of an argument value.
To include spaces in an argument value, enclose the argument value in single or double quotes.
Imagine that we want to be able to enter the names of some colors for the foreground and background and the dimensions of the terminal window at the command line. We would be able to read the colors and numbers by reading them from the args array, which is always passed into the Main method, aka the entry point of a console app:
Use your preferred code editor to add a new Console App / console project named Arguments to the Chapter02 solution.
Open Arguments.csproj, and after the <PropertyGroup> section, add a new <ItemGroup> section to statically import System.Console for all C# files using the implicit usings .NET SDK feature, as shown in the following markup:
Good Practice: Remember to use the implicit usings .NET SDK feature to statically import the System.Console type in all future console app projects to simplify your code, as these instructions will not be repeated every time.
In Program.cs, delete the existing statements, and then add a statement to output the number of arguments passed to the application, as shown in the following code:
WriteLine($"There are {args.Length} arguments.");
Run the console app and view the result, as shown in the following output:
There are 0 arguments.
If you are using Visual Studio 2022:
Navigate to Project | ArgumentsProperties.
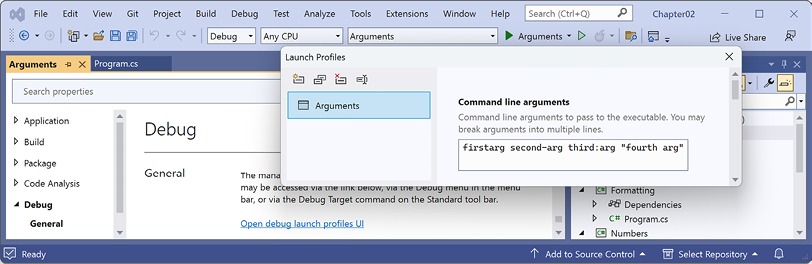
Select the Debug tab, click Open debug launch profiles UI, and in the Command line arguments box, enter the following arguments: firstarg second-arg third:arg "fourth arg", as shown in Figure 2.10:
Figure 2.10: Entering command line arguments in the Visual Studio project properties on Windows
Close the Launch Profiles window.
In Solution Explorer, in the Properties folder, open the launchSettings.json file and note it defines the command-line arguments when you run the project, as shown highlighted in the following configuration:
The launchSettings.json file can also be used by JetBrains Rider. The equivalent for Visual Studio Code is the .vscode/launch.json file.
Run the console app project.
If you are using JetBrains Rider:
Right-click the Arguments project.
In the pop-up menu, select More Run/Debug | Modify Run Configuration….
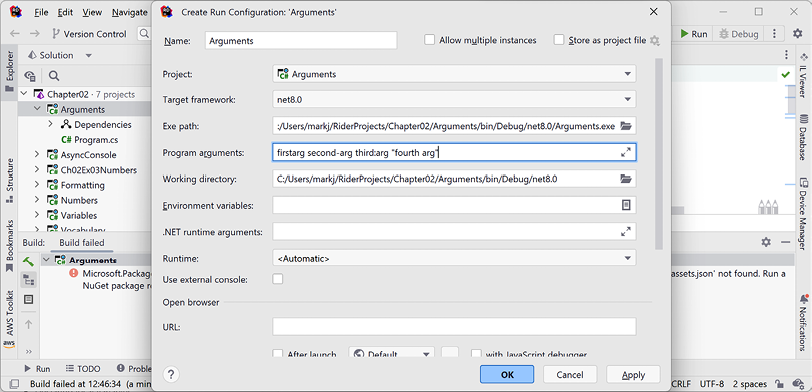
In the Create Run Configuration: ‘Arguments’ dialog box, in the Program arguments box, enter firstarg second-arg third:arg "fourth arg", as shown in Figure 2.11:
Figure 2.11: Entering command-line arguments in the JetBrains Rider run configuration
Click OK.
Run the console app.
If you are using Visual Studio Code:
In Terminal, enter some arguments after the dotnet run command, as shown in the following command:
dotnet run firstarg second-arg third:arg "fourth arg"
For all code editors:
Note the result indicates four arguments, as shown in the following output:
There are 4 arguments.
In Program.cs, to enumerate or iterate (that is, loop through) the values of those four arguments, add the following statements after outputting the length of the array:
foreach (string arg in args)
{
  WriteLine(arg);
}
Run the code again and note the result shows the details of the four arguments, as shown in the following output:
There are 4 arguments.
firstarg
second-arg
third:arg
fourth arg
Setting options with arguments
We will now use these arguments to allow the user to pick a color for the background, foreground, and cursor size of the output window. The cursor size can be an integer value from 1, meaning a line at the bottom of the cursor cell, up to 100, meaning a percentage of the height of the cursor cell.
We have statically imported the System.Console class. It has properties like ForegroundColor, BackgroundColor, and CursorSize that we can now set just by using their names without needing to prefix them with Console.
The System namespace is already imported so that the compiler knows about the ConsoleColor and Enum types:
Add statements to warn the user if they do not enter three arguments, and then parse those arguments and use them to set the color and dimensions of the console window, as shown in the following code:
if (args.Length < 3)
{
  WriteLine("You must specify two colors and cursor size, e.g.");
  WriteLine("dotnet run red yellow 50");
  return; // Stop running.
}
ForegroundColor = (ConsoleColor)Enum.Parse(
  enumType: typeof(ConsoleColor),
  value: args[0], ignoreCase: true);
BackgroundColor = (ConsoleColor)Enum.Parse(
  enumType: typeof(ConsoleColor),
  value: args[1], ignoreCase: true);
CursorSize = int.Parse(args[2]);
Note the compiler warning that setting the CursorSize is only supported on Windows. For now, do not worry about most of this code like (ConsoleColor), Enum.Parse, or typeof, as it will all be explained in the next few chapters.
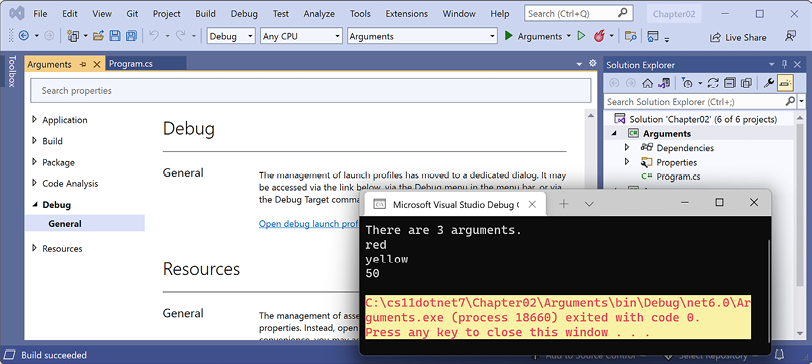
If you are using Visual Studio 2022, change the arguments to red yellow 50. Run the console app and note the cursor is half the size and the colors have changed in the window, as shown in Figure 2.12:
Figure 2.12: Setting colors and cursor size on Windows
If you are using Visual Studio Code, then run the code with arguments to set the foreground color to red, the background color to yellow, and the cursor size to 50%, as shown in the following command:
dotnet run red yellow 50
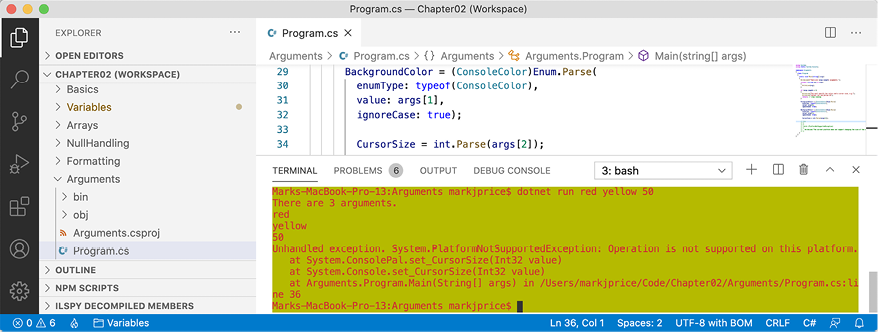
On macOS or Linux, you’ll see an unhandled exception, as shown in Figure 2.13:
Figure 2.13: An unhandled exception on unsupported macOS
Although the compiler did not give an error or warning, at runtime, some API calls may fail on some platforms. Although a console app running on Windows can change its cursor size, on macOS, it cannot, and it complains if you try.
Handling platforms that do not support an API
So how do we solve this problem? We can solve this by using an exception handler. You will learn more details about the try-catch statement in Chapter 3, Controlling Flow, Converting Types, and Handling Exceptions, so for now, just enter the code:
Modify the code to wrap the lines that change the cursor size in a try statement, as shown in the following code:
try
{
  CursorSize = int.Parse(args[2]);
}
catch (PlatformNotSupportedException)
{
  WriteLine("The current platform does not support changing the size of the cursor.");
}
If you were to run the code on macOS, then you would see the exception is caught, and a friendlier message is shown to the user.
Another way to handle differences in operating systems is to use the OperatingSystem class in the System namespace, as shown in the following code:
if (OperatingSystem.IsWindows())
{
// Execute code that only works on Windows.
}
elseif (OperatingSystem.IsWindowsVersionAtLeast(major: 10))
{
// Execute code that only works on Windows 10 or later.
}
elseif (OperatingSystem.IsIOSVersionAtLeast(major: 14, minor: 5))
{
// Execute code that only works on iOS 14.5 or later.
}
elseif (OperatingSystem.IsBrowser())
{
// Execute code that only works in the browser with Blazor.
}
The OperatingSystem class has equivalent methods for other common operating systems, like Android, iOS, Linux, macOS, and even the browser, which is useful for Blazor web components.
A third way to handle different platforms is to use conditional compilation statements.
There are four preprocessor directives that control conditional compilation: #if, #elif, #else, and #endif.
You define symbols using #define, as shown in the following code:
#define MYSYMBOL
Many symbols are automatically defined for you, as shown in Table 2.10:
Target Framework
Symbols
.NET Standard
NETSTANDARD2_0, NETSTANDARD2_1, and so on
Modern .NET
NET7_0, NET7_0_ANDROID, NET7_0_IOS, NET7_0_WINDOWS, and so on
Table 2.10: Predefined compiler symbols
You can then write statements that will compile only for the specified platforms, as shown in the following code:
#if NET7_0_ANDROID// Compile statements that only work on Android.#elif NET7_0_IOS// Compile statements that only work on iOS.#else// Compile statements that work everywhere else.#endif


 Free Chapter