In the previous recipe, you saw how data can be in something other than a traditional GIS format. It can be a standalone table that contains X and Y coordinates, along with other information. This can then be turned into points on a map. X and Y coordinates are not the only way we can identify a location.
Another even more common way to show a location is with a postal address. This is how postal carriers know where mail needed to be delivered well before the days of global navigation satellite systems such as GPS. ArcGIS Pro can also use an address to identify a location. This is called geocoding.
Simply put, geocoding is the process of converting an address or series of addresses into a location on a map or in a GIS. In this recipe, you will learn how to geocode addresses within ArcGIS Pro. This will include determining reference data in your GIS, creating an address locator, and geocoding an Inspections spreadsheet.
In this recipe, the city manager for the city of Trippville has a spreadsheet containing all the inspections recently completed by inspectors from various departments in the city. They want you to show where these inspections occurred on a map. The spreadsheet includes the address where each inspection occurred, so you will need to geocode this data.
Getting ready
To complete this recipe, you will need a spreadsheet application, such as Microsoft Excel or similar, that can open a .xlsx file. You also need to have the sample data installed. It is recommended that you complete the recipes in Chapter 1 to ensure you understand the basic terminology associated with ArcGIS Pro and how to navigate the interface. This recipe can be completed with any license level of ArcGIS Pro (Basic, Standard, or Advanced).
How to do it…
You will now work through the process needed to bring in data from a spreadsheet and then geocode it so that those locations will be displayed on a map:
- Before you start ArcGIS Pro, examine the spreadsheet containing the inspections data you will be using. Open Windows File Explorer. It should be on your Windows taskbar at the bottom of your screen and have an icon that resembles an old paper file folder in a holder.
- Select This PC or My Computer in the left panel of the File Explorer window. Then, navigate to
C:\Student\ArcGISPro3Cookbook\Chapter2.
- Locate the
Inspections.xlsx file and double-click on it to open it.
Tip
You will need an application such as Microsoft Excel or similar installed for this to work. If you do not have Microsoft Excel or a similar application, you can download and install Open Office for free. This is an open source application that has comparable functionality with Microsoft Office. You can download it from https://www.openoffice.org/download/index.html.
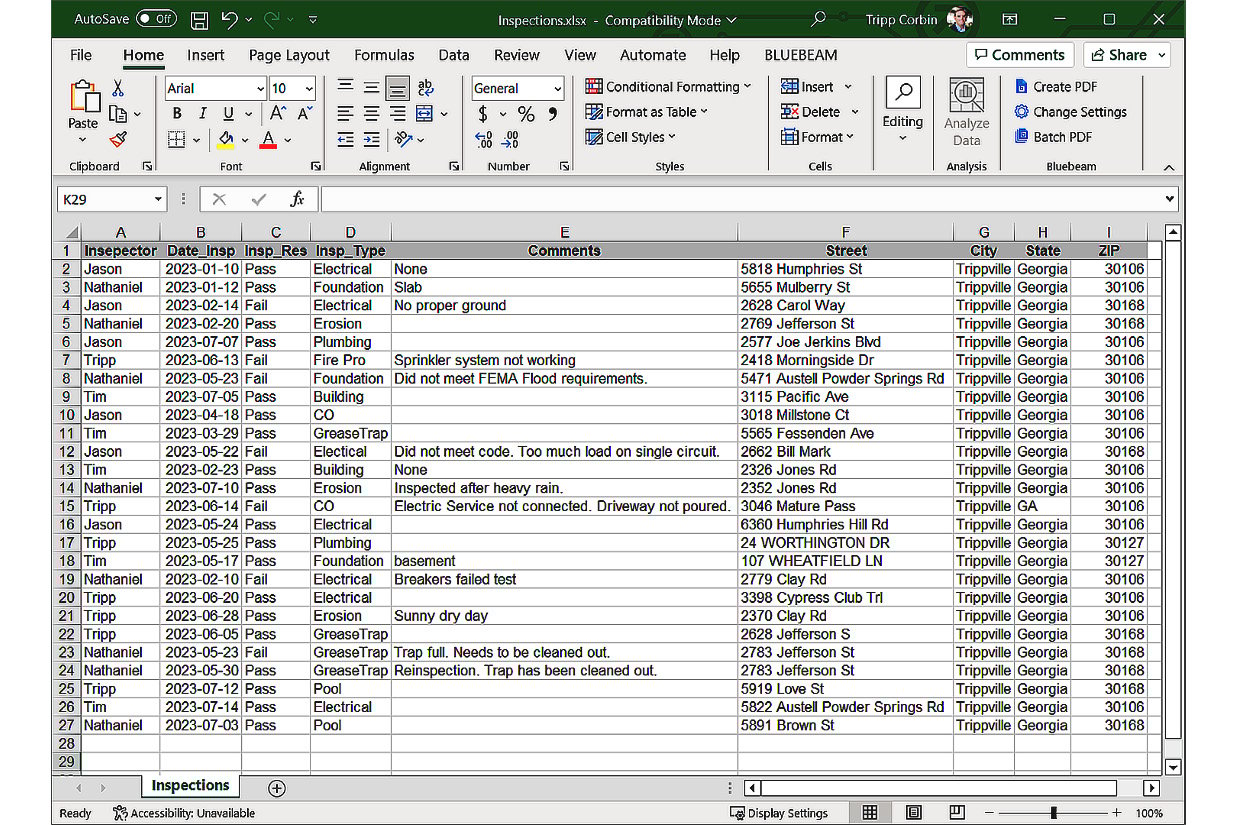
- Review the data contained in the spreadsheet you just opened. Note what columns it contains and the data in each row:
Figure 2.21 – The Inspections spreadsheet open in Microsoft Excel
This spreadsheet, provided by the city manager, represents an export from a permitting and inspections system used by the city. That system cannot display data on a map, but the city manager wants to see where inspections have been completed within the city. As you can see, the spreadsheet does include the address where the inspection took place. You will use that to geocode the location of each inspection onto a map.
Launching ArcGIS Pro and adding an Excel spreadsheet
Follow these steps to add the spreadsheet you just examined to an ArcGIS Pro project so that you can start using that data:
- Start ArcGIS Pro and open the
Geocoding.aprx project located in C:\Student\ArcGISPro3Cookbook\Chapter2. Click on the Open another project button and navigate to C:\Student\ArcGISPro3Cookbook\Chapter2. Select the desired project file (.aprx) and click OK.
- In the Catalog pane, expand the Folders option so that you can see its contents. Then, expand the
Chapter2 folder.
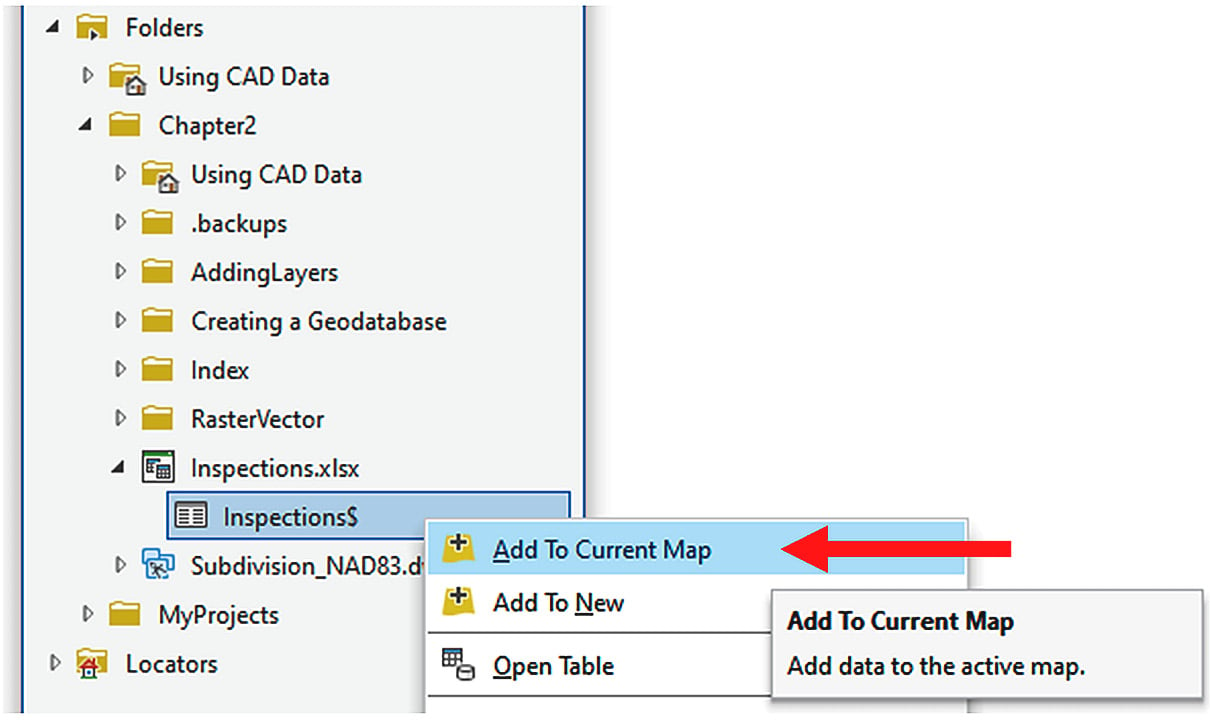
- Locate the
Inspections.xlsx file and expand it so that you can see the individual sheets included in the file. Right-click on the Inspections$ sheet and select Add To Current Map, as shown in the following screenshot:
Figure 2.22 – Adding a spreadsheet to the current map from the Catalog pane
You have just added the spreadsheet you examined to your map so that you can geocode it.
Creating an address locator
Before you can geocode the data in the spreadsheet, you will need to create a locator. Geocoding in ArcGIS Pro requires three components if you are using just your own data. You will need the table you want to geocode, the reference data in your GIS that contains address information, and a locator.
Reference data is typically road centerlines, address points, or parcel polygons. Address points typically provide the greatest level of accuracy. This is followed by parcel polygons. The least accurate is road centerlines.
The locator is the translator between your source data and the data you are trying to geocode. It provides basic settings and options required to geocode. Several styles of locators are dependent on your reference data and how the address information is formatted.
So, before you can create your locator, you must first identify your source data. This will be a GIS layer that already contains address information:
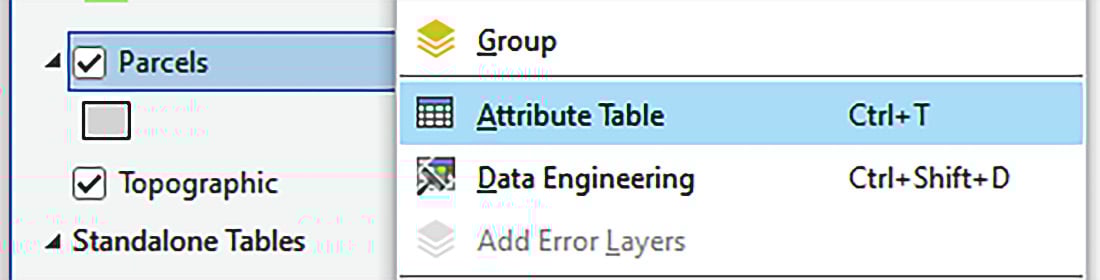
- Since there is no address point layer in the
Trippville_GIS.gdb geodatabase, you know that will not be your reference data. You do have parcel polygons, so right-click the Parcels layer in the Contents pane and select Attribute Table:
Figure 2.23 – Opening the Parcels layer attribute table
- Examine the attribute table for the
Parcels layer to determine whether it contains address data. Review the field names contained in the table, along with the data itself.The Parcels layer does include some address information. It has the street name, street number, and street suffix fields. However, the data is incomplete. Also, it is missing other information that is typically included in a complete address. Therefore, the parcels layer is not well-suited to be your reference layer. It’s time to look at the street centerlines to see whether they have more complete address information.
- Close the attribute table for the
Parcels layer you just reviewed.
- Open the attribute table for the
Street Centerlines layer using the same process you did for the Parcels layer.
- Review the
Street Centerlines attribute table to see whether it includes the data needed to identify a complete address. You may need to scroll over to see the entire table.The Street Centerlines layer does have more complete address information. It has address ranges for both the left and right sides of the road. It also has fields for the road name and type. In addition, it has fields for the ZIP code and city on the left and right sides of each road. This is enough information to create complete addresses. So, the Street Centerlines layer is the best choice as your reference layer, even if it might not produce the most accurate data points. Now, you are ready to create your locator.
- Close the
Street Centerlines attribute table.
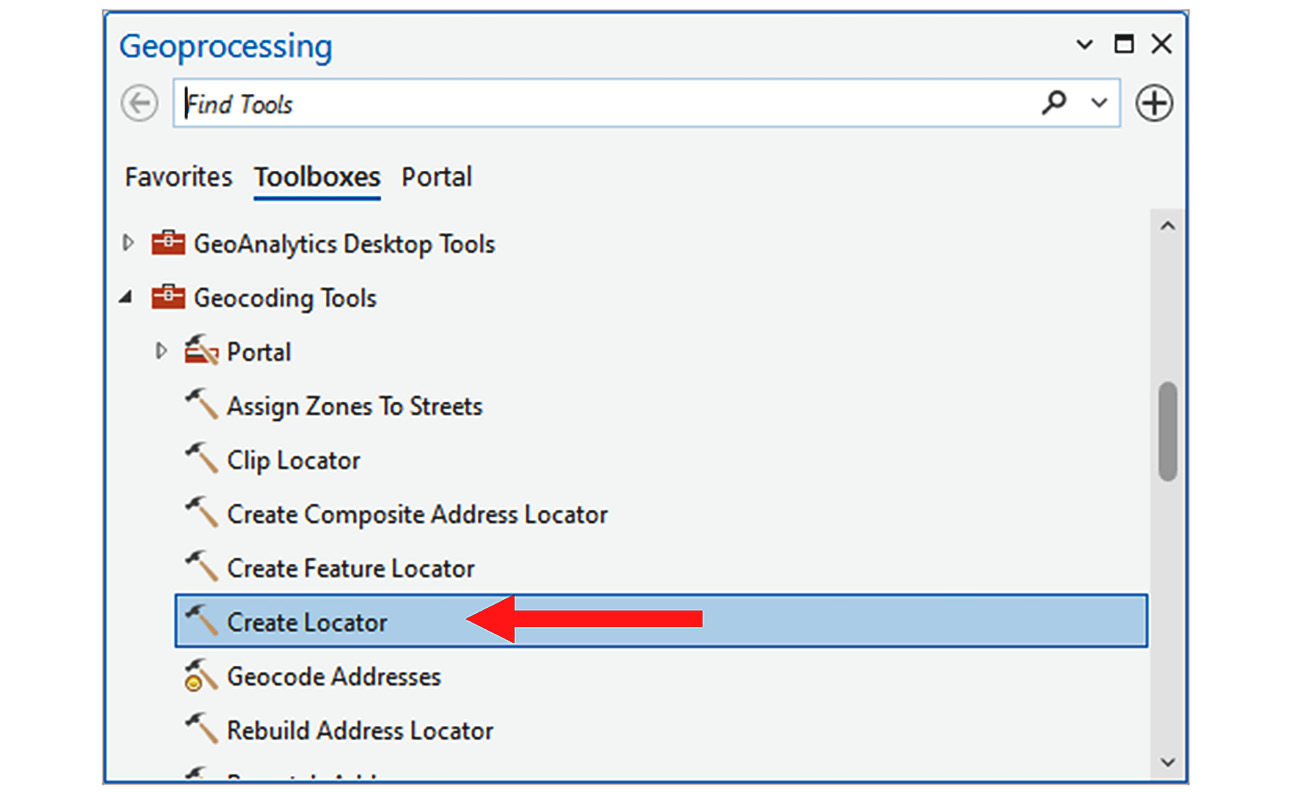
- Click the Analysis tab in the ribbon. Then, click the Tools button to open the Geoprocessing window.
- Click the Toolboxes tab at the top of the Geoprocessing pane. Then, scroll down and locate the Geocoding Tools toolbox.
- Expand the Geocoding Tools toolbox and click on the Create Locator tool, as shown in the following screenshot:
Figure 2.24 – Accessing the Create Locator tool in the Geoprocessing pane
- In the Create Locator tool, set Country or Region to
United States using the drop-down arrow.
- Set Primary Table(s) to
Street Centerlines using the drop-down arrow. Then set Role to Street Address, also using the drop-down arrow. You should see Field Mapping options appear when you do this.
Information
Field mapping allows you to identify which fields in the primary table you want the locator to consider when you geocode your data. Those with an asterisk (*) before the field name are required. Those without an asterisk are not required by the locator to work but might improve your geocoding results if you have them. To learn more about the Create Locator tool, go to https://pro.arcgis.com/en/pro-app/latest/tool-reference/geocoding/create-locator.htm.
- Using the drop-down arrows, set the following field mapping values:
- Left House Address From:
L_F_ADD - Left House Address To:
L_T_ADD - Right House Address From:
R_F_ADD - Right House Address To:
R_T_ADD - Prefix Direction:
PREFIXDIR - Street Name:
NAME - Left City:
GEONAME_L - Right City:
GEONAME_R - Left State:
STATE_L - Right State:
STATE_R - Left Zip:
POSTAL_L - Right Zip:
POSTAL_R - Country:
COUNTRY
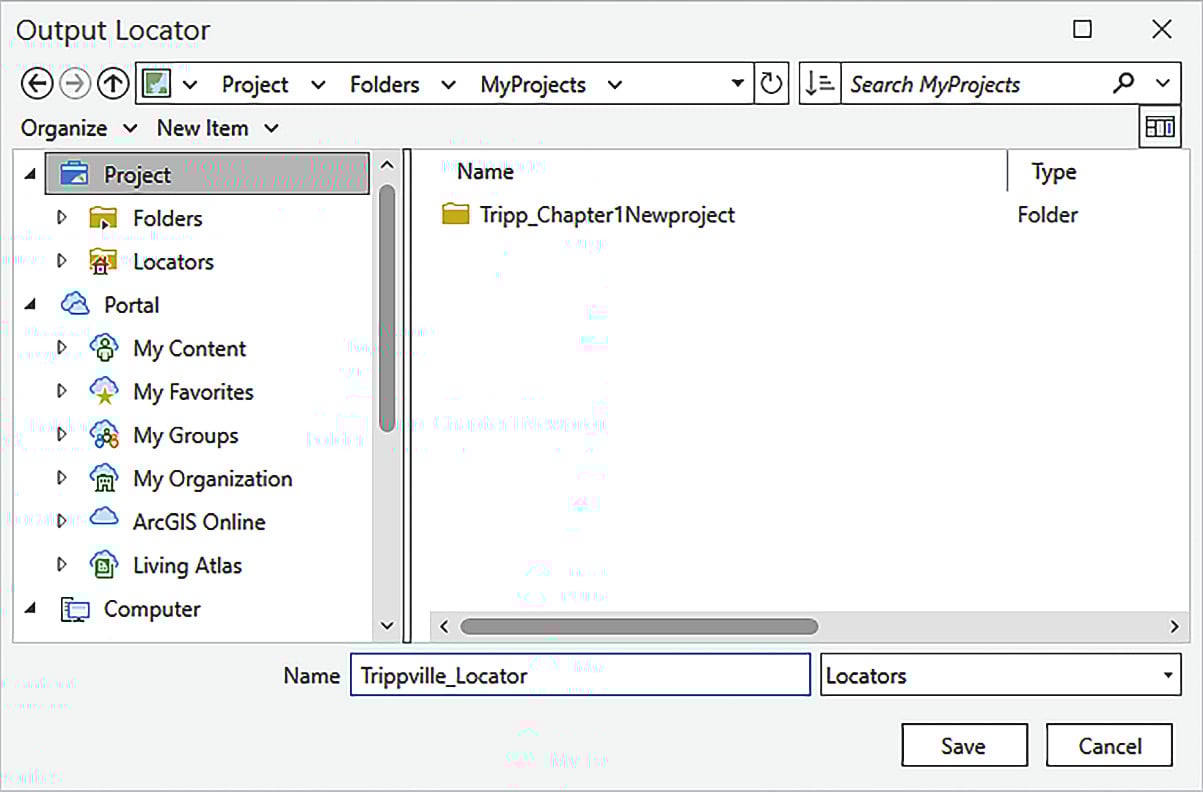
- For Output Locator, click on the Browse button. Then, navigate to
C:\Student\ArcGISPro3Cookbook\MyProjects.
- Name the new locator
Trippville_Locator, as shown in the following screenshot, and click Save:
Figure 2.25 – Naming the new locator and creating it
- Set Language Code to
English using the drop-down arrow. Then, click the Run button.
Information
If the tool completes but has warnings, you can ignore them for the sake of this recipe. In a real-world situation, you would want to investigate the warnings and determine whether they will affect your ability to use the locator successfully. If they negatively affect the use of the locator, you will need to fix the issues causing the warning. In this case, most of the issues involve street centerlines located outside the city limits for Trippville so that they do not impact the use of the locator within the city.
- Close the Geoprocessing pane once the tool completes.
Adjusting address locator settings
Now that you created the address locator, you will need to adjust some of the property settings to improve the final results when you geocode the spreadsheet of addresses:
- In the Catalog pane, expand the Locators option to reveal its contents. You should see the new locator you just created. This means it is now available for you to use in your project.
- In the Catalog pane, right-click on the
Trippville_Locator locator you just created and select Properties from the menu that appears.
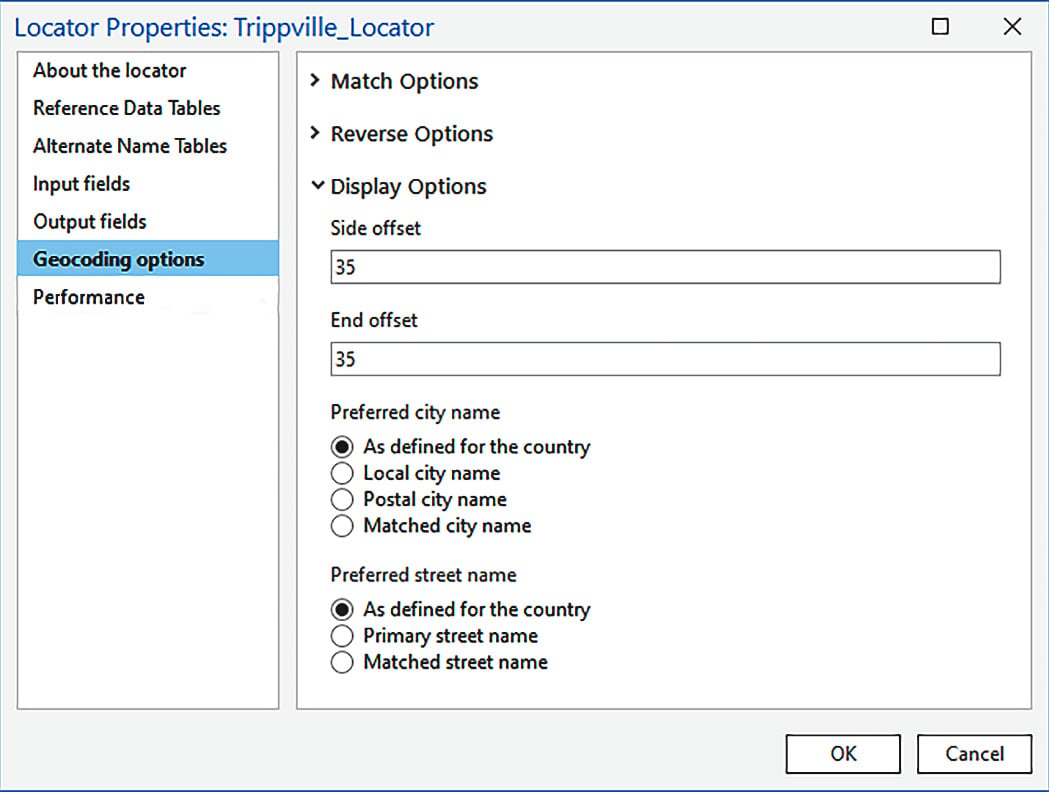
- In the Locator Properties window, select Geocoding options from the left panel.
- In the right panel of the Locator Properties window, expand Display Options.
- Set the Side Offset and End Offset parameters to
35.
Information
Side Offset is how far off the centerline the geocoding process will create a new point along the edge of the centerline. End Offset works similarly but is at the end of the line segment. Since we know most of the street rights-of-way are between 50 and 60 feet, 35 should put the point on or close to the parcel it belongs on.
- Verify that your Locator Properties window looks like what’s shown in the following screenshot and click OK:
Figure 2.26 – Locator Properties with adjusted settings
Geocoding the spreadsheet data
You are now ready to geocode the address locations shown in the spreadsheet you reviewed at the start of the recipe. This will create points in the map at the address locations:
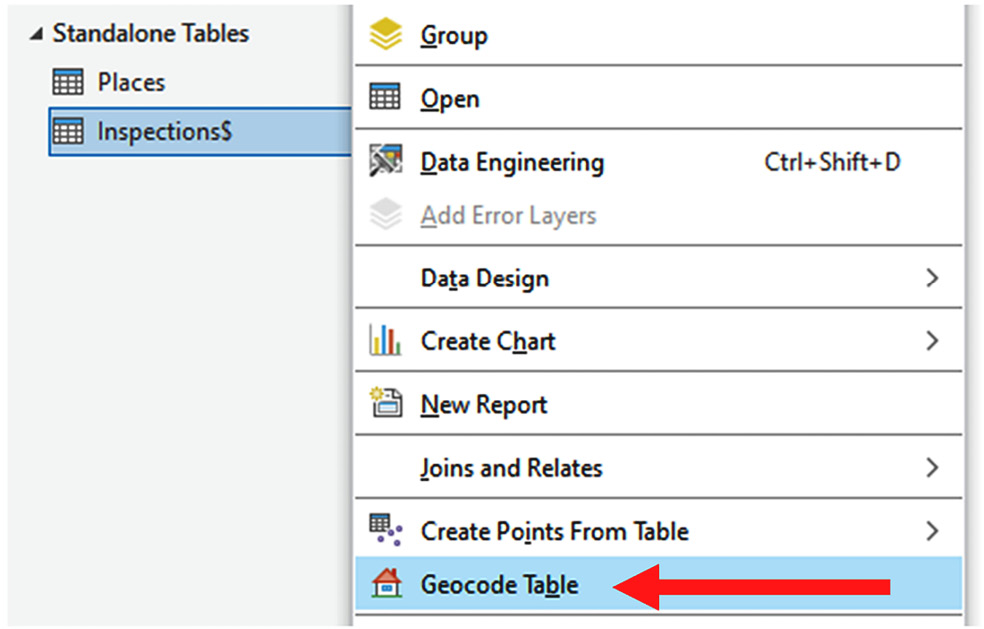
- In the Contents pane, right-click on the
Inspections$ table and select Geocode Table from the menu that appears, as illustrated in the following screenshot:
Figure 2.27 – Selecting Geocode Table from the Contents pane
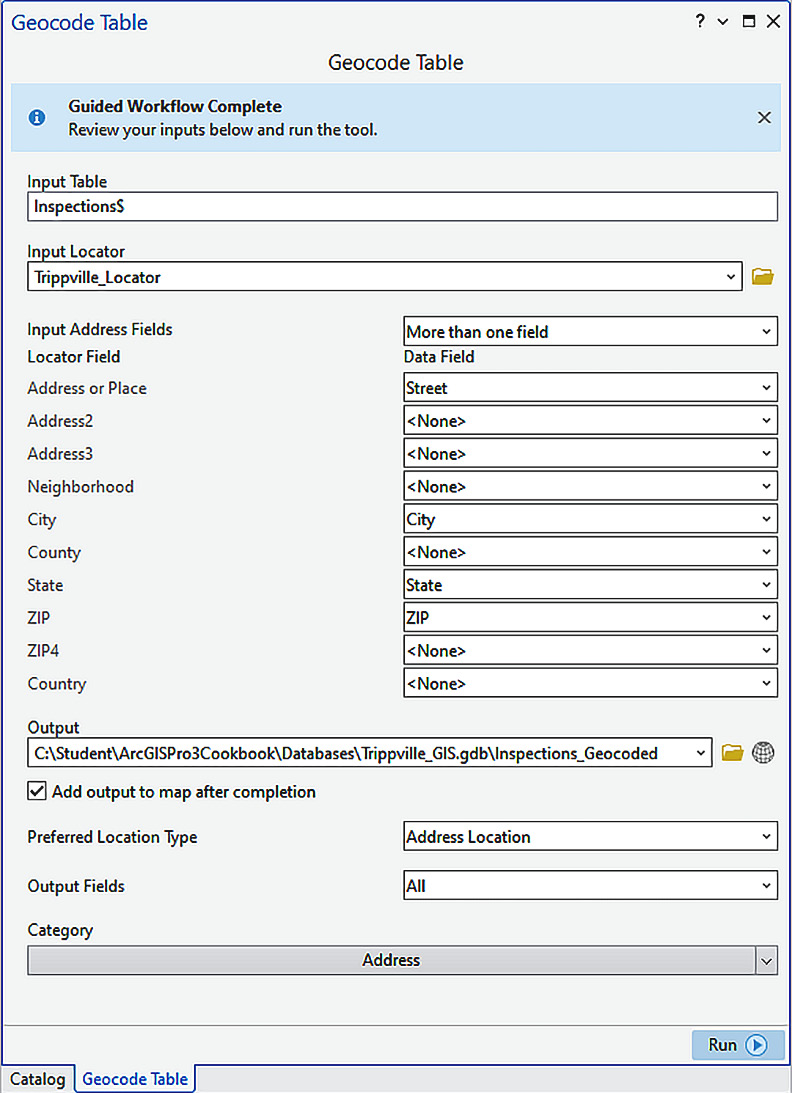
- The Geocode Table tool will open. Initially, it will show you a list of steps the tool requires to complete the process. Scroll down and click Start.
- Set Input Locator to
Trippville_Locator using the drop-down arrow. Then, click Next.
- Verify that Input Table is set to
Inspections$, which it should be because you right-clicked on that table to start this process.
- Scroll down in the tool and verify that it is set to
More than one field. Then, click Next.
- Verify that the input address fields are set as follows:
- Address or Place:
Street - City:
City - State:
State - ZIP:
ZIP - All others:
<None>
- Click Next.
- In Step 4 of the Geocode Table tool, set the Output by clicking the Browse button. Then, select the Databases option under Project in the left panel of the Output window.
- Double-click the
Trippville_GIS.gdb geodatabase in the right-hand panel of the Output window.
- In the Name field, type
Inspections_Geocoded and click Save.
- Verify that Add output to map after completion is checked.
- Set Preferred Location Type to
Address location using the drop-down arrow and set Output fields to All. Then, click Next.
- Under Step 6: Limit by Category, set Category to
Address by clicking the checkbox. Then, click Finish. This might be listed as Step 5 of 5 at the bottom of the tool. This isn’t a cause for concern.
- Review your input in the Geocode Table tool and ensure it matches what’s shown in the following screenshot. Then, click Run:
Figure 2.28 – The Geocode Table tool with completed parameters
When the tool completes, a new window will appear showing you the results. Luckily, you don’t have any unmatched locations. A new layer should appear on your map showing the results of your geocoding efforts.
- In the Geocoding Complete window, select No when you’re asked to start the rematch process and close the Geocode Table tool.
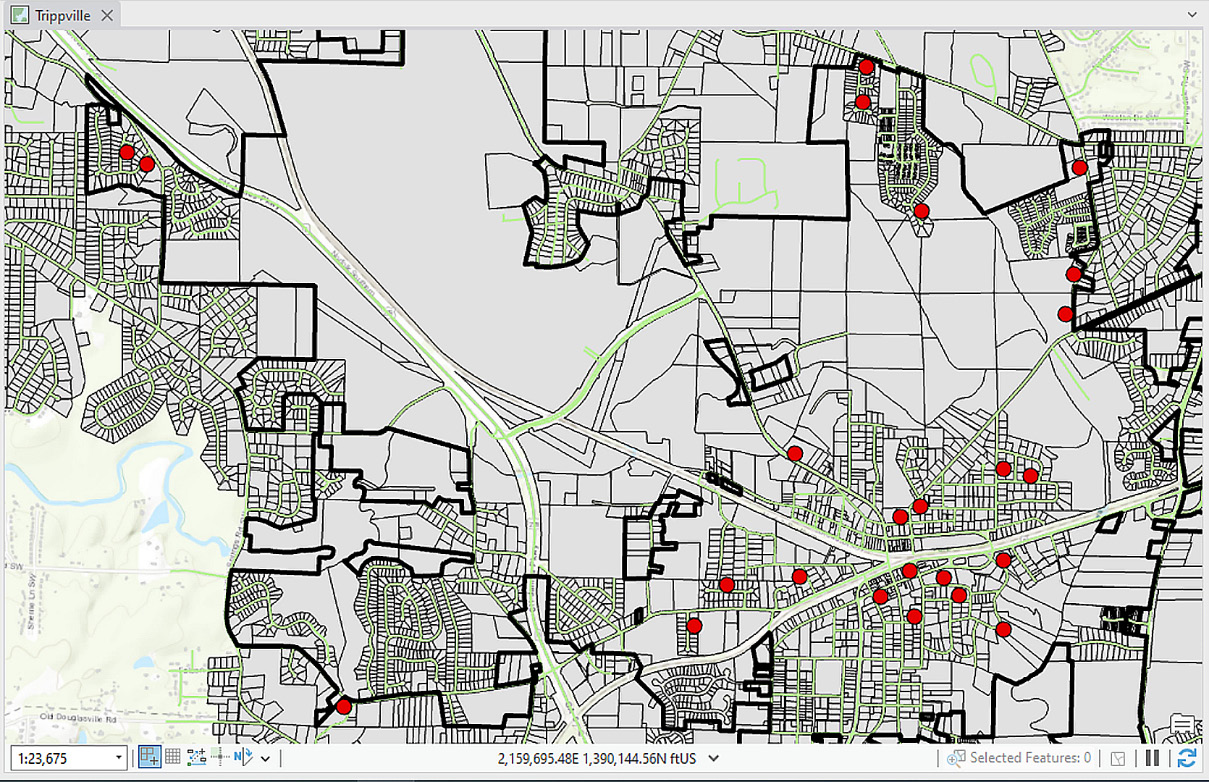
- Now, examine your results more closely. In the Contents pane, right-click on the
Inspections_Geocoded layer and select Zoom to Layer. Your map should look similar to the following:
Figure 2.29 – Map zoomed into the geocoding results
- Using the skills you have learned in this chapter, open the attribute table for the
Inspections_Geocoded layer. Examine the table to see what fields and data it contains.When you examine the attribute table, you should recognize several of the fields as coming from the Inspections$ table you geocoded. You will also see several fields that were created by the geocoding process. This includes Status, Score, Match_type, and many more. The Status, Score, and Match_type values are calculated from the Geocode Table tool. The Status field will contain one of three values – M = Match, T = Tie, or U = Unmatched. The Score field indicates how well the address in the input table (Inspections$) matched the reference data (Street Centerlines) used by the locator. It will be between 1 and 100, with 100 being a perfect match. Match_type is how the location was geocoded. A is automatic and M is manual.
- Close the attribute table once you’ve finished reviewing it.
- Save your project and close ArcGIS Pro.
You have successfully geocoded the data in an Excel spreadsheet so that it is displayed on a map.
How it works…
In this recipe, you geocoded a spreadsheet of inspections that had been exported from a permitting and inspections system that was external to your GIS. To do this, you had to determine a reference layer. This reference layer was a GIS layer that contained address data. You examined the Parcels and Street Centerline layers to determine which one would be the best reference layer. You determined that the Street Centerlines layer was best due to the completeness of the address information.
Then, you created a new locator that allowed you to use the centerlines for reference. You used the Create Locator geoprocessing tool found in the Geocoding Tools toolbox to do this.
Once the locator was created, you were able to geocode the Inspections spreadsheet. This created a new point layer in your map showing the locations of the inspections.


 Free Chapter