Sign In Start Free Trial
Account

Add to playlist

Create a Playlist

Modal Close icon
You need to login to use this feature.
  • Book Overview & Buying Learning Salesforce Lightning Application Development
  • Table Of Contents Toc
  • Feedback & Rating feedback
Learning Salesforce Lightning Application Development

Learning Salesforce Lightning Application Development

By : Mohit Shrivatsava
4.1 (13)
close
close
Learning Salesforce Lightning Application Development

Learning Salesforce Lightning Application Development

4.1 (13)
By: Mohit Shrivatsava

Overview of this book

Built on the Salesforce App Cloud, the new Salesforce Lightning Experience combines three major components: Lightning Design System, Lightning App Builder, and Lightning Components, to provide an enhanced user experience. This book will enable you to quickly create modern, enterprise apps with Lightning Component Framework. You will start by building simple Lightning Components and understanding the Lightning Components architecture. The chapters cover the basics of Lightning Component Framework semantics and syntax, the security features provided by Locker Service, and use of third-party libraries inside Lightning Components. The later chapters focus on debugging, performance tuning, testing using Lightning Testing Services, and how to publish Lightning Components on Salesforce AppExchange.
Table of Contents (17 chapters)
close
close

Lightning Experience

Lightning Experience is new Salesforce user interface. As a developer, to explore Lightning Experience, all you need is a free Salesforce developer instance. You can sign up for a developer instance at https://developer.Salesforce.com/signup.

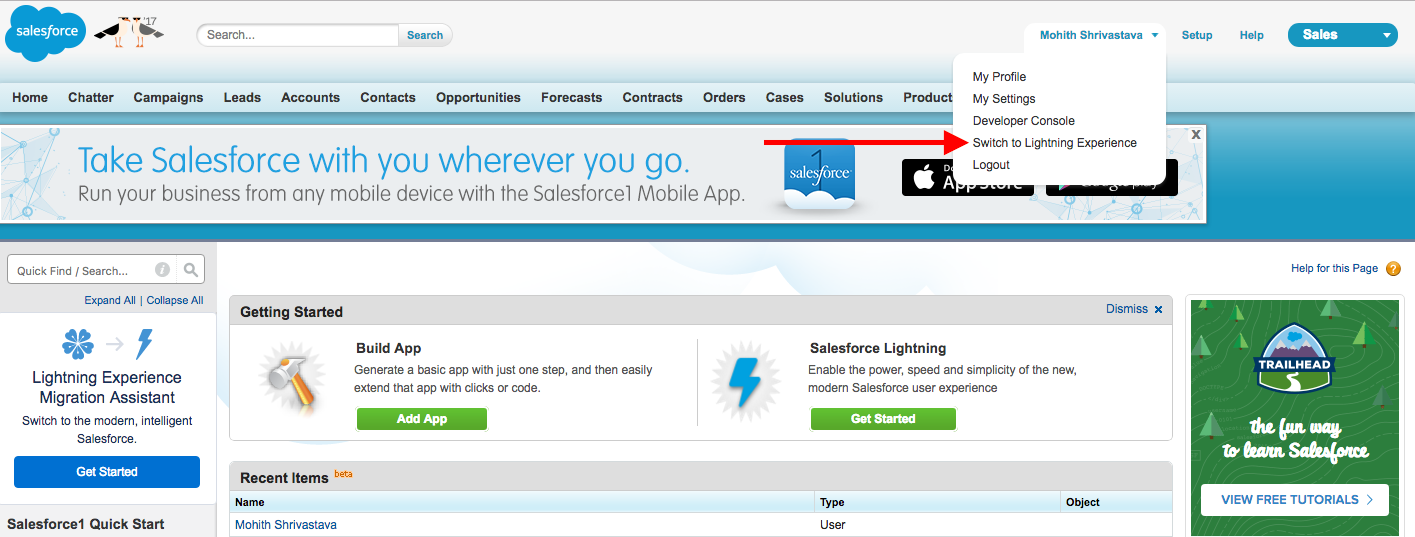
If you already have one of these instances, you can switch to Lightning Experience. To see how to switch to Lightning Experience from Classic, please check out the following screenshot:

This shows how one can switch to Lightning Experience From Classic Salesforce
In some instances, one would need to enable Lightning Experience. Once Lightning Experience is enabled, you will notice the Switch To Lightning Experience link.

Lightning Experience, like Salesforce Classic, consists of applications (Apps), Tabs, List views, and Detail Record View pages. Additionally, beyond all these, the Lightning UI provides the following additions:

  • App Builder for Salesforce administrators to drag and drop Lightning Components 
  • Lightning Utility Bar (located at the footer)
  • The ability to create Kanban views 
  • The ability to calendar custom objects

Let's examine each of these views with some screenshots and further explore the various ways a Salesforce administrator can customize them with Lightning Components.

Custom Lightning Components can also be installed by administrators from the Salesforce application store, known as AppExchange. To explore the components available on Salesforce AppExchange, visit https://appexchange.Salesforce.com/components.

Lightning Application

The App Launcher allows you to switch between different Salesforce applications.

The following screenshot shows the App Launcher. All of the applications are represented by cards:

App Launcher helps to switch between apps

The setup  link for Lightning Experience takes you to the standard Setup page for Salesforce administrators to execute admin-related tasks. The following screenshot shows the Setup menu:

This shows how one can navigate to Setup Screen from the Setup Menu

Once in the Setup menu, find App Manager from the search box. A new Lightning app can be created using the New Lightning App button, and if the application is Classic, you can upgrade it to a Lightning Application.

Creating a Lightning Application

To create a Lightning Application, follow the steps from the App Launcher:

  1. Click on the New Lightning App button.
  2. Follow the prompt and enter the name of the application (note that the developer name gets auto-populated once you click on the Developer Name field), description, and configure App Branding:
  1. Choose between a console app and a standard app. 
  1. Optionally, select Utility Bar items. Utility bars are used to carry quick functionalities that need to be accessed quickly, such as taking notes during sales calls, or quickly finding contact details when a service representative is on a call with a customer.
  2. Select the Navigation tab:
  1. Select the profiles that the application will have access to:
The process of upgrading a classic application to Lightning involves the same steps as highlighted in this section. Classic apps in Salesforce do not appear in Lightning Experience unless you upgrade them.

Creating tabs in Lightning Experience

The creation of a Lightning tab can be achieved by searching for Tabs in the Setup menu. The navigation path for the creation of a tab is Setup | User Interface | Tabs.

The following screenshot shows the tab creation screen:

Screenshot shows Custom Tab Creation Screen In Setup Menu
The creation of Custom Object Tabs, Web Tabs, and Visualforce Tabs is very similar to in Salesforce Classic, and they appear as navigation based on the profile and application assigned.

Lightning Component Tabs

A custom Lightning Component can be assigned as a Lightning Component tab. The component must implement a force:appHostable interface for it to appear as a Lightning Component tab.

Lightning Page Tabs

Lightning page tabs are created from a Lightning page using the App Builder.

From the Setup menu, navigate to User Interface | Lightning App Builder. The screenshot that follows shortly shows the navigation path for finding the Lightning App Builder.

There are three different types of Lightning pages, explained in the following table:

Lightning Page Type Description
App Page  Used to create an app's navigation for Lightning Experience and Salesforce 1 
Home Page  Used to customize the Home Page of Lightning Experience
Record Page  Used to customize the Record Page of Lightning Experience


The following screenshot shows the selection options when choosing the type of Lightning page:

A Lightning page comprises multiple Lightning Components. You can use a combination of standard Lightning Components, custom-built Lightning Components, and components installed from Salesforce AppExchange.

There are also multiple options to choose the type of layout for a Lightning page. The following screenshot shows the various options:

Lightning App Builder

Lightning App Builder allows administrators to drag and drop various standard and custom components to create a Lightning page.

The following screenshot shows the Lightning App Builder screen that administrators use to create a Lightning page:

Screenshot shows the Lightning App Builder Screen

Once a Lightning page is saved, the activation screen provides options to configure the profile for the page.

On the Record Page, the assignment configuration can be understood with the help of the following screenshot:

Clearly, one overrides the other. ORG DEFAULT is the top level, followed by APP DEFAULT, and then by APP, RECORD TYPE, AND PROFILE.

Lightning Utility Bar

In a Lightning Application, you can add Lightning Components to the horizontal footer. This can be very useful for adding productive tools such as a simple calculator, reports, recent items, a Computer Telephony Interface (CTI) softphone, and any other quick access tools that your sales or support representatives might find useful.

To make a Lightning Components available as a utility, the component must implement the flexipage:availableForAllPageTypes interface.

We will explore all of the interfaces later, as we learn how to build Lightning Components.

The following screenshot shows how you can edit a Lightning Application from the App Manager and add a Utility Bar to a Lightning Application:

The horizontal footer is where Components added to the Utility Bars are displayed. You can control the height and width of utility components, and their ability to load in the background.

The following screenshot shows a utility Component added to a sales application:

List views in the Lightning UI

List views in Lightning Components are similar to those in Salesforce Classic, but with some additional capabilities, such as creating a Kanban view, using quick charts to display data in graph format, inline editing, adding filters, sorting, and the ability to take mass actions.

In List views, currently, there is no way to overwrite an object List view with a custom Lightning Components.

The following screenshot shows functionalities present on the List view that can help end users to visualize data and perform actions on it:

 Screenshot shows the All Opportunities List View 

Note that the New Edit and View buttons can also be overridden with a custom Lightning Component. To override these standard buttons and views, the navigation path is Setup | Object Manager | <select object> | Button, Links, and Actions. The following screenshot shows how you can override the New button (a similar screen appears for other overrides):

Screenshot shows how you can override New button on Account with a Custom Lightning Component 
To override New, Edit, or View, the Lightning Component must implement the Lightning:actionOverride interface.

The ability to calendar data in the Date and Datetime fields

Lightning Experience provides end users with the ability to calendar any object. The following screenshot shows how you can use the Calendar tab to calendar data across objects. The user can follow the prompts and select Field for Start and Field Name to Display to create a calendar:

Global Actions

Global Actions are available on all pages. The following screenshot shows Global Actions:

You can also create a new custom global action by using a custom Lightning Component. The navigation path from set up manager page is Setup | Global Actions.

The following screenshot shows how you can add a custom Global Action using a Lightning Component:

For custom Global Actions to appear, the Salesforce administrator needs to add the action to Publisher Layouts. The navigation path for Publisher Layouts is Setup | Global Actions | Publisher Layouts.

Publisher actions

Publisher actions are available in Salesforce 1 and Lightning Experience, and these are object-specific and available on the Object Detail Lightning page.

To create a publisher action, you can use the Object Manager tab from the Setup menu. The navigation path is Setup | Object Manager | <select object>| Buttons, Links, and Actions.

The following screenshot shows how you can create a publisher action for an Account object using a custom Lightning Component:

The Publisher Action also needs to be configured based on the page layout. This can be achieved via Object Manager. The following screenshot shows how you can configure a custom publisher action:

The Screenshot shows Page Layout Editor In Lightning Experience

Create a Note

Modal Close icon
You need to login to use this feature.
notes
bookmark search playlist download font-size

Change the font size

margin-width

Change margin width

day-mode

Change background colour

Close icon Search
Country selected

Close icon Your notes and bookmarks

Delete Bookmark

Modal Close icon
Are you sure you want to delete it?
Cancel
Yes, Delete

Delete Note

Modal Close icon
Are you sure you want to delete it?
Cancel
Yes, Delete

Edit Note

Modal Close icon
Write a note (max 255 characters)
Cancel
Update Note

Confirmation

Modal Close icon
claim successful

Buy this book with your credits?

Modal Close icon
Are you sure you want to buy this book with one of your credits?
Close
YES, BUY