Sign In Start Free Trial
Account

Add to playlist

Create a Playlist

Modal Close icon
You need to login to use this feature.
  • Book Overview & Buying Build Supercomputers with Raspberry Pi 3
  • Table Of Contents Toc
  • Feedback & Rating feedback
Build Supercomputers with Raspberry Pi 3

Build Supercomputers with Raspberry Pi 3

By : Carlos R. Morrison
4.3 (7)
close
close
Build Supercomputers with Raspberry Pi 3

Build Supercomputers with Raspberry Pi 3

4.3 (7)
By: Carlos R. Morrison

Overview of this book

Author Carlos R. Morrison (Staff Scientist, NASA) will empower the uninitiated reader to quickly assemble and operate a Pi3 supercomputer in the shortest possible time. The lifeblood of a supercomputer, the MPI code, is introduced early, and sample MPI code provides additional practice opportunities for you to test the effectiveness of your creation. You will learn how to configure various nodes and switches so that they can effectively communicate with each other. By the end of this book, you will have successfully built a supercomputer and the various applications related to it.
Table of Contents (13 chapters)
close
close
6
6. Creating a Mountable Drive on the Master Node
12
A. Appendix

Preparing the master node


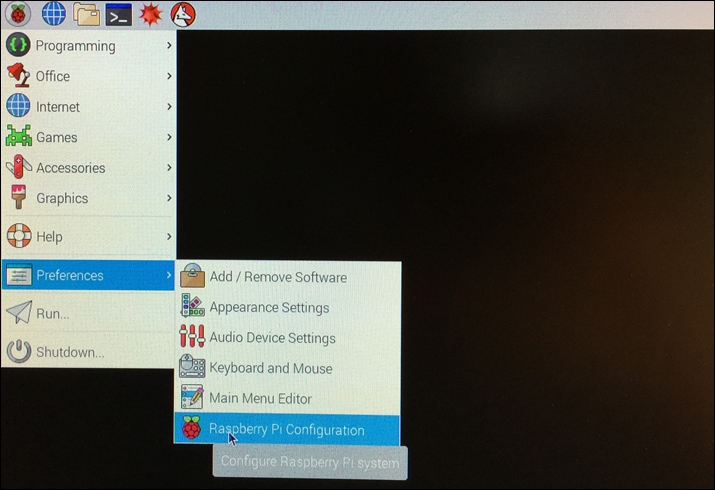
During bootup, select the US or (whatever country you reside in) keyboard option located at the middle-bottom of the screen. After bootup completes, start with the following screenshot. Click on Menu, and then Preferences. Select Raspberry Pi configuration (see the following screenshot):

Menu options

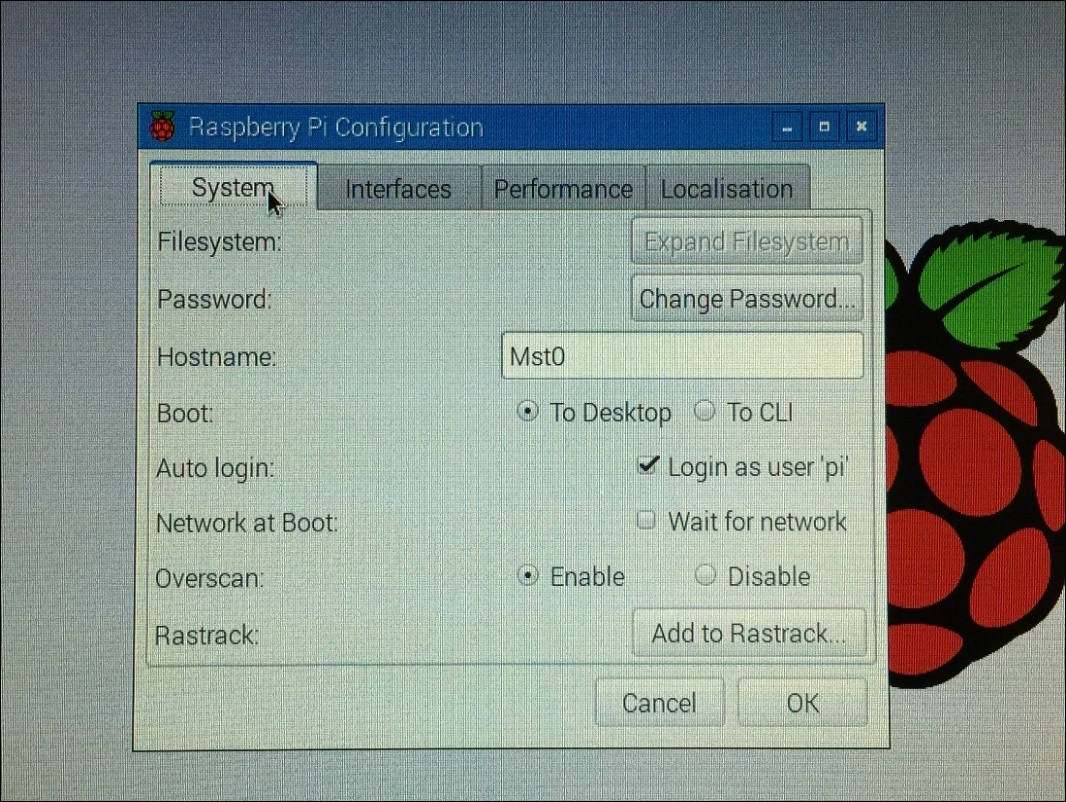
The System tab appears (see the following screenshot). Type in a suitable Hostname for your master Pi. Auto login  is already checked:

System tab

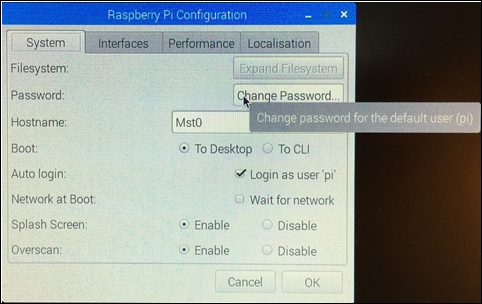
Go ahead and Change Password to your preference (see the following screenshot):

Change password

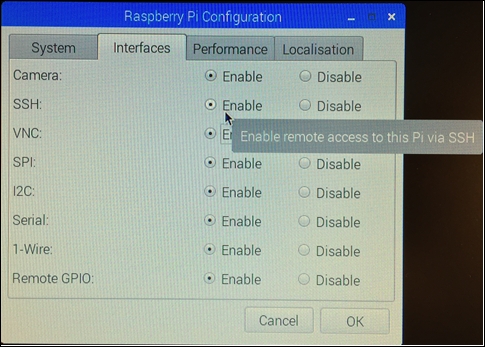
Select the Interfaces tab (see the following screenshot). Click  Enable on all options, especially Secure Shell (SSH), as you will be remotely logging into the Pi2 or Pi3 from your main PC. The other options are enabled for convenience, as you may be using the Pi2 or Pi3 in other projects outside of supercomputing:

Interface options

The next important step is to boost the processing speed from 900MHz to 1000 MHz or 1 GHz (this option...

Unlock full access

Continue reading for free

A Packt free trial gives you instant online access to our library of over 7000 practical eBooks and videos, constantly updated with the latest in tech

Create a Note

Modal Close icon
You need to login to use this feature.
notes
bookmark search playlist download font-size

Change the font size

margin-width

Change margin width

day-mode

Change background colour

Close icon Search
Country selected

Close icon Your notes and bookmarks

Delete Bookmark

Modal Close icon
Are you sure you want to delete it?
Cancel
Yes, Delete

Delete Note

Modal Close icon
Are you sure you want to delete it?
Cancel
Yes, Delete

Edit Note

Modal Close icon
Write a note (max 255 characters)
Cancel
Update Note

Confirmation

Modal Close icon
claim successful

Buy this book with your credits?

Modal Close icon
Are you sure you want to buy this book with one of your credits?
Close
YES, BUY