A glance at the Raspberry Pi board
Before we get started, it's time to reintroduce our good friend, the Raspberry Pi. Kudos to the designers of the board, who have packed everything we need to accomplish our projects in a credit-card-sized printed circuit, also called a credit-card-sized single-board computer. There are two versions of Raspberry Pi: Raspberry Pi 1 and Raspberry Pi 2. Due to earlier developments, the Raspberry Pi 1 family consists of model A, model A+, model B, and model B+. The recently launched model is Raspberry Pi 2, the new addition to the model B category. Nowadays, the most widely used Raspberry Pi is model B+, which is also called the original Raspberry Pi board in the Raspberry Pi 1 family. The predecessor of the Raspberry Pi models B and B+ was model A, which is not widely used in the hobbyist space compared to other models such as A+ and B+. If you are not aware of the specifications of these boards, take a look at the complete comparison in the following table, which contains the comparable parameters of the current models of Raspberry Pi 1 and 2. Then you can choose a board that you want.
Raspberry Pi 1 has a Broadcom BCM2835 processor with a 256 MB or 512 MB RAM on top of it. The processors and RAM are integrated as
Package on Package (POP). On the other hand, Raspberry Pi 2 has a Broadcom BCM2836 processor, which comes with a 1024 MB RAM interfaced beneath the board. Raspberry Pi 1 model A+ is still loved by minimal RasPi users who need low-powered performance when they are running on batteries. There's lots of good stuff here: RAM states the temporary memory available to run the current processes and applications. Multimedia processing ensures smooth graphical processing to run high-resolution videos through HDMI and video-extensive applications on Raspberry Pi.
Note
We have already decided to make the Raspberry Pi our friend, and like all our friends, it requires a unique and cool name so that we can call it easily when we need it. I would like to call it a RasPi, so throughout the book, whenever you are referring to the name RasPi, it's your buddy, Raspberry Pi.
Your new friend has all the capabilities that your computer has. The RasPi can be used to understand how a computer works, to learn programming, for word processing, and for gaming. Here are the small and shiny hacks that we can do with RasPi:
- Do you want to watch your favorite high-definition movie just by connecting a display to it? You can do this.
- Do you want to use RasPi as a web server, where you can run your websites? Not a problem with RasPi.
- Do you have a vacation and want to play video games, such as Minecraft? You can try using RasPi.
- Do you want to use it as your point-and-shoot digital camera while you are going to visit a zoo this weekend? Easy!
- You can even make your own robot or quadcopter using the RasPi. Wow!
All of these features come in such a small piece of board.
Note
Does this make you excited? Obviously, yes! There are such numerous applications that we can build with the RasPi, but they are out of the scope of this book.
Because of its ability to interact with the outside world, the major applications developed using RasPi include recognizing the surrounding parameters using sensors and converting them into useful data to analyze and control the appliances that we are going to experiment in the upcoming chapters.
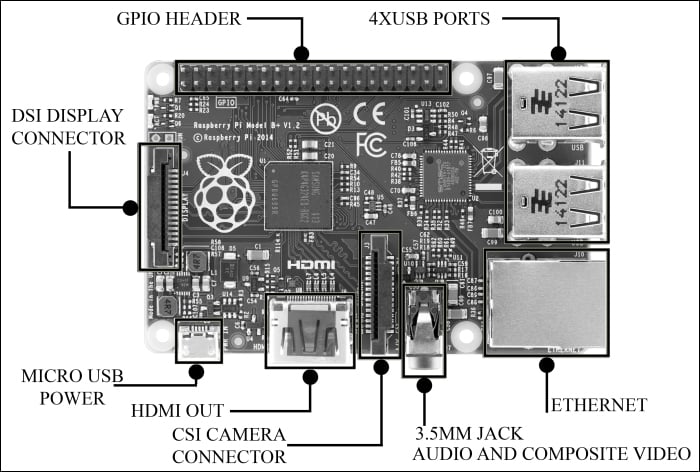
I assume that you have the RasPi (model B or B+) in your hand, and you might be wondering what are the different connectors and electronic elements on the board. Rather than introducing the jargon of specifications, I will introduce what we need to make our projects. Take a look at the different connectors in the following diagrams. The nomenclature presented here will be used throughout the book.
The Raspberry Pi 1 model B+ and Raspberry Pi 2 model B look identical to each other, and the difference is only in performance.
Due to a more powerful processor and an upgraded RAM, Raspberry Pi 2 Model B improves on performance by six times. In a clockwise direction in the diagram of the RasPi 1 model B, the short description of the important connectors is as follows:
- GPIO header: GPIO stands for General Purpose Input Output, which has been brought out to pin connectors present on the board. The processor on board (BCM283x, which is the brain of a RasPi) has a facility to provide a specific functionality during the runtime of your own program. We are going to use them a lot in the upcoming chapters. The great thing with this is that you can assign a specific task to the specific GPIO in your program, and while your program executes, it goes to logic low or high (triggers to off state and on state) accordingly. We can read values from any other peripherals, such as sensors, and compute the received values in your own programs. Apart from reading the values, we can show the result of the program by connecting LEDs or embedded LCD displays to the board. Depending on the decision taken in the code, we can drive a motor connected on GPIO through a motor driver circuit. This feature on RasPi makes a huge difference compared to the normal computing board by giving developers the freedom of crafting the creation.
Tip
For example, in one of your applications, if the temperature falls below 20 degree Celsius then the thermostat connected to your RasPi gets the signal through the specific GPIO assigned and it starts heating. GPIOs typically work in logic high (1, ON) and logic low (0, OFF), and this will work the way you program it!
- RCA video out: This is the most widely used and one of the oldest connectors that both old and new televisions or displays use. It carries the video signal, which is the type output on the RasPi. The RCA connector or composite video signal is merged with a 3.5 mm audio jack on RasPi 1 model A+ and model B+ and RasPi 2 model B.
- 3.5 mm audio out jack: If you are not using the HDMI connection (which will be described soon), the audio can be played through speakers or headphones using a standard 3.5 mm jack. In RasPi 1 model B+ or RasPi 2 model B, audio jack being the combination of composite and audio has all the functionalities of composite video and audio out.
- USB: This is the most common connector, widely used in the modern computers, and hence called the Universal Serial Bus. You can connect your flash drives, keyboard, Wi-Fi dongles, and mouse to play around with the RasPi. You can also connect the externally powered USB hub with RasPi to connect more USB-based peripherals on it.
- Ethernet: This is one of the most important connections to have a remote login on RasPi and to provide wired internet connection. In the next sections of this chapter, we will be using it widely. We cannot always connect RasPi to the dedicated display, so we use the remote login, and we see the entire desktop or Command-line Interface (CLI) of RasPi on our computer screen.
- CSI camera connector: The RasPi board does not come with camera module integrated, but a separately bought camera module can be interfaced using the CSI connector via a 15 cm flex cable. A longer flex cable will lead to bad quality of images. The 5-megapixel Raspberry Pi camera module can be used to record high-definition videos as well as still photographs. It's easy to use for beginners, but has plenty to offer advanced users if you're looking to expand your knowledge. This camera module provides improved performance over a USB-connected camera.
- HDMI connector: The High-definition Multimedia Interface (HDMI) is a compact audio/video interface used to transfer uncompressed media data. You can connect your modern HDTV to watch full high definition (FHD/HD) videos through the RasPi. If you plug in the HDMI connector, there is no need to connect the speakers to the audio jack, and if you want to get sounds on both HDMI and the 3.5 mm jack, then you'll have to play with and edit the internal files of Linux.
- Micro USB power: You survive on food, don't you? Well, so does the RasPi (kind of). It needs power supply to operate. The device can be powered by a 5V input voltage, and the current ratings solely depend upon what you have hooked up with RasPi. Have you seen any power button on RasPi? In fact, the RasPi module does not have the power on button. Therefore, just plugging the micro USB power adapter will boot the RasPi.
Note
The maximum current the Raspberry Pi models A and B can use is 1 ampere, so if you need to connect a USB device that will take the power requirements of the Raspberry Pi above 1 ampere, then you must connect it to an externally powered USB hub. For example, a USB hard disk will need an ample amount of current to operate, which RasPi cannot deliver through the USB port. Alternatively, the maximum power model B+ can use is 2 amperes before needing to connect devices to an externally powered USB hub. There are power banks and batteries available for connecting to the RasPi if you are designing a remotely operated car or a quadcopter. If you are not sure how much power the USB device is going to take, buy an externally powered USB hub. Do not go above 2.4 amperes in any case, because this will destroy your RasPi if peripheral current demand is high—it'll be dead!
- SD card slot: The SD card is important because it is where the RasPi keeps its operating system. It is also where you will store your documents, programs, and pictures. It is the secondary and a necessary memory part for the RasPi, the on-board RAM being the primary. Model B requires the standard-sized SD card (the big one!), whereas model B+ requires the microSD card.
Tip
It is suggested to purchase the microSD card with the SD card adaptor so that if you switch over from RasPi 1 model B to B+ or RasPi 2 model B, you can retain the same operating systems and your programs. Additionally, after installing the libraries and setups, the OS crash can be painful. To avoid this, the periodical backup of the entire OS should be taken, and this can be used to install the OS on a new SD card again. The microSD card can easily be contained in an SD adaptor to convert it into a normal SD card, with no performance losses.
- Display connector: Last but not least, the display connector is used to connect a 7-inch finger-touch LCD display to the board for your embedded product development. But usually, the RCA and HDMI are enough. If your application requires this, then you will need to use it.


 Free Chapter