Sign In Start Free Trial
Account

Add to playlist

Create a Playlist

Modal Close icon
You need to login to use this feature.
  • Book Overview & Buying GitHub Actions Cookbook
  • Table Of Contents Toc
  • Feedback & Rating feedback
GitHub Actions Cookbook

GitHub Actions Cookbook

By : Michael Kaufmann
4.8 (5)
close
close
GitHub Actions Cookbook

GitHub Actions Cookbook

4.8 (5)
By: Michael Kaufmann

Overview of this book

Say goodbye to tedious tasks! GitHub Actions is a powerful workflow engine that automates everything in the GitHub ecosystem, letting you focus on what matters most. This book explains the GitHub Actions workflow syntax, the different kinds of actions, and how GitHub-hosted and self-hosted workflow runners work. You’ll get tips on how to author and debug GitHub Actions and workflows with Visual Studio Code (VS Code), run them locally, and leverage the power of GitHub Copilot. The book uses hands-on examples to walk you through real-world use cases that will help you automate the entire release process. You’ll cover everything, from automating the generation of release notes to building and testing your software and deploying securely to Azure, Amazon Web Services (AWS), or Google Cloud using OpenID Connect (OIDC), secrets, variables, environments, and approval checks. The book goes beyond CI/CD by demonstrating recipes to execute IssueOps and automate other repetitive tasks using the GitHub CLI, GitHub APIs and SDKs, and GitHub Token. You’ll learn how to build your own actions and reusable workflows to share building blocks with the community or within your organization. By the end of this GitHub book, you'll have gained the skills you need to automate tasks and work with remarkable efficiency and agility.
Table of Contents (10 chapters)
close
close

Creating and using environments

Environments are used to describe a general deployment target such as development, test, staging, or production. You can protect environments with protection rules, and you can provide configuration variables and secrets for specific environments.

Getting ready

We will first create some environments using the web UI and add some protection rules, secrets, and variables. Then, we add them to our existing workflow.

How to do it…

  1. Navigate to Settings | Environments and click on New environment (see Figure 1.25):
Figure 1.25 – Managing environments in a repository

Figure 1.25 – Managing environments in a repository

Enter the name Production and click Configure environment (see Figure 1.26):

Figure 1.26 – Creating a new environment

Figure 1.26 – Creating a new environment

  1. Add yourself as a required reviewer and click Save protection rule (see Figure 1.27):
Figure 1.27 – Configuring deployment protection rules

Figure 1.27 – Configuring deployment protection rules

  1. Under Deployment branches and tags, choose Selected branches and tags, click the plus symbol, and add a name pattern for the main branch (see Figure 1.28):
Figure 1.28 – Configuring deployment branches and tags

Figure 1.28 – Configuring deployment branches and tags

  1. Under Environment secrets, click on Add secret and add a new MY_SECRET secret with the value Open Sesame (see Figure 1.29). Repeat this with Add variable and add a WHO_TO_GREET variable with the value Production users:
Figure 1.29 – Adding secrets and variables to environments

Figure 1.29 – Adding secrets and variables to environments

  1. Repeat step 1 and create two additional environments, Test and Load-Test. We will use these environments in the next steps to show how to execute jobs in parallel. You don’t have to configure deployment branches or required reviewers. Just add a WHO_TO_GREET variable with the corresponding value. The result should look like Figure 1.30:
Figure 1.30 – Multiple environments in the settings of the repository

Figure 1.30 – Multiple environments in the settings of the repository

  1. Now, go back to the workflow file and edit it. Add a new job beneath first_job called Test that runs on the latest Ubuntu image. We associate this job with the Test environment. To run this job after first_job, we use the needs property and set it to the job we depend on:
    Test:
      runs-on: ubuntu-latest
      environment: Test
      needs: first_job

    To see how secrets are overwritten by the environment, we have to use a little hack. As GitHub searches for the value of secrets in the output of the log to mask it, we have to modify the actual text. We can do this, for example, using the sed 's/./& /g' command. This will add a blank between every character of the secret. With this little hack, the steps of the Test job should look like this:

    steps:
    - run: |
        echo "Hello ${{ vars.WHO_TO_GREET }}  from ${{ github.actor }}."
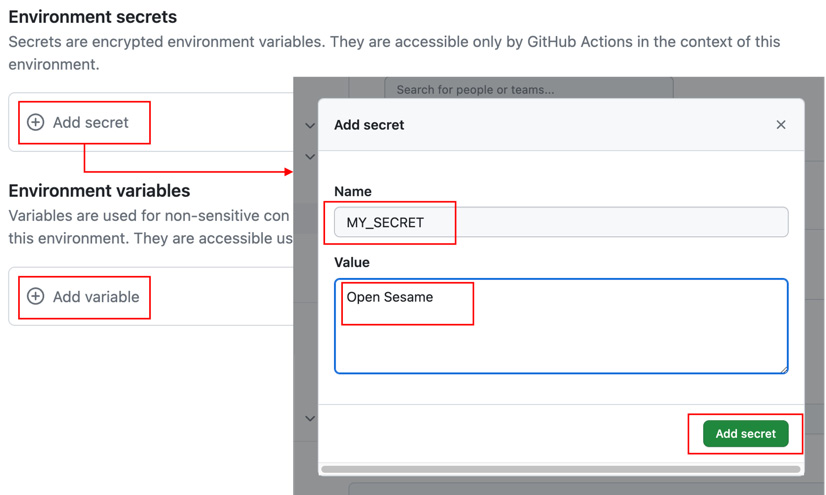
        sec=$(echo ${{ secrets.MY_SECRET }} | sed 's/./& /g')
        echo "My secret is  '$sec'."
  2. Next, add a new Load-Test job that is associated with the Load-Test environment and also executes after first_job:
    Load-Test:
      runs-on: ubuntu-latest
      environment: Load-Test
      needs: first_job

    Just copy the steps from Test. There is no need to change anything.

  3. The last job is a Production job. In addition to the name, the environment property accepts a URL that later will be displayed in the workflow designer. Set it to any URL you want. To show how after a parallel execution of jobs the workflow can merge again, we will run Production after Test and Load-Test:
    Production:
      runs-on: ubuntu-latest
      environment:
        name: Production
        url: https://writeabout.net
      needs: [Test, Load-Test]

    Just copy the steps from the previous jobs.

  4. Commit your changes to the main branch. The workflow will run automatically. Navigate to the new workflow run and inspect the workflow designer, which nicely shows the parallel execution. The workflow will pause before executing Production and will wait for approval (see Figure 1.31):
Figure 1.31 – The workflow will stop before an environment with required reviewers and wait for approval

Figure 1.31 – The workflow will stop before an environment with required reviewers and wait for approval

  1. Click Review deployment, check Production, and add an optional comment. Click Approve and deploy to start executing the Production job (see Figure 1.32):
Figure 1.32 – Approving a protected environment

Figure 1.32 – Approving a protected environment

The workflow will execute completely, and the result should look like Figure 1.33. Note that the URL is displayed in the Production environment. Also, note the history of approvals in the workflow summary:

Figure 1.33 – The final summary of the workflow

Figure 1.33 – The final summary of the workflow

Open the individual jobs and inspect the output of the step we added (see Figure 1.34). The secrets and variables are used from the repository and are only overridden if we set them in an environment:

Figure 1.34 – The production secret is only available to the production environment after approval

Figure 1.34 – The production secret is only available to the production environment after approval

There’s more…

If you are setting secrets or variables for an environment using the GitHub CLI, then you can specify them using the --env (-e) argument. For organization secrets, you set the visibility (--visibility or -v) to all, private, or selected. For selected, you must specify one or more repos using --repos (-r):

$ gh secret set secret-name --env environment-name
$ gh secret set secret-name --org org -v private
$ gh secret set secret-name --org org -v selected -r repo

Environments have more options than we have used in this recipe. You can also configure a wait timer that will pause the workflow for n minutes (with a maximum of 30 days) before executing the deployment job for that particular environment.

There is also a new feature called custom deployment protection rules that is still in beta. This feature allows the creation of GitHub apps that can pause your deployment and wait for a specific condition. There are already apps from Datadog, Honeycomb, Sentry, New Relic, and ServiceNow (see https://docs.github.com/en/actions/deployment/protecting-deployments/configuring-custom-deployment-protection-rules#using-existing-custom-deployment-protection-rules). We’ll have a closer look at custom deployment rules in Chapter 7, Release Your Software with GitHub Actions.

The true power of environment protection rules lies in the deployment branch or tag rules. This can restrict code that does not apply to branch protection rules from deploying to certain environments. This can include all kinds of checks – Codeowners approvals, code reviewers, deployments to certain other environments, SonarQube quality gates, and many other automated code checks (see https://docs.github.com/en/repositories/configuring-branches-and-merges-in-your-repository/managing-protected-branches/about-protected-branches for more information).

bookmark search playlist download font-size

Change the font size

margin-width

Change margin width

day-mode

Change background colour

Close icon Search
Country selected

Close icon Your notes and bookmarks

Delete Bookmark

Modal Close icon
Are you sure you want to delete it?
Cancel
Yes, Delete

Confirmation

Modal Close icon
claim successful

Buy this book with your credits?

Modal Close icon
Are you sure you want to buy this book with one of your credits?
Close
YES, BUY