GitHub does a good job of guiding people in the workflow designer when writing workflows. That’s why it is best to just start and write your first workflow and familiarize yourself with the platform.
Getting ready
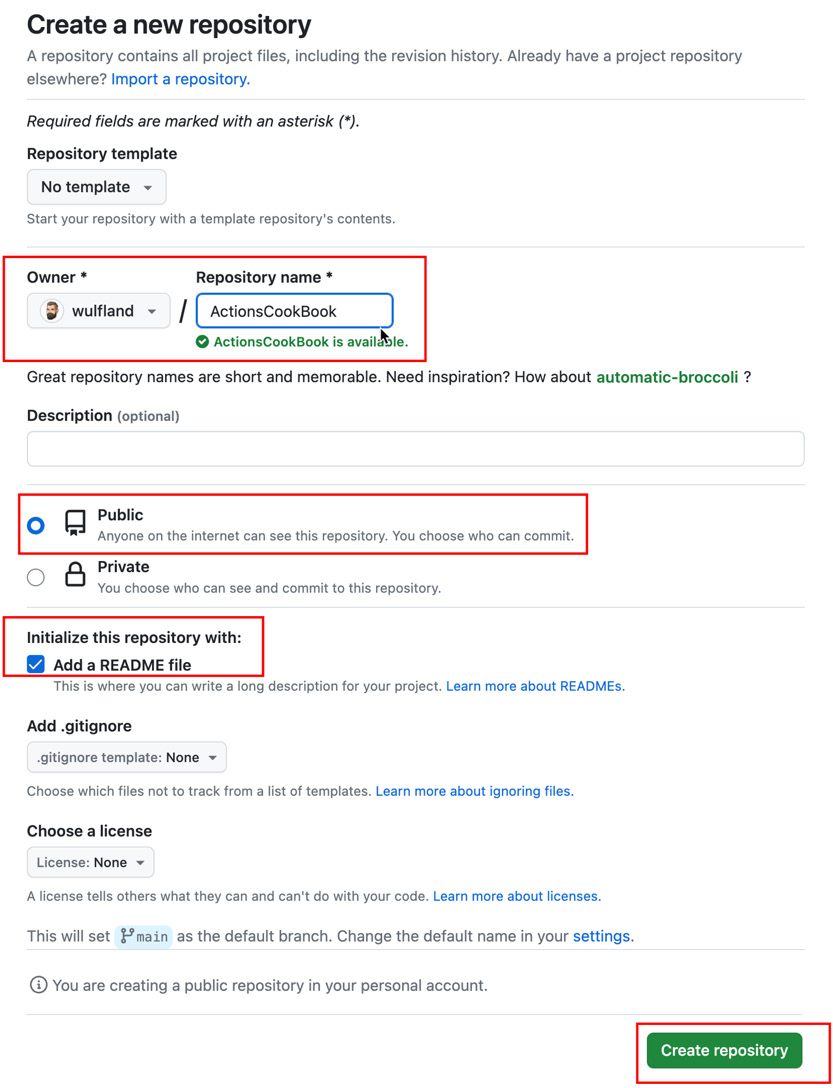
Before you can create your first workflow, you first have to create a repository on GitHub. Navigate to https://github.com/new, authenticate if you are not authenticated yet, and fill in data as in Figure 1.6:
Figure 1.6 – Creating a new repository
Pick your GitHub user as the owner and give the repo a unique name – for example, ActionsCookBook. Make it a public repo so that all workflows and storage are free. Initialize the repo with a README file – this way, we have already files in the repo and something in the workflow to work with.
How to do it…
GitHub Action workflows are YAML files with a .yml or .yaml extension that are located in the .github/workflows folder in a repository. You could create the file manually, but then the workflow editor would only work after the first commit. Therefore, I recommend creating a new workflow from the menu.
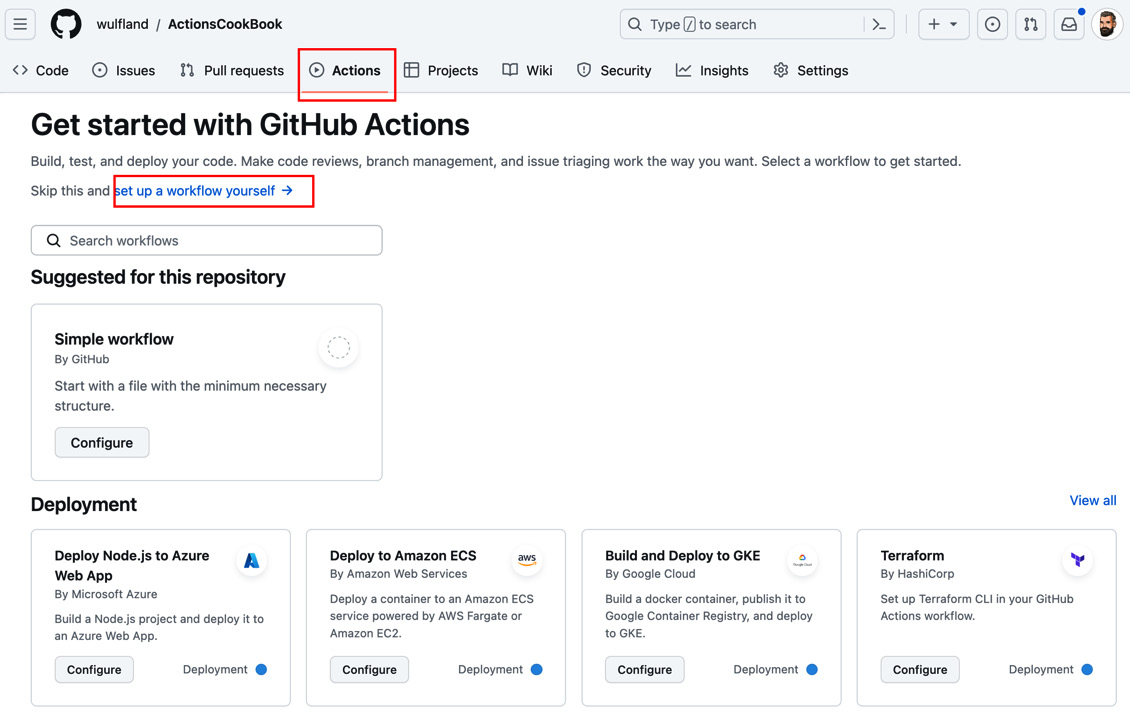
- In your new repository, navigate to Actions. Since your repository is new and you don’t have any workflows yet, this will redirect you directly to the Create new workflow page (
actions/new). If your repository contains workflows, you will see the workflows here (as later displayed in Figure 1.16), and you would have to click the New workflow button to get to that page.On this page, you will find a lot of template workflows you could use as a starting point. There are starter workflows for deployments to most clouds, CI for most languages, security scanning of your code, automation in general, and templates to deploy content to GitHub Pages. You can filter the starter workflows by these categories. These workflows give you a good starting point for most of your workflows.
In this recipe, we will focus on familiarizing ourselves with the editor, and we will create a workflow from scratch by clicking set up a workflow yourself (see Figure 1.7):
Figure 1.7 – Creating a new workflow in GitHub
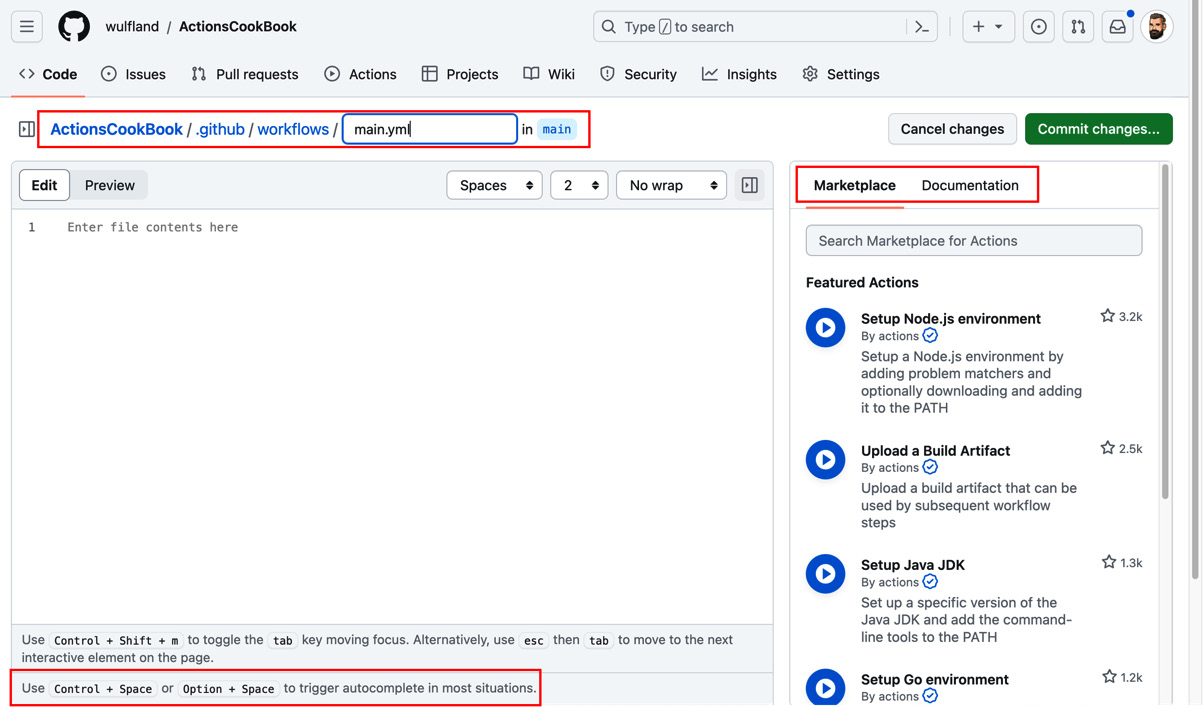
- GitHub will create a new
main.yml file in .github/workflows on the default branch and display it in the web editor. On the right side of the editor, you have the documentation, and you can search for actions in GitHub Marketplace. In the editor, you can use Ctrl + Space (or Option + Space – depending on your keyboard settings) to trigger autocomplete. The editor will capture the Tab key and by default use it for a two-space indentation. To navigate to other controls on the page using the Tab key, you first have to exit it using Esc or using Ctrl + Shift + M.Modify the filename to MyFirstWorkflow.yml and familiarize yourself with the editor (see Figure 1.8):
Figure 1.8 – The workflow editor for GitHub Actions
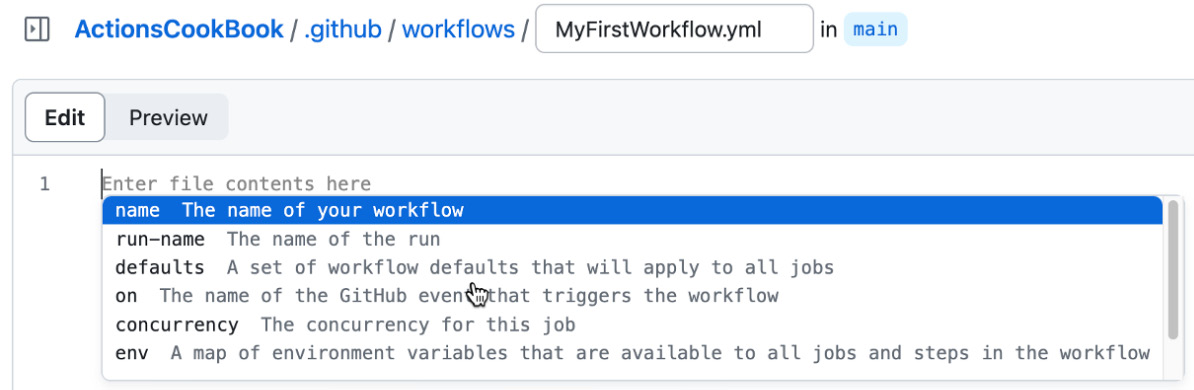
- In the editor, click Ctrl + Space (or Option + Space) to see a list of root elements valid in a workflow file (see Figure 1.9):
Figure 1.9 – The editor shows you all valid options at a certain level in the workflow file
Typically, workflows are started with the name property, which sets the display name of the workflow in the UI. It’s a good practice to add a comment to the top of the file summarizing the intent of the workflow.
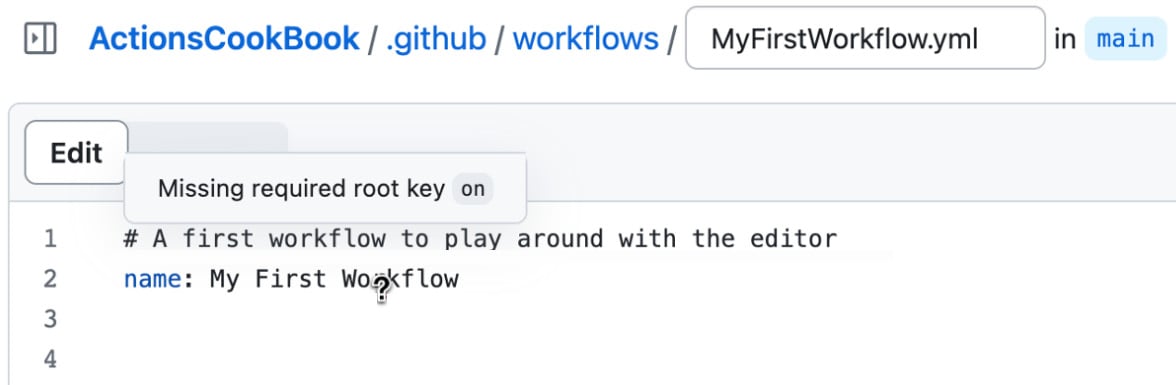
- Add a comment to the top of the file and set the
name property using autocomplete. Note that the editor has error checking and indicates that you are still missing the required root key, on (see Figure 1.10):
Figure 1.10 – Error checking in the code editor
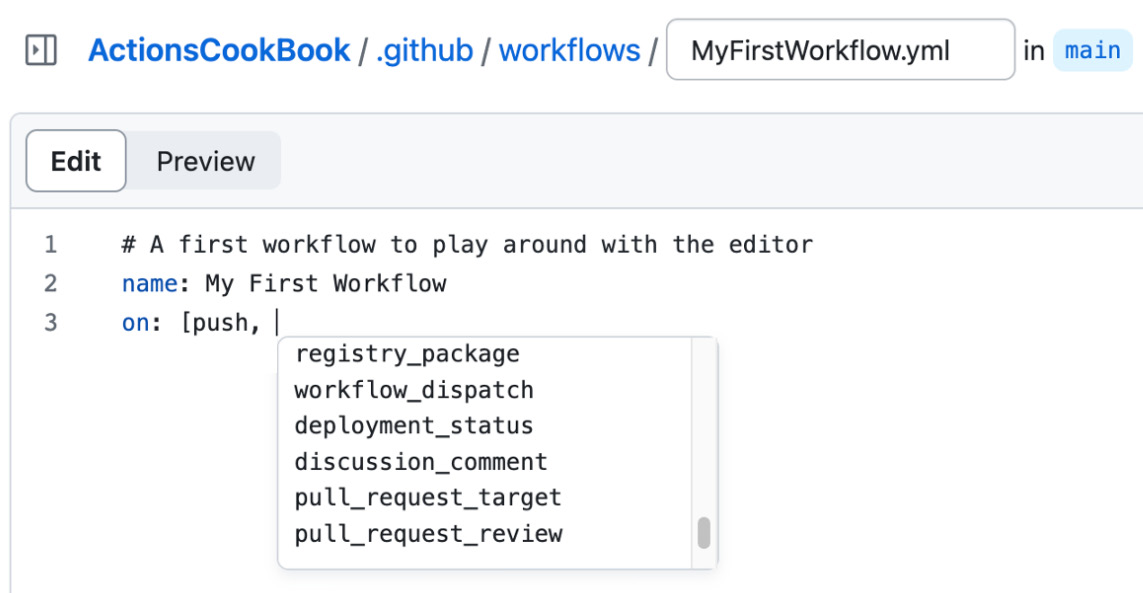
- Next, we are going to configure events that should trigger the workflow. Note that a workflow can have multiple triggers. Depending on where you are in the designer, autocomplete will give you different results. If you are on the same line as
on:, you will get a result in the JSON syntax (see the YAML collection types section); that is, on: [push].If you add a comma after the first element and click Control + Space again, then you can pick additional elements from autocomplete (see Figure 1.11):
Figure 1.11 – Autocomplete works also inside squared brackets
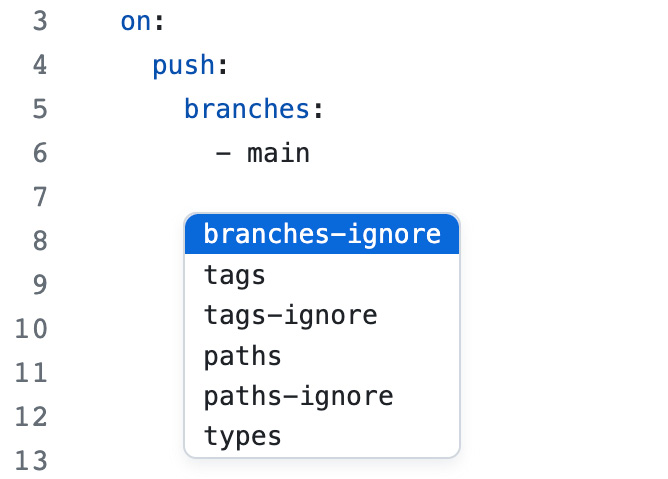
Each trigger is a map and can contain additional arguments. If you put your cursor on the line below on: and add a two-space indentation, autocomplete will give you the results in the full YAML syntax. It will also give you properties that you can use to configure each trigger (see Figure 1.12):
Figure 1.12 – Autocomplete also helps with options for triggers
Note that most arguments – for example, branches or paths – are sequences and need a dash for each entry if you are not using the JSON syntax.
We want our test workflow to run on every push to the main branch. We also want to be able to trigger it manually (see the Events that trigger workflows section). Your workflow code for triggers should look like this:
on:
  push:
    branches:
      - main
  workflow_dispatch:
Wildcards
The * character can be used as a wildcard in paths and ** as a recursive wildcard. * is a special character in YAML, so you need to use quotation marks in that case:
push:
branches:
- 'release/**'
paths:
- 'doc/**'
- After configuring the triggers for the workflow, the next step is to add another root element: the jobs. Jobs are a map in YAML – meaning on the next line with two-space indentation, autocomplete will not work as the editor expects you to set a name. Name your job
first_job and go to the next line. The name of the job object can only contain alphanumeric values, a dash (-), and an underscore (_). If you want any other characters to be displayed in the workflow, you can use the name property:jobs:
first_job:
name: My first job
- Every job needs a runner that executes it. Runners are identified by labels. You will learn more about runners in Chapter 4, The Workflow Runtime. We want our workflow to be executed on the latest version of the Ubuntu runners provided by GitHub, so we use the
ubuntu-latest label:runs-on: ubuntu-latest
- A job consists of a sequence of steps that are executed one after the other. The most basic step is the
run: command, which will execute a command-line command:steps:
- name: Greet the user
run: echo "Hello world"
shell: bash
The name is optional and sets the output of the step in the log. The shell is also optional and will default to bash on non-Windows platforms, with a fallback to sh. On Windows, the default is PowerShell Core (pwsh), with a fallback to cmd. But you could configure any shell you want with the {0} placeholder for the input of the step (that is, shell: perl {0}).
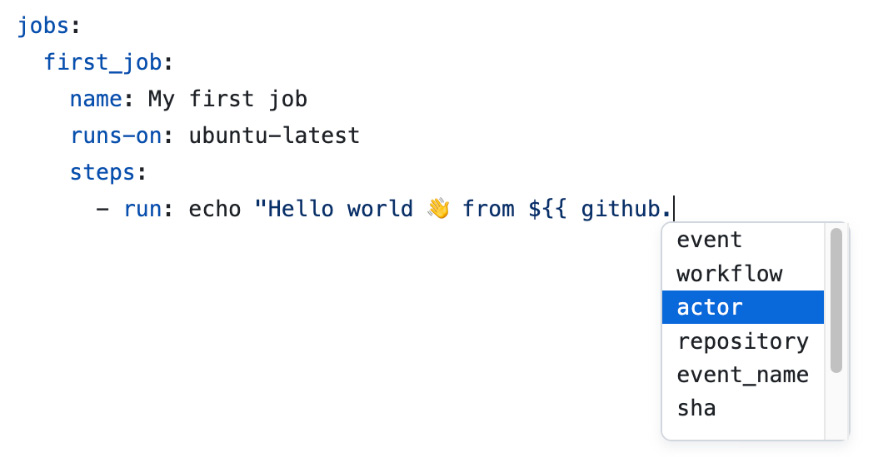
To add variable output, we can use expressions that are written between ${{ and }}. In the expression, you can use values from context objects such as the GitHub context. Note that autocomplete also works for these context objects (see Figure 1.13):
Figure 1.13 – Autocomplete also works for context objects
Pick the actor from the list of values:
- run: echo "Hello world  from ${{ github.actor }}."
You will learn more about expressions and context syntax throughout the book. But you can refer to the documentation for expressions (https://docs.github.com/en/actions/learn-github-actions/expressions) and context (https://docs.github.com/en/actions/learn-github-actions/contexts) at any time.
- YAML allows you to write multiline scripts without the need to wrestle with quotations and newlines. Just add the pipe operator (
|) after run: and write your script in the next line with a four-space indentation. YAML will treat this as one block until the next element – even with new and blank lines in it:- run: |
echo "Hello world from ${{ github.actor }}."
echo "Current branch is '${{ github.ref }}'."
- GitHub Actions workflows will not automatically download the code from your repository. If you want to do something with files in your repository, you have to check out the content first. This is done using a GitHub action – a reusable workflow step that can easily be shared for multiple workflows.
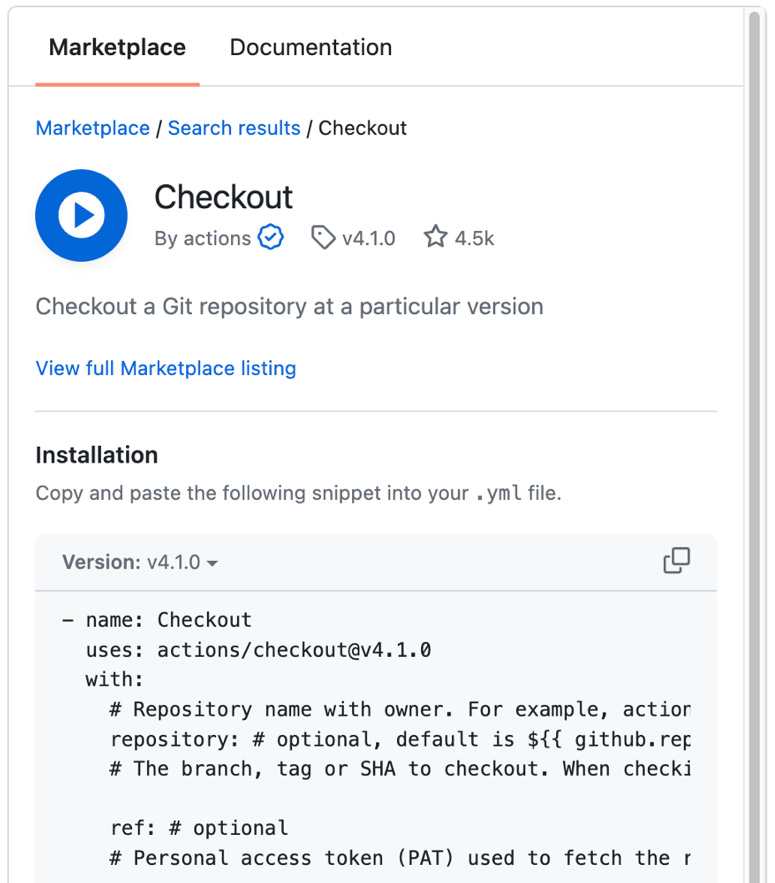
On the right side of the workflow editor is the marketplace. You can directly search there for all kinds of actions. Search for checkout and locate the action from actions (these are built-in actions from GitHub). In the listing, you see the owner of the action, the latest version, and the stars of the repository. The listing contains an Installation section that you can copy into your workflow to use the action (see Figure 1.14):
Figure 1.14 – Listing of the marketplace in the workflow editor
Note that many parameters are optional. To check out the repo, you only need the following lines:
- name: Checkout
  uses: actions/[email protected]
Using GitHub Actions
Actions refer to a location on GitHub. The syntax is {path}@{ref}. The path points to a physical location on GitHub and can be {owner}/{repo} if the actions are in the root of a repository or {owner}/{repo}/{path} if the actions are in a subfolder. The reference after @{ref} is any git reference that points to a commit. It can be a tag, branch, or an individual commit SHA.
- To display the files in our repository after checking them out, we’ll add an extra step:
- run: tree
This will output the files in the repository in a tree structure.
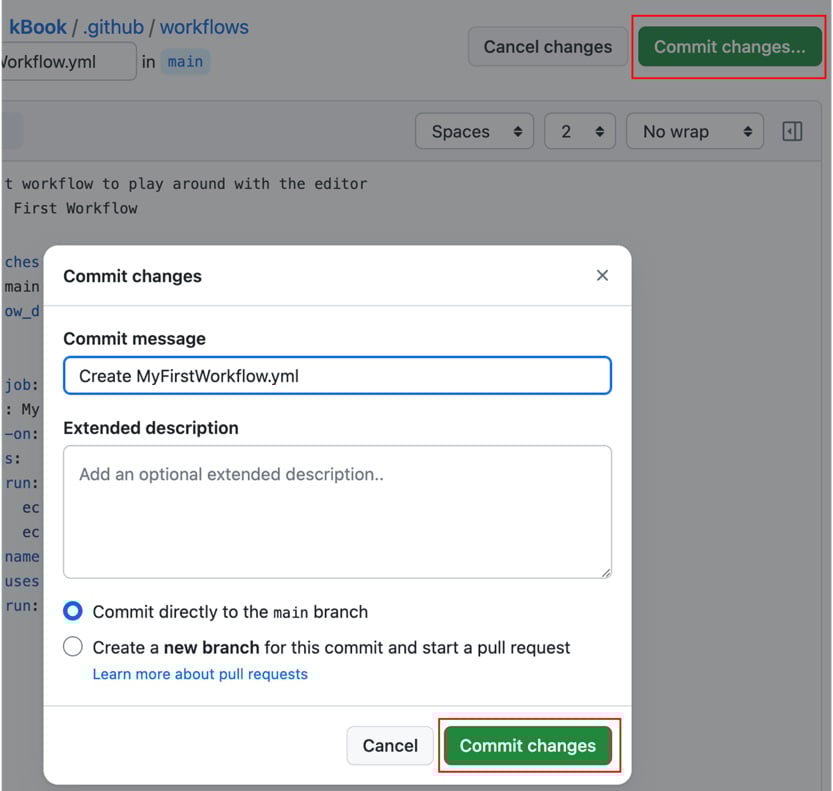
- To run the workflow, just commit the workflow file to the
main branch. Click Commit changes…, leave the commit message and branch, and click Commit changes in the dialog to finish the operation (see Figure 1.15):
Figure 1.15 – Committing the workflow file
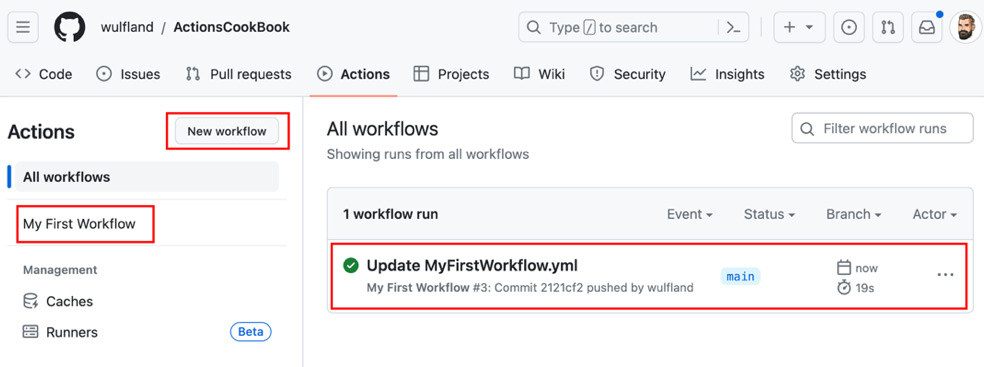
- As we have set a push trigger for the
main branch, our commit has automatically triggered the workflow. If you navigate now to Actions in your repository, you will be able to see your workflow and the latest workflow run (see Figure 1.16):
Figure 1.16 – The default view in Actions displays the latest workflow runs of all workflows
Note that the name of the workflow run is the commit message. You can also see the commit that triggered the workflow and the actor that pushed the changes.
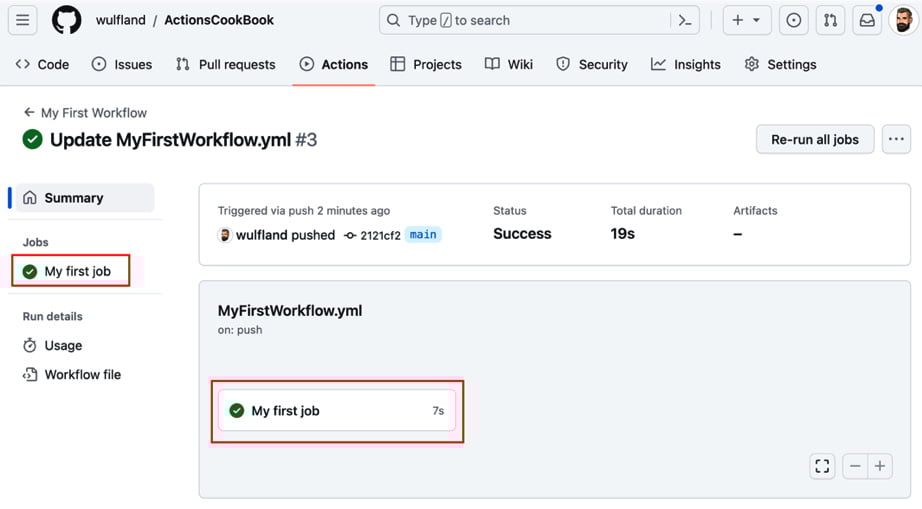
- Click on the workflow run to see more details. The workflow summary page contains jobs on the left and a visual representation on the right (see Figure 1.17). It also contains metadata for the trigger, the status, and the duration:
Figure 1.17 – The workflow summary page
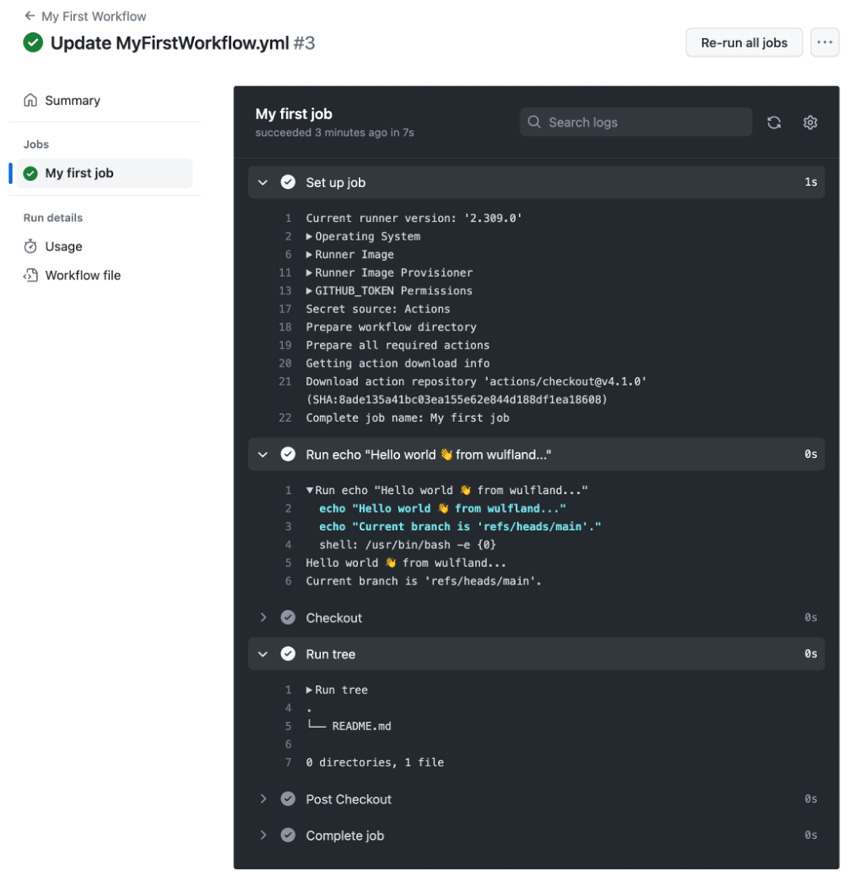
- Click on the job to view more details. In the workflow log, you can inspect the individual steps. Note that each line of the workflow file has a clickable number – that is a URL that you could use to identify each line. The Set up job step is a special step that gives you a lot of background information about the workflow runner and workflow permissions (see Figure 1.18). Inspect the output of all steps of your workflow:
Figure 1.18 – The workflow log for an individual job
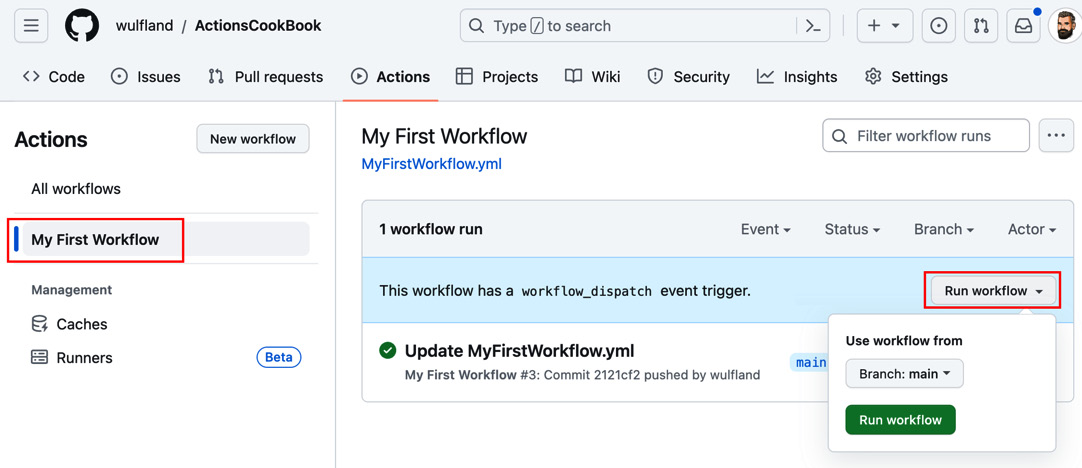
- As a last step, we want to trigger the workflow manually to also see the difference in the workflow run. Go back to Actions, select the workflow on the left side (see Figure 1.19), and run the workflow:
Figure 1.19 – Triggering a workflow manually through the UI
Inspect the new workflow run and its output.
How it works…
Workflow files are YAML files located in the .github/workflows folder in a repository.
YAML basics
YAML stands for YAML Ain’t Markup Language and is a data-serialization language optimized to be directly writable and readable by humans. It is a strict superset of JSON but with syntactically relevant newlines and indentation instead of braces.
You can write comments by prefixing text with a hash (#).
In YAML, you can assign a value to a variable with the following syntax: key: value.
key is the name of the variable. Depending on the data type of value, the type of the variable will be different. Note that keys and values can contain spaces and do not need quotation marks! Only add them if you use some special characters or you want to force certain values to be a string. You can quote keys and values with single or double quotes. Double quotes use the backslash as the escape pattern ("Foo \"bar \" foo"), while single quotes use an additional single quote for this ('foo ''bar'' foo').
YAML collection types
In YAML, there are two different collection types: nested types called maps and lists – also called sequences. Maps use two spaces of indentation:
parent_type:
  key1: value1
  key2: value2
  nested_type:
    key1: value1
A sequence is an ordered list of items and has a dash before each line:
sequence:
  - item1
  - item2
  - item3
Since YAML is a superset of JSON, you can also use the JSON syntax to put collections in one line:
key: [item1, item2, item3]
key: {key1: value1, key2: value2}
Events that trigger workflows
There are three types of triggers for workflows: webhook triggers, scheduled triggers, and manual triggers.
Webhook triggers start the workflow based on an event in GitHub. There are many webhook triggers available. For example, you could run a workflow on an issues event, a repository event, or a discussions event. The push trigger in our example is a webhook trigger.
Scheduled triggers can run the workflow at multiple scheduled times. The syntax is the same syntax used for cron jobs:
on:
  schedule:
    # Runs at every 15th minute
    - cron:  '*/15 * * * *'
    # Runs every hour from 9am to 5pm
    - cron:  '0 9-17 * * *'
    # Runs every Friday at midnight
    - cron:  '0 2 * * FRI'
Manual triggers allow you to start the workflow manually. The workflow_dispatch trigger will allow you to start the workflow using the web UI or GitHub CLI. You can define input parameters for this trigger using the inputs property. The repository_dispatch trigger can be used to trigger the workflow using the API. This trigger can also be filtered by certain event types and can accept additional JSON payload that can be accessed in the workflow.
To learn more about triggers, check the documentation at https://docs.github.com/en/actions/using-workflows/events-that-trigger-workflows.
Jobs
Every job needs a runner that executes it. Runners are identified by labels. In our recipe, we use the ubuntu-latest label. This means that our job will be executed on the latest Ubuntu image hosted by GitHub. You will learn more about runners in Chapter 4, The Workflow Runtime.
Using GitHub Actions
Actions refer to a location on GitHub. The syntax is {path}@{ref}. The path points to a physical location on GitHub and can be {owner}/{repo} if the actions are in the root of a repository or {owner}/{repo}/{path} if the actions are in a subfolder. The reference after @{ref} is any git reference that points to a commit. It can be a tag, branch, or an individual commit SHA:
# Reference a version using a tag
- uses: actions/[email protected]
# Reference the current head of a branch
- uses: actions/checkout@main
# Reference a specific commit
- uses: actions/checkout@8e5e7e5ab8b370d6c329ec480221332ada57f0ab
For local actions in the same repository, you can omit the reference if you check out of the repository.
If the action has defined inputs, you can specify them using the with property:
- uses: ActionsInAction/HelloWorld@v1
  with:
    WhoToGreet: Mona
Inputs can be optional or required. You can also set environment variables for steps using the env property:
- uses: ActionsInAction/HelloWorld@v1
  env:
    GITHUB_TOKEN: ${{ secrets.GITHUB_TOKEN }}
There’s more…
This is just a very basic workflow that uses an action to check out code and runs some commands on the command line. In the next two recipes, I’ll show you how to use secrets, variables, and protected environments for more complex workflows.


 Free Chapter