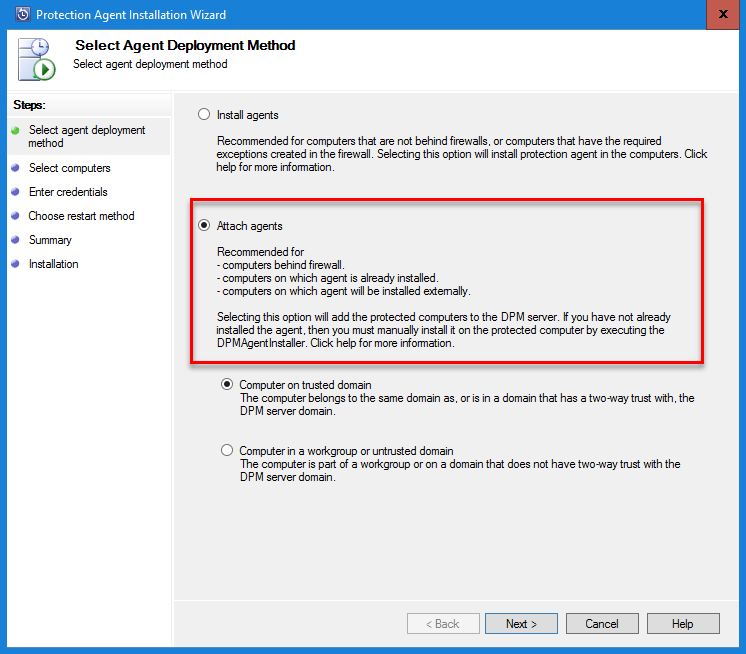
This recipe will cover the installation of a DPM agent from the DPM console as well as a manual-based installation.
Microsoft System Center Data Protection Manager Cookbook
By :
Microsoft System Center Data Protection Manager Cookbook
By:
Overview of this book
System Center Data Protection Manager (SCDPM) is a robust enterprise backup and recovery system that contributes to your BCDR strategy by facilitating the backup and recovery of enterprise data. With an increase in data recovery and protection problems faced in organizations, it has become important to keep data safe and recoverable. This book contains recipes that will help you upgrade to SCDPM and it covers the advanced features and functionality of SCDPM.
This book starts by helping you install SCDPM and then moves on to post-installation and management tasks. You will come across a lot of useful recipes that will help you recover your VMware and Hyper-V VMs. It will also walk you through tips for monitoring SCDPM in different scenarios. Next, the book will also offer insights into protecting windows workloads followed by best practices on SCDPM. You will also learn to back up your Azure Stack Infrastructure using Azure Backup. You will also learn about recovering data from backup and implementing disaster recovery. Finally, the book will show you how to configure the protection groups to enable online protection and troubleshoot Microsoft Azure Backup Agent.
Table of Contents (12 chapters)
Preface
 Free Chapter
Installing and Upgrading DPM
DPM Post-Installation and Management Tasks
Protecting Hyper-V VMs
Monitoring DPM and Configuring Role-Based Access
Protecting Microsoft Workloads with DPM
Securing Windows Client with DPM
Protecting Microsoft Azure Stack with DPM
Protecting Workgroups and Untrusted Domains
Recovering Data from Backup
Integrating DPM with Azure Backup
Other Books You May Enjoy
How would like to rate this book
Customer Reviews