Sign In Start Free Trial
Account

Add to playlist

Create a Playlist

Modal Close icon
You need to login to use this feature.
  • VMware NSX Cookbook
  • Toc
  • feedback
VMware NSX Cookbook

VMware NSX Cookbook

By : Bayu Wibowo, Tony Sangha
5 (4)
close
VMware NSX Cookbook

VMware NSX Cookbook

5 (4)
By: Bayu Wibowo, Tony Sangha

Overview of this book

This book begins with a brief introduction to VMware's NSX for vSphere Network Virtualization solutions and how to deploy and configure NSX components and features such as Logical Switching, Logical Routing, layer 2 bridging and the Edge Services Gateway. Moving on to security, the book shows you how to enable micro-segmentation through NSX Distributed Firewall and Identity Firewall and how to do service insertion via network and guest introspection. After covering all the feature configurations for single-site deployment, the focus then shifts to multi-site setups using Cross-vCenter NSX. Next, the book covers management, backing up and restoring, upgrading, and monitoring using built-in NSX features such as Flow Monitoring, Traceflow, Application Rule Manager, and Endpoint Monitoring. Towards the end, you will explore how to leverage VMware NSX REST API using various tools from Python to VMware vRealize Orchestrator.
Table of Contents (14 chapters)
close

Validating NSX VIB installation

Installation of NSX VIBs that enable the Distributed Firewall and VXLAN are essential for a working NSX environment. This section will investigate how to manually verify that each VIB is installed correctly and whether communication to both the NSX controller cluster and NSX Manager are present.

Distributed Firewall communication

The first control plane communication that we are concerned with is from the NSX Manager to each ESXi host via TCP port 5671. This port is reserved for the Rabbit MQ Message bus to the vsfwd daemon running on each host after the VMware Service Insertion Platform (VSIP) VIB installation, which is the Distributed Firewall kernel module. The NSX Manager uses the message bus to publish firewall rules down to each ESXi host. The ESXi host then applies them to vNICs of virtual machines that are running on top of its hypervisor.

Controller communication

The second control plane communication that is expected from each ESXi host is an open connection to each of the NSX controllers deployed. The NSX controller cluster is responsible for control plane information for ARP/MAC/VTEP tables. It is also used to program routes received on the Distributed Logical Router Control VM to each host (more on this in Chapter 2, Configuring VMware NSX Logical Switch Networks). From each host, we expect the netcpa daemon to have an active connection to the controller cluster on TCP port 1234.

Getting ready

To manually verify control-plane communication and VIB installation, you will need the following access to the following NSX components:

  • SSH access to NSX Manager
  • SSH access to each NSX controller
  • SSH access to ESXi hosts that were prepared for NSX

You would not be expected to check communication of each and every host in your environment, as this can become unwieldly. However, this section is included for you to understand what the expected communication is, but in large deployments you would check the communication channel health per vSphere cluster as depicted in the earlier section.

How to do it...

To check whether the NSX VIBs have been installed successfully is crucial. The upcoming section details how to do this manually on an ESXi host and how to check NSX component communication.

Manually checking VIB installation

In this section we perform manual verification that the VIBs have been successfully installed.

  1. SSH onto an ESXi host.
  2. Check whether VXLAN VIB modules have been installed by executing the following command:
esxcli software vib get --vibname esx-vxlan 
  1. You will receive an output similar to the following:
[root@vSphere:~]    esxcli software vib get --vibname esx-vxlan
VMware_bootbank_esx-vxlan_6.0.0-0.0.4987429
   Name: esx-vxlan
   Version: 6.0.0-0.0.4987429
   Type: bootbank
   Vendor: VMware
   Acceptance Level: VMwareCertified
   Summary: Vxlan and host tool
   Description: This package loads module and configures firewall for vxlan networking.
   ReferenceURLs:
   Creation Date: 2017-01-27
   Depends: esx-base >= 6.0, esx-base <= 6.5.0, nsx-api <= 2.1, vmkapi_2_3_0_0
   Conflicts: nsx-api = 2
   Replaces: esx-traceflow, esx-dvfilter-switch-security, esx-bfd
   Provides: com.vmware.vxlan = 1.0.0.0-nsx, com.vmware.switchsecurity = 1.0.0.0, com.vmware.traceflow = 1.0.0.0, com.vmware.bfd = 1.0.0.0
   Maintenance Mode Required: True
   Hardware Platforms Required:
   Live Install Allowed: True
   Live Remove Allowed: True
   Stateless Ready: True
   Overlay: False
   Tags:
   Payloads: esx-vxlan
  1. If the module has been installed correctly, you should see open TCP connections on port 1234 with the following command:
esxcli network ip connection list | grep 1234

An example is included below that shows the connection as established to each of the three NSX controllers from the point of view of an ESXi host:

  1. To see which NSX controllers the host is configured to communicate with, execute the following command:
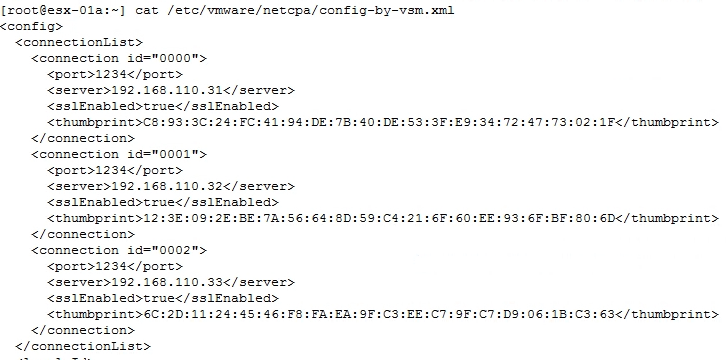
cat /etc/vmware/netcpa/config-by-vsm.xml

The following screenshot provides a truncated output of the command and its expected output.

  1. Check if VSIP VIB modules have been installed by executing the following command: esxcli software vib get --vibname esx-vsip:
  1. You will receive an output similar to the following:
[root@vSphere:~] esxcli software vib get --vibname esx-vsip
VMware_bootbank_esx-vsip_6.0.0-0.0.4987429
   Name: esx-vsip
   Version: 6.0.0-0.0.4987429
   Type: bootbank
   Vendor: VMware
   Acceptance Level: VMwareCertified
   Summary: vsip module
   Description: This package contains DFW and NetX data and control plane components.
   ReferenceURLs:
   Creation Date: 2017-01-27
   Depends: esx-base >= 6.0, esx-base <= 6.5.0, nsx-api <= 2.1, vmkapi_2_3_0_0
   Conflicts: nsx-api = 2
   Replaces: esx-vdpi
   Provides: vsip = 1.0.0-0
   Maintenance Mode Required: True
   Hardware Platforms Required:
   Live Install Allowed: True
   Live Remove Allowed: True
   Stateless Ready: True
   Overlay: False
   Tags:
   Payloads: esx-vsip 
  1. If the module has been installed correctly, you can open TCP connections on port 5671 with the following command:
esxcli network ip connection list | grep 5671

The following screenshot provides an example of the above command, the output shows a connection of established to the NSX Manager over TCP Port 5671:

  1. To see which NSX Manager the host is configured to communicate with, execute the following command:
esxcfg-advcfg -g /UserVars/RmqIpAddress

The following screenshot shows the results of the execution of the command above, and the expected configuration parameter is the IP address of the NSX Manager:

Checking NSX component communication

To check the communication channel between NSX Manager, NSX controller cluster, control plane agent, and Distributed Firewall agent, follow the following procedure:

  1. In the vCenter Web Client, navigate to Networking & Security | Installation | Host Preparation
  2. Select your vSphere cluster or an ESXi host
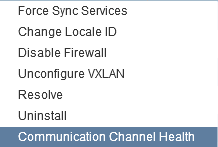
  1. Click on the Actions button and navigate to | Communication Channel Health:

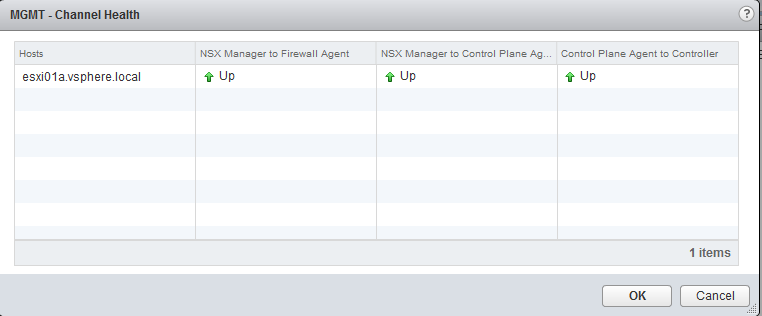
The following screenshot displays the result of the preceding action and the ESXi communication health:

bookmark search playlist download font-size

Change the font size

margin-width

Change margin width

day-mode

Change background colour

Close icon Search
Country selected

Close icon Your notes and bookmarks

Delete Bookmark

Modal Close icon
Are you sure you want to delete it?
Cancel
Yes, Delete