Microsoft Teams is a permanent fixture in the modern workplace, but many of its productivity-boosting features go unnoticed or unused. Hands-On Microsoft Teams shows you how to use Teams to its full potential through easy-to-follow practical tutorials.
This guide to mastering Teams explores the platform in comprehensive detail and how it interacts with the rest of the Microsoft ecosystem to help you work efficiently and manage your resources. You'll get to grips with core functionality like setting up and managing teams, channels, chats, tabs, and meetings.
You'll also learn to get the best out of Teams by adding custom apps, integrating with Microsoft 365, using PowerShell automation, and exploring useful settings you didn't know existed. Along the way, you'll be shown various real-world scenarios and how to implement solutions for them in Teams that will increase your productivity.
Whether you're an administrator, manager, or team member, by the end of this book you'll be confident in using everything Microsoft Teams has to offer.
Even though Microsoft Teams is a working platform, it allows you to customize certain features and settings to make it fit better with your working preferences and routines.
To access the configuration settings of Microsoft Teams, do the following:
On the Microsoft Teams client, click on the … icon next to your profile picture and then on Settings:
Figure 2.4.1: Navigating to personal Teams Settings
A popup will open, and from there you will have access to eight different groups of settings:
General: In this group, you will be able to access the Microsoft Teams themes. The default is a light theme, but dark and high contrast themes are also available. From the General tab, you can also select the language for the app and keyboard, as well as general application settings, such as auto-starting the application and using Teams as the default chat app for Office. From the General area, you will also be able to schedule your out of office and automatic replies, informing users that you are currently not working.
Figure 2.4.2: General Teams settings
Accounts: In the Accounts section you will find all the organizations where you exist as a guest user, along with the ability to mute their notifications or switch to the organization tenant. In this area, you will also be able to add your personal Microsoft Teams account. You can learn more about the personal Microsoft Teams version in Chapter 8, Other Microsoft Teams Use Cases.
Figure 2.4.3: The user Accounts Teams settings
Privacy: In the privacy settings, you will find an important option that allows you to prioritize notifications and calls from certain people when your status is set to Do not disturb.
Figure 2.4.4: Privacy settings
Here, you can also decide whether other users can access your read receipts on the app. A read receipt is displayed next to a message, with an icon representing an eye that informs other users that you have read their messages.
Figure 2.4.5: An "eye" icon appears next to a message when it has been seen by the recipient
Notifications: On Microsoft Teams, these settings will help you prioritize what is most relevant to you. You will find the notifications divided into seven different groups, each one allowing personalization to better suit your needs:
Figure 2.4.6: Settings used to help the user prioritize notifications
Email: This allows you to set the frequency that the Microsoft Teams platform sends you an email with a résumé of your missed activities. You will be able to define it as such: As soon as possible, Once every 10 minutes, Once every hour, Once every 8 hours, Daily, or Off.
Appearance and sound: Allows you to turn on/off the sounds for incoming calls and notifications. It also provides the ability to control whether notifications are displayed with a message preview; this option is particularly useful when projecting your screen.
Teams and channels: You can define when to be notified, choosing from the following options: All Activity, Mentions & replies, and Custom. The Custom setting provides a way to fine-tune several notification settings and define whether the notification is shown in the banner and feed, only in the feed, or turned off completely. The available refiners are shown in Figure 2.4.7.
Chat: You can define where notifications are displayed for mentions, replies, likes, and reactions.
Meetings: Define where the meeting notifications are displayed, and control the meeting chat notifications.
Pro tip: Mute chat meeting notifications while in a meeting
Meeting chat notifications can be controlled individually by meeting. If during the meeting you have the need to mute the chat, you can do so by going to the Chat option in the app bar. From there, locate the meeting's chat by clicking on the three dots (…) to open the context menu and select the Mute option, as shown in Figure 2.4.8.
Figure 2.4.8: Muting a meeting chat
People: You can define a pool of users that will trigger a notification every time they appear online or go offline.
Figure 2.4.9: Define whether you receive a notification when a user comes online or goes offline
Other: Define where to get notified when someone you know joins Microsoft Teams.
Devices: Allows you to select which devices are used for audio and video on Microsoft Teams. Here, you also have the option to perform a test call to make sure everything is working as expected. When attending a meeting or a live event, you can always override the settings defined here and use any other hardware available on your device. Another important setting you will find in this section is the noise suppression feature, so if you work in noisy environments, make sure to turn this feature on. With it enabled, Microsoft Teams will remove background noise automatically, improving the call experience for other participants.
Pro tip: Use Microsoft Teams-certified headsets
Microsoft Teams has a wide range of hardware that was designed specifically to work with the platform, leveraging Teams features and making the global use of the application a lot easier. Instead of using the built-in microphone and speakers on your computer, it is recommended that you use a certified headset; these will be automatically detected and prioritized by Teams as the main device to use if multiple peripherals are present. Certified devices are designed to prevent echo and distortion, and include basic built-in controls to answer/hang-up, mute/unmute, and control volume. To learn more about the Teams headsets, visit https://www.microsoft.com/en-us/microsoft-teams/across-devices/devices/category/headsets/36.
Pro tip: Never miss a call with the secondary ringer
With the Secondary ringer option available in the Devices settings, you will be able to define a second instance for the incoming calls on your device. If you have the default settings defined for your Teams headset, you will also be able to define the computer speakers as a ringer so you can hear any incoming call, even when you are not using the headset.
Figure 2.4.10: Device settings configuration
App permissions: To get the most out of all of Microsoft Teams' features, the application has permission to use a range of information from your device, including the location, or the physical hardware for meetings and live events. If you want to revoke access to peripherals or settings such as Location, you can do so in this tab:
Figure 2.4.11: Configuring permissions used by Microsoft Teams
From the App permissions option, you will also be able to control the permissions assigned to any custom personal application installed in Microsoft Teams. From this area, you will be able to grant or revoke access to your media devices such as the camera, microphone, speakers, location, notifications, MIDI device, or external links:
Figure 2.4.12: Refining the permissions of personal apps
Captions and transcripts: This setting allows you to turn on/off the possibility of being identified in meeting captions and transcripts.
Figure 2.4.13: Meeting captions and transcription settings
Calls: In this tab, you will find everything related to the calling features on Microsoft Teams. You can configure the voicemail options and the ringtone when someone calls you. If you have Microsoft Phone System, in this area you will also be able to define the phone number where the call should also ring.
Figure 2.4.14: Configuring call options
Microsoft Teams has the option to manage settings individually; this section covered each one of the options available in the platform. Once you start using Teams, make sure you have a look at each one of these settings to ensure that the application is adjusted to your needs and preferences.
Using Microsoft Teams with multiple organizations
As mentioned in Chapter 1, Microsoft Teams Basics, Teams does not allow you to run multiple instances of the application at the same time. If you are collaborating in multiple organizations, you will be able to use the fast switch option to access the other instances of Teams in which you exist as a guest user by using the same email address that is used in your organization.
To quickly change between organizations, you must do the following:
On the Microsoft Teams client, click on your profile picture.
From the menu, select the organization you want to join and click on it. Microsoft Teams will carry out the switch immediately:
Figure 2.4.15: Select which organization to switch to
There are a few considerations about the Accounts & orgs menu above that should be kept in mind:
It only becomes visible when the user belongs to more than one organization.
If you have unread notifications in any of the guest tenants, you will see a counter that shows the number of notifications, as can be seen in Figure 2.4.15; however, this information does not trigger any pop-up notifications in the Microsoft Teams application.
From this menu you will also be able to add a personal Microsoft Teams account to the application; this option is explained in detail in Chapter 8, Other Microsoft Teams Use Cases.
You will be able to see exactly what organization you are connected to by looking at the organization name next to your profile picture:
Microsoft Teams has a presence indicator system that is extremely handy for informing teammates about your availability to be contacted at a given moment. The presence indicator reacts automatically to Teams activity, and changes to Away if you leave the application inactive for 5 minutes or lock your device; if you are in a meeting or presenting it also changes, informing other users you are busy.
While there is an automatic system to define the presence, you can also manually define it from the personal menu in the application. To control your status and availability, the following must be done:
On the Microsoft Teams client, click on your profile picture; under your email click on the presence bar dropdown.
Figure 2.4.17: Changing the Microsoft Teams status
To change your presence indicator, click on one of the following:
Available: Represented by a green icon
Busy: Represented by a red icon
Do not disturb: Represented by a red icon resembling a prohibited signal
Be right back: Represented by a yellow icon
Appear away: Represented by a yellow icon
Appear offline: Represented by a white icon with a cross
If you need to define your presence for a set amount of time, use the duration option, which allows you to select the period that you would like a presence indicator to be shown for:
30 minutes
1 hour
2 hours
Today
This week
Custom: You can define the date and hour after which point your status will be reset
Figure 2.4.18: Set the duration for which a presence indicator is shown
To let Microsoft Teams control your status automatically, again, click on the Reset status option.
In Microsoft Teams you will be able to see the presence indicator for each user and the presence state associated with them when you hover over the user presence indicator, as shown in Figure 2.4.19.
Figure 2.4.19: The status of a user can be shown by hovering over the presence indicator
Pro tip: Change Microsoft Teams status using commands
When using Microsoft Teams, use the keyboard shortcut Ctrl+E on Windows, or Command+E on macOS, to open the search bar and then type the status command you want to change to:
/available
/away
/brb
/busy
/dnd
/offline
When using Teams, you will notice that some users have presence indicators that cannot be defined manually; those are defined automatically by a combination of settings made in other Microsoft 365 applications. Table 2.2 displays a list of all the icons and states you can find in Microsoft Teams and other Microsoft 365 applications.
Icon
State
User-configured
App-configured
Available
Yes
Yes
Available, Out of Office
No
Yes*
Busy
Yes
Yes
In a call
No
Yes
In a meeting
No
Yes
On a call, Out of Office
No
Yes
Do not disturb
Yes
No
Presenting
No
Yes
Focusing
No
Yes†
Away
Yes
Yes
Away – Last Seen
No
Yes
Be right back
Yes
No
Offline
Yes
Yes
Unknown
No
Yes
Out of Office
No
Yes
Table 2.2: All the status symbols visible in Microsoft Teams defined by Teams or other Microsoft 365 applications
* Out of Office is configured when automatic replies are defined in Outlook; if the user is using Microsoft Teams and is out of office at the same time, the presence is represented by this state.
† The Focusing state appears when the user defines a focus time in the My Analytics or Viva Insights applications.
Custom status messages
To complement the presence indicator, you can define custom status messages that are displayed to users when they reach out to you. To define a custom status message, perform the following:
On the Microsoft Teams client, click on your profile picture, and then under your email click on Set status message.
Fill in the text box with your message, and, if needed, mention other users using @, followed by the name of the user.
Figure 2.4.20: Filling in the status message box and mentioning other users
Choose whether the message should be displayed to users when they message you.
Define the Clear status message after setting.
Click Done.
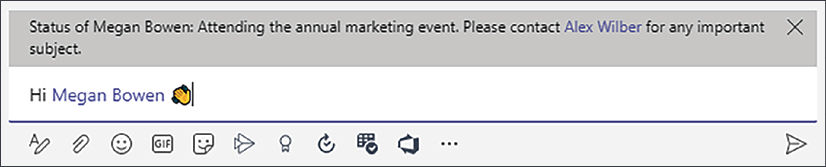
When a custom status is defined, users will see your message displayed in the way shown in Figure 2.4.21.
Figure 2.4.21: When messaging someone who has a status message set, it will appear as shown
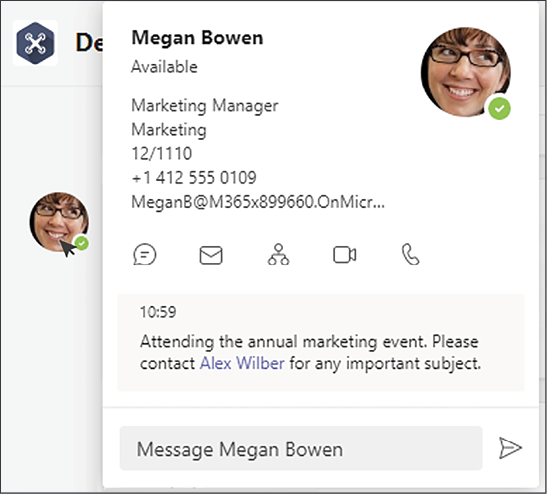
Custom status messages are also shown in the user profile card that is displayed when someone hovers over the user profile picture.
Figure 2.4.22: The status message, as seen when hovering over a user's profile icon
Defining focus time
Defining focus time is important for when you wish to focus on your own tasks without being disturbed by other users and notifications. You can set your focus time manually every day by changing your status to Do not disturb, or you can automate this process by using the My Analytics application included in the Microsoft 365 ecosystem.
To automatically define your focus time, do the following:
Define your focus plan by defining the number of focus hours:
Figure 2.4.23: Set your focus time for a set number of hours
Follow the wizard and choose whether you prefer your focus in the morning or afternoon, and whether or not you wish to receive notifications.
Once completed, you will get your calendar blocked with focus time. For those blocks your presence state is automatically defined as Focusing.
Figure 2.4.24: Focus time, as it appears in the calendar
Now that you have an overview of what Microsoft Teams' core features are and how to use them, you might be curious to know where all the data generated by these features is stored. Let us now look at this in more detail.


 Free Chapter