Sign In Start Free Trial
Account

Add to playlist

Create a Playlist

Modal Close icon
You need to login to use this feature.
  • Book Overview & Buying Learning Shiny
  • Table Of Contents Toc
  • Feedback & Rating feedback
Learning Shiny

Learning Shiny

By : Hernan Resnizky
2.9 (7)
close
close
Learning Shiny

Learning Shiny

2.9 (7)
By: Hernan Resnizky

Overview of this book

Make the most of R’s dynamic capabilities and implement web applications with Shiny About This Book Present interactive data visualizations in R within the Shiny framework Construct web dashboards in a simple, intuitive, but fully flexible environment Apply your skills to create a real-world web application with this step-by-step guide Who This Book Is For If you are a data scientist who needs a platform to show your results to a broader audience in an attractive and visual way, or a web developer with no prior experience in R or Shiny, this is the book for you. What You Will Learn Comprehend many useful functions, such as lapply and apply, to process data in R Write and structure different files to create a basic dashboard Develop graphics in R using popular graphical libraries such as ggplot2 and GoogleVis Mount a dashboard on a Linux Server Integrate Shiny with non-R-native visualization, such as D3.js Design and build a web application In Detail R is nowadays one of the most used tools in data science. However, along with Shiny, it is also gaining territory in the web application world, due to its simplicity and flexibility. Shiny is a framework that enables the creation of interactive visualizations written entirely in R and can be displayed in almost any ordinary web browser. It is a package from RStudio, which is an IDE for R. From the fundamentals of R to the administration of multi-concurrent, fully customized web applications, this book explains how to achieve your desired web application in an easy and gradual way. You will start by learning about the fundamentals of R, and will move on to looking at simple and practical examples. These examples will enable you to grasp many useful tools that will assist you in solving the usual problems that can be faced when developing data visualizations. You will then walk through the integration of Shiny with R in general and view the different visualization possibilities out there. Finally, you will put your skills to the test and create your first web application! Style and approach This is a comprehensive, step-by-step guide that will allow you to learn and make full use of R and Shiny’s capabilities in a gradual way, together with clear, applied examples.
Table of Contents (13 chapters)
close
close
Free Chapter
1
1. Introducing R, RStudio, and Shiny
chevron up
12
Index

About RStudio

As with other programming languages, there is a huge variety of IDEs available for R. IDEs are applications that make code development easier and clearer for the programmer. RStudio is one of the most important ones for R, and it is especially recommended to write web applications in R with Shiny because this contains features specially designed for this purpose. Additionally, RStudio provides facilities to write C++, Latex, or HTML documents and also integrates them to the R code.

RStudio also provides version control, project management, and debugging features among many others.

Installing RStudio

RStudio for desktop computers can be downloaded from its official website at http://www.rstudio.com/products/rstudio/download/ where you can get versions of the software for Windows, MAC OS X, Ubuntu, Debian, and Fedora.

A quick guide to RStudio

Before installing and running RStudio, it is important to have R installed. As it is an IDE and not the programming language, it will not work at all. The following screenshot shows RStudio's starting view:

A quick guide to RStudio

At the first glance, the following four main windows are available:

  • Text editor: This provides facilities to write R scripts such as highlighting and a code completer (when hitting Tab, you can see the available options to complete the code written). It is also possible to include R code in an HTML, Latex, or C++ piece of code.
  • Environment and history: They are defined as follows:
    • In the Environment section, you can see the active objects in each environment. By clicking on Global Environment (which is the environment shown by default), you can change the environment and see the active objects. You can find more information about environments in a chapter dedicated to this topic in the book Advanced R, by Hadley Wickham. It is available at http://adv-r.had.co.nz/Environments.html.
    • In the History tab, the pieces of codes executed are stored line by line. You can select one or more lines and send them either to the editor or to the console. In addition, you can look up for a certain specific piece of code by typing it in the textbox in the top right part of this window.
  • Console: This is an exact equivalent of R console, as described in Quick guide of R.
  • Tabs: The different tabs are defined as follows:
    • Files: This consists of a file browser with several additional features (renaming, deleting, and copying). Clicking on a file will open it in editor or the Environment tab depending on the type of the file. If it is a .rda or .RData file, it will open in both. If it is a text file, it will open in one of them.
    • Plots: Whenever a plot is executed, it will be displayed in that tab.
    • Packages: This shows a list of available and active packages. When the package is active, it will appear as clicked. Packages can also be installed interactively by clicking on Install Packages.
    • Help: This is a window to seek and read active packages' documentation.
    • Viewer: This enables us to see the HTML-generated content within RStudio.

Along with numerous features, RStudio also provides keyboard shortcuts. A few of them are listed as follows:

Description

Windows/Linux

OSX

Complete the code.

Tab

Tab

Run the selected piece of code. If no piece of code is selected, the active line is run.

Ctrl + Enter

⌘ + Enter

Comment the selected block of code.

Ctrl + Shift + C

⌘ + /

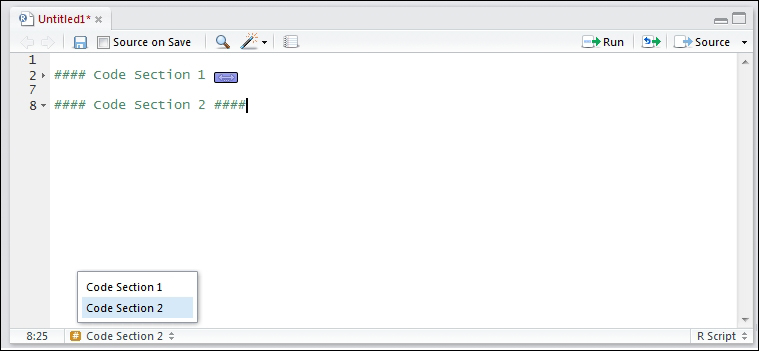
Create a section of code, which can be expanded or compressed by clicking on the arrow to the left. Additionally, it can be accessed by clicking on it in the bottom left menu.

#####

#####

Find and replace.

Ctrl + F

⌘ + F

The following screenshots show how a block of code can be collapsed by clicking on the arrow and how it can be accessed quickly by clicking on its name in the bottom-left part of the window:

A quick guide to RStudio

Clicking on the circled arrow will collapse the Section 1 block, as follows:

A quick guide to RStudio

The full list of shortcuts can be found at https://support.rstudio.com/hc/en-us/articles/200711853-Keyboard-Shortcuts.

Note

For further information about other RStudio features, the full documentation is available at https://support.rstudio.com/hc/en-us/categories/200035113-Documentation.

Create a Note

Modal Close icon
You need to login to use this feature.
notes
bookmark search playlist font-size

Change the font size

margin-width

Change margin width

day-mode

Change background colour

Close icon Search
Country selected

Close icon Your notes and bookmarks

Delete Bookmark

Modal Close icon
Are you sure you want to delete it?
Cancel
Yes, Delete

Delete Note

Modal Close icon
Are you sure you want to delete it?
Cancel
Yes, Delete

Edit Note

Modal Close icon
Write a note (max 255 characters)
Cancel
Update Note

Confirmation

Modal Close icon
claim successful

Buy this book with your credits?

Modal Close icon
Are you sure you want to buy this book with one of your credits?
Close
YES, BUY