Sign In Start Free Trial
Account

Add to playlist

Create a Playlist

Modal Close icon
You need to login to use this feature.
  • Building Smart Drones with ESP8266 and Arduino
  • Toc
  • feedback
Building Smart Drones with ESP8266 and Arduino

Building Smart Drones with ESP8266 and Arduino

By : Omar Faruk Towaha
4.1 (8)
close
Building Smart Drones with ESP8266 and Arduino

Building Smart Drones with ESP8266 and Arduino

4.1 (8)
By: Omar Faruk Towaha

Overview of this book

With the use of drones, DIY projects have taken off. Programmers are rapidly moving from traditional application programming to developing exciting multi-utility projects. This book will teach you to build industry-level drones with Arduino and ESP8266 and their modified versions of hardware. With this book, you will explore techniques for leveraging the tiny WiFi chip to enhance your drone and control it over a mobile phone. This book will start with teaching you how to solve problems while building your own WiFi controlled Arduino based drone. You will also learn how to build a Quadcopter and a mission critical drone. Moving on you will learn how to build a prototype drone that will be given a mission to complete which it will do it itself. You will also learn to build various exciting projects such as gliding and racing drones. By the end of this book you will learn how to maintain and troubleshoot your drone. By the end of this book, you will have learned to build drones using ESP8266 and Arduino and leverage their functionalities to the fullest.
Table of Contents (11 chapters)
close

Using drones and delivery man

In this section we will ship or drop a package to a destination by our drone. This is a tricky part in the Mission Planner software. There is no direct way to do it. We can modify the camera shutter button to drop a package from our drone. We need to connect a servo motor with ArduPilot, and we will trigger a signal to the channel we connect and move the servo. If we have a placeholder connected to our servo, we can drop the package from the placeholder by triggering the servo from our remote or the Mission Planner software.

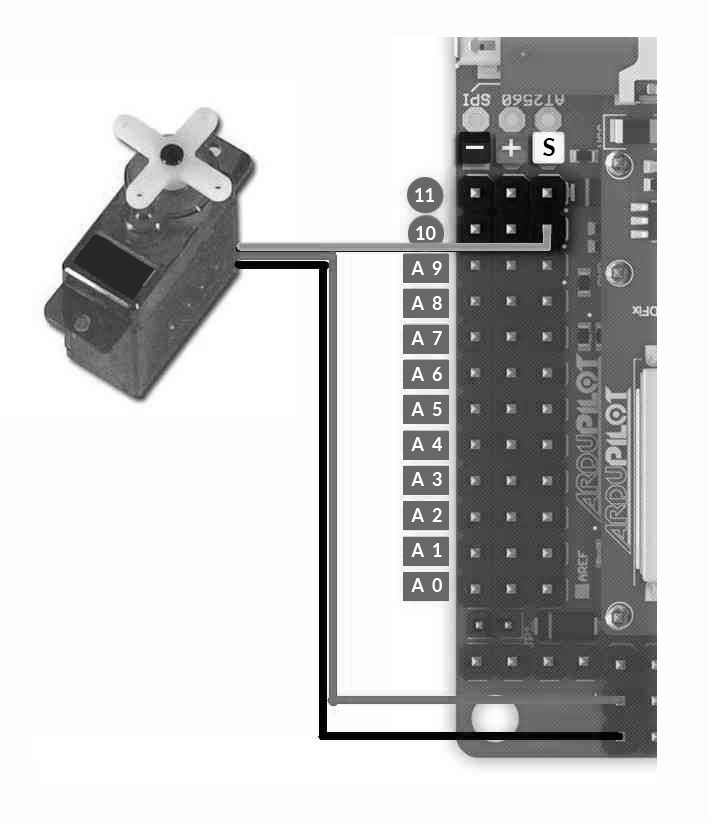
Let's connect the servo motor first. For our quadcopter, we have used one-four output channels of ArduPilot. On any other channel, we will connect a servo, as shown in the following picture:

  1. Now, go to the initial setup of the Mission Planner software, and from Optional Hardware, select Camera Gimbal. At the bottom you...
bookmark search playlist download font-size

Change the font size

margin-width

Change margin width

day-mode

Change background colour

Close icon Search
Country selected

Close icon Your notes and bookmarks

Delete Bookmark

Modal Close icon
Are you sure you want to delete it?
Cancel
Yes, Delete