Sign In Start Free Trial
Account

Add to playlist

Create a Playlist

Modal Close icon
You need to login to use this feature.
  • Book Overview & Buying Building Smart Drones with ESP8266 and Arduino
  • Table Of Contents Toc
  • Feedback & Rating feedback
Building Smart Drones with ESP8266 and Arduino

Building Smart Drones with ESP8266 and Arduino

By : Omar Faruk Towaha
4.1 (8)
close
close
Building Smart Drones with ESP8266 and Arduino

Building Smart Drones with ESP8266 and Arduino

4.1 (8)
By: Omar Faruk Towaha

Overview of this book

With the use of drones, DIY projects have taken off. Programmers are rapidly moving from traditional application programming to developing exciting multi-utility projects. This book will teach you to build industry-level drones with Arduino and ESP8266 and their modified versions of hardware. With this book, you will explore techniques for leveraging the tiny WiFi chip to enhance your drone and control it over a mobile phone. This book will start with teaching you how to solve problems while building your own WiFi controlled Arduino based drone. You will also learn how to build a Quadcopter and a mission critical drone. Moving on you will learn how to build a prototype drone that will be given a mission to complete which it will do it itself. You will also learn to build various exciting projects such as gliding and racing drones. By the end of this book you will learn how to maintain and troubleshoot your drone. By the end of this book, you will have learned to build drones using ESP8266 and Arduino and leverage their functionalities to the fullest.
Table of Contents (11 chapters)
close
close

GPS Tracker using ESP8266

We will use the following components:

  • NodeMCU (it has a built-in ESP8266)
  • GPS receiver (you can use the Ublox NEO-6M GPS Module)
  • A few cables
  • Power source
  • A smartphone (for the Blynk)

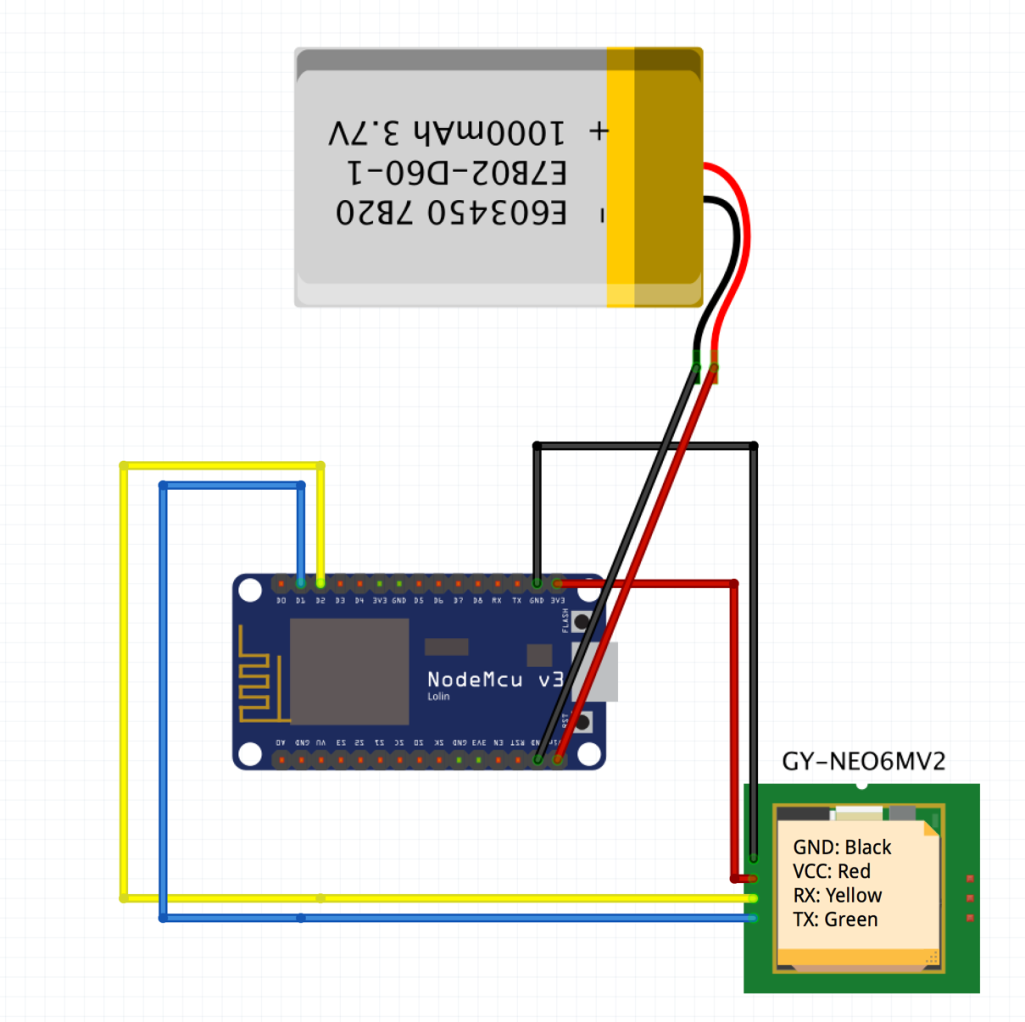
To make the connection, follow the pin configurations with NodeMCU and the GPS receiver:

NodeMCU

GPS receiver

D1

TX

D2

RX

GND

GND

VCC

3V

See the following circuit for clarification:

  1. Now, connect the NodeMCU to the computer and open the Arduino application to program the NodeMCU. Before uploading the code, let's open our Blynk app.
  2. Create a new project, as we discussed in Chapter 3, Preparing Your Drone for Flying.
  3. Remember the authentication code sent to the email address you registered with the app; this will be needed later. In my case, I have set my project name as MY GPS TRACKER, device type as NodeMCU, and connection type...

Unlock full access

Continue reading for free

A Packt free trial gives you instant online access to our library of over 7000 practical eBooks and videos, constantly updated with the latest in tech

Create a Note

Modal Close icon
You need to login to use this feature.
notes
bookmark search playlist download font-size

Change the font size

margin-width

Change margin width

day-mode

Change background colour

Close icon Search
Country selected

Close icon Your notes and bookmarks

Delete Bookmark

Modal Close icon
Are you sure you want to delete it?
Cancel
Yes, Delete

Delete Note

Modal Close icon
Are you sure you want to delete it?
Cancel
Yes, Delete

Edit Note

Modal Close icon
Write a note (max 255 characters)
Cancel
Update Note

Confirmation

Modal Close icon
claim successful

Buy this book with your credits?

Modal Close icon
Are you sure you want to buy this book with one of your credits?
Close
YES, BUY