-
Book Overview & Buying
-
Table Of Contents

-
Feedback & Rating

Data Acquisition Using LabVIEW
By :
Data Acquisition Using LabVIEW
By:
Overview of this book
NI LabVIEW's intuitive graphical interface eliminates the steep learning curve associated with text-based languages such as C or C++. LabVIEW is a proven and powerful integrated development environment to interact with measurement and control hardware, analyze data, publish results, and distribute systems.
This hands-on tutorial guide helps you harness the power of LabVIEW for data acquisition. This book begins with a quick introduction to LabVIEW, running through the fundamentals of communication and data collection. Then get to grips with the auto-code generation feature of LabVIEW using its GUI interface. You will learn how to use NI-DAQmax Data acquisition VIs, showing how LabVIEW can be used to appropriate a true physical phenomenon (such as temperature, light, and so on) and convert it to an appropriate data type that can be manipulated and analyzed with a computer. You will also learn how to create Distribution Kit for LabVIEW, acquainting yourself with various debugging techniques offered by LabVIEW to help you in situations where bugs are not letting you run your programs as intended.
By the end of the book, you will have a clear idea how to build your own data acquisition system independently and much more.
Table of Contents (12 chapters)
Preface

 Free Chapter
1. LabVIEW Basics
2. Most Common Communication Buses
3. Using the DAQ Assistant to Automatically Generate LabVIEW Code
4. DAQ Programming Using LabVIEW
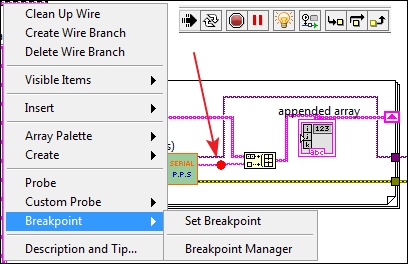
5. Debugging Techniques
6. Real-World DAQ Programming Techniques
7. Real-Time Issues
8. DAQ at a Distance - Network and Distributed Systems
9. Alternate Software for DAQ
10. Non-National Instrument Devices DAQ
11. LabVIEW and Simple Microcontrollers
Customer Reviews