Installing Maven on Mac OS X
Let us look at the steps to install Maven on Mac OS X. This applies to the latest version of Mac OS X, namely Yosemite.
Earlier, Apple provided Java for Mac, but stopped doing so from Java 7 onwards. Apple Java is not available on recent versions of Mac OS X.
Let us check if the Java environment is available on your Mac:
- Open the terminal and run the following command:
- See if you get an output similar to the following:
- Run the following command to check if you have Java 8:
- This should give the following output if Java exists:
As you can see, my system has both Java 1.7 and 1.8.
- Set
JAVA_HOME to the desired JDK. This can be done in two ways, depending on what you desire:If this is for the duration of the session, run the following command:
If this is permanent, add the preceding line in .bash_profile in your HOME folder
Tip
Ensure you have the JDK installation and not JRE.
If Java is not present, download and install Java from the Oracle Java download page at http://www.oracle.com/technetwork/java/javase/downloads/index.html.
Once installed, verify the Java installation by following the preceding steps.
Now, let us set up Maven on Mac OS X.
Let's download Maven from its official website by performing the following steps:
- Go to http://maven.apache.org/ and click on the Download link. Links to the latest stable versions of Maven will be displayed.
- The binaries are available in both
.zip and .tar.gz formats. Choose one of them. - Extract the downloaded binary to the folder you want Maven to reside in. The typical location for the Mac is
/usr/local folder. - You will need a super user (su) or administrator access to place the contents in the
/usr/local folder. If you do not have access, you can place the contents in a subfolder of your HOME folder. - Ensure the contents are similar to the following output by executing the following command:
The output is shown as:
- Set the
M2_HOME variable as follows: - Update the
PATH to include Maven's bin folder:
Tip
Like JAVA_HOME, the preceding settings can be persisted by updating .bash_profile with the preceding lines.
In the preceding steps, we discussed the steps to download Maven from its official website. We will now discuss installing Maven using brew. Brew is a popular application on Mac OS X to install open source software. If you have brew installed on your Mac OS X, run the following command to install Maven:
The output for the preceding command will be displayed as shown in the following screenshot:
The Maven installation is essentially a set of JAR files, configuration files, and a Mac OS X shell script, namely mvn.
The mvn command essentially runs this script. It first checks for JAVA_HOME. This file is present in the bin folder of the Maven installation and, hence, it needs to be in PATH.
If the shell script does not find JAVA_HOME, it looks for Java in its PATH. This can lead to unexpected results, as typically the Java in PATH is usually the JRE installation and not JDK.
The shell script then looks for M2_HOME, which is the location for the Maven installation. It does this so that it can load the libraries that are present.
Additionally, it also reads values specified in MAVEN_OPTS. This variable allows you to run Maven with an additional heap size and other Java parameters.
Using the values for JAVA_HOME, M2_HOME, and MAVEN_OPTS, the shell script runs its main class org.codehaus.plexus.classworlds.launcher.Launcher.
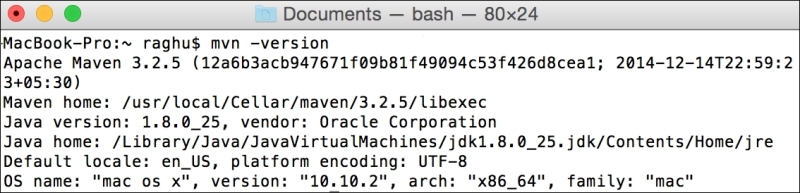
Verify your Maven installation using the following steps:
- Open a command prompt and run the following command:
- The output for the preceding command should be displayed as shown in the following screenshot:
- The Creating a simple project with Maven recipe in this chapter


 Free Chapter