Microsoft Teams provides various ways to schedule meetings via the Teams desktop client / Teams Web on your Windows/Mac, mobile devices, or iPad/tablet devices:
- Log in to Microsoft Teams using your credentials. On the left side, you will see the Calendar button. Click on New meeting and schedule a meeting.
- Click on the New meeting dropdown in the top-right corner and select Schedule meeting.
Figure 1.1 – New meeting drop-down menu
- You have an option to modify the view of the calendar to show meetings for a day, work week, or calendar week.
Figure 1.2 – Calendar view options
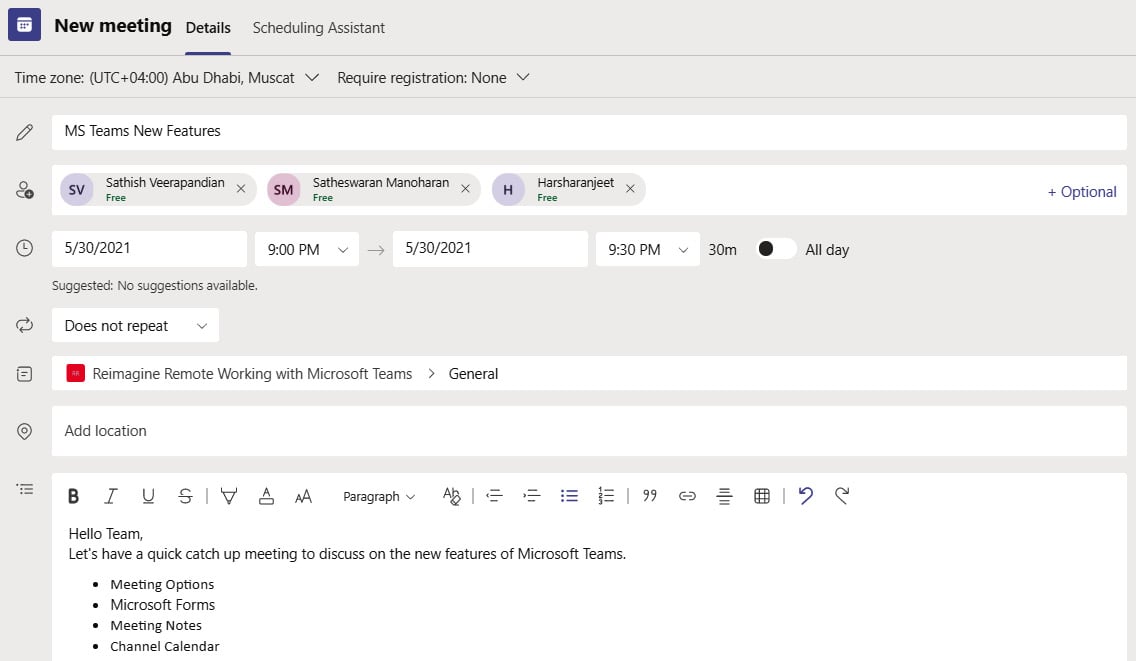
- Add a title for the Microsoft Teams meeting that gives a quick insight into the meeting for the recipients.
- Modify Time Zone if required.
- Require Registration allows the meeting organizer to request participants to register for an event.
Note
If you require the user to register for this event, we cannot add a channel to the meeting. The registration link can be modified.
- Add participants by typing in the first few letters of the recipients' names and Teams will pull out suggestions from the address book.
Figure 1.3 – Looking up recipients in the address book
- You will also notice that the availability of the participants is shown automatically based on the date and time that you choose. This helps you to adjust the meeting time directly, avoiding any decline responses. This availability feature is limited to internal organization members.
Figure 1.4 – Availability of participants
- To invite someone outside your organization, type in their email address and they will get a link to join as a guest. You can also add optional recipients.
Figure 1.5 – Inviting a guest
- Choose the start and end date and time from the date picker. Use the All day toggle bar if you wish to have the meeting for the whole day.
Figure 1.6 – Setting start and end times
- Scheduling Assistant is a key feature with Exchange, and this is available in Microsoft Teams as it is tightly integrated with your Exchange calendar.
Figure 1.7 – Scheduling Assistant
This feature helps you to show the free/busy information of the meeting recipients and helps you to decide on a suitable time at which all participants will be able to join the meeting.
Figure 1.8 – Using Scheduling Assistant
- There are a variety of options to choose from out of the box from Teams to set a meeting as a recurring meeting or choose a custom date.
Figure 1.9 – Create a recurring meeting
Channel Meeting
Teams meetings allow you to directly add a team channel where all the members of the channel will be auto-added to the meeting request. This allows you to post the meeting link in the channel to join the meeting and to collaborate.
Figure 1.10 – Adding a Teams channel to a meeting
- You can add a location according to your Rooms system, or by default, the meeting is created as an online meeting.
- Finally, add the agenda in the body of the meeting for the participants to be prepared well ahead of the meeting. You can use the default word editing options, such as Bold, Italics, Underline, and other formatting options, for clearer content.
Figure 1.11 – Preview of the meeting request
Now all the participants who are added to the meeting should have an email with the meeting link to Join.
Meeting options are limited when initiating them through mobile devices; however, most of the settings are like the steps in this section.
Initiating a meeting
A Microsoft Teams meeting can be initiated from the Teams client directly, or from Outlook, as the Teams and Outlook calendars are completely integrated with each other.
Note
The Outlook plugin option is applicable only if it is enabled by your administrator.
To start a meeting, follow these steps:
- Click on the Calendar icon in the Teams client. You will notice that the meeting item has a Join option at the scheduled time. Click on Join.
Figure 1.12 – Calendar within Teams
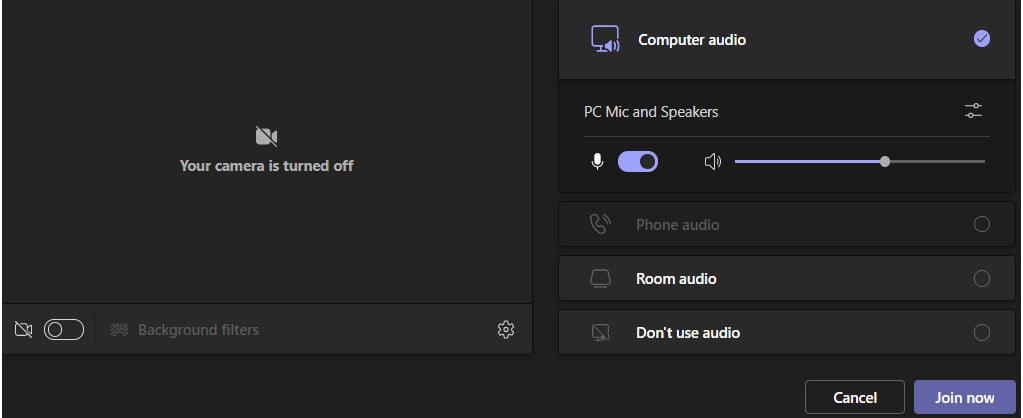
- Teams allows you to configure your audio and video settings before the actual meeting starts. This option is not limited to the organizer, any participant who joins in the meeting will be allowed to choose their preferred audio and video options.
Figure 1.13 – Audio and video options
Turning video on and off
To turn video on and off and to see how to set up your preferences, follow these steps:
- You can choose to turn your video on or off during meetings. You can simply use the toggle button to turn on your video. Microsoft Teams remembers your initial settings for your later meetings. You can always change the settings based on your needs.
Figure 1.14 – How to toggle video on
- Once the video is turned on, you can choose from the variety of background filters that are available by clicking on Background filters. Microsoft Teams also allows you to add a personalized background filter (such as a company logo) to show as your background during the whole meeting.
Figure 1.15 – Background filters
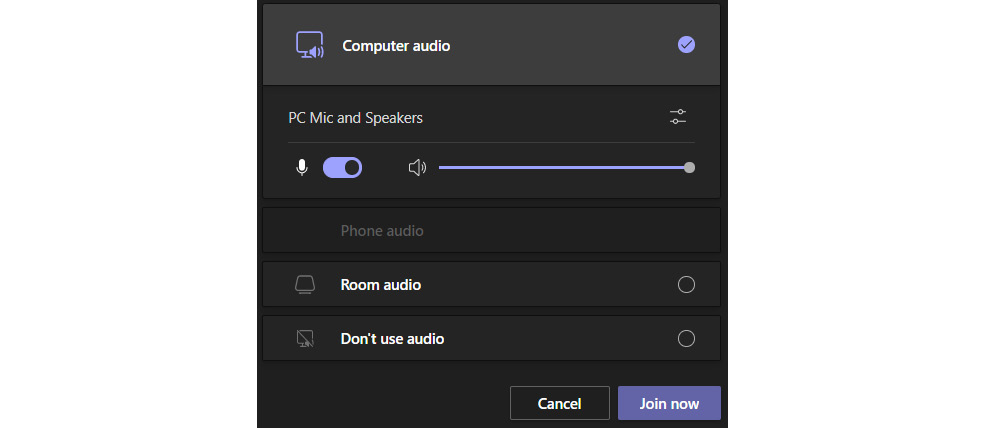
- Click on the Settings button and choose your audio preference. Microsoft allows you to select your computer audio for voiceovers during the meeting, or a room system if your IT team has configured any room devices in your meeting rooms. More importantly, you can join as a silent audience by selecting the option Don't use audio. Please feel free to select the appropriate option for your voiceover. From this screen, Teams also allows you to adjust your computer's speaker volume.
Figure 1.16 – Adjust speaker volume
Alternatively, you can open your Microsoft Outlook or Outlook Web Access, click on Calendar, and initiate the meeting from either of these clients.
Configuring meeting options
Once you have initiated the meeting, you can still change your audio or video preferences by clicking on the options in the top-right corner of your client.
Figure 1.17 – Options within an active meeting
Let's look at what each option icon allows you to do:
- Participants: Click on the Participants button to display all meeting participants, including the people who are invited and are yet to join.
- Conversation: Select the Conversation button to have an overview of the chat between participants within the meeting. You also have the option of adding files, emojis, GIFs, and stickers. Emojis, animated GIFs, and stickers are a great way to add some fun and express yourself in your communication! Teams has added new emoji galleries with over 800 emojis to choose from, including some you can personalize.
- Categorizing Messages: This is one of the most used features, to categorize a message before sending. As you can see in the following screenshot, if you categorize the messages as Urgent, every participant will be notified every 2 minutes for 20 minutes, so you can bring a critical message to everyone's attention.
Figure 1.18 – Categorizing messages
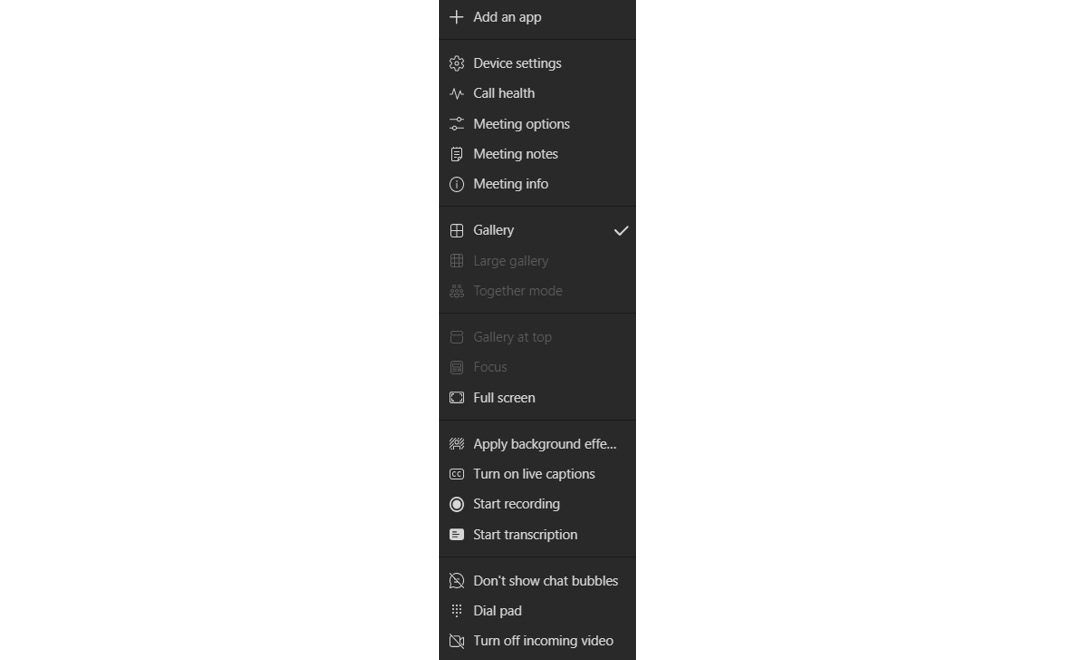
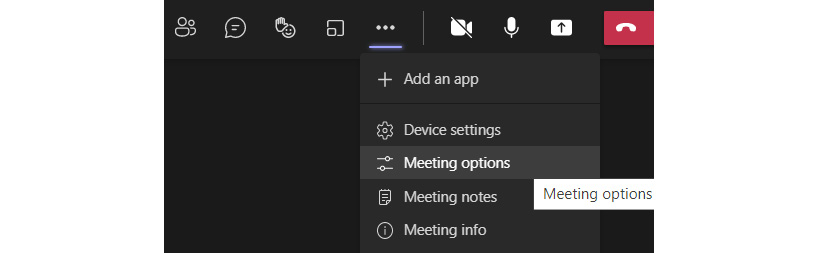
Select the …to configure further options such as screen recording, turning on live captions, and meeting notes.
Figure 1.19 – Further meeting options
- Device settings: Device settings allows you to change the audio/video options at any time in the meeting.
- Meeting options: Although default participant settings are determined by a company's IT admin, the meeting organizer may want to change them for a specific meeting. The organizer can make these changes on the Meeting options web page.
Figure 1.20 – Meeting options
- Lobby Settings: It is very important to know that IT admins can set default policies; however, meeting organizers can always override the settings for their particular meeting. It can be very useful when you have a meeting with management users and you do not want them to have to wait in the lobby to get into the meeting. So, you can simply choose any one of the lobby settings based on the following screenshot and table.
Figure 1.21 – Bypassing the lobby
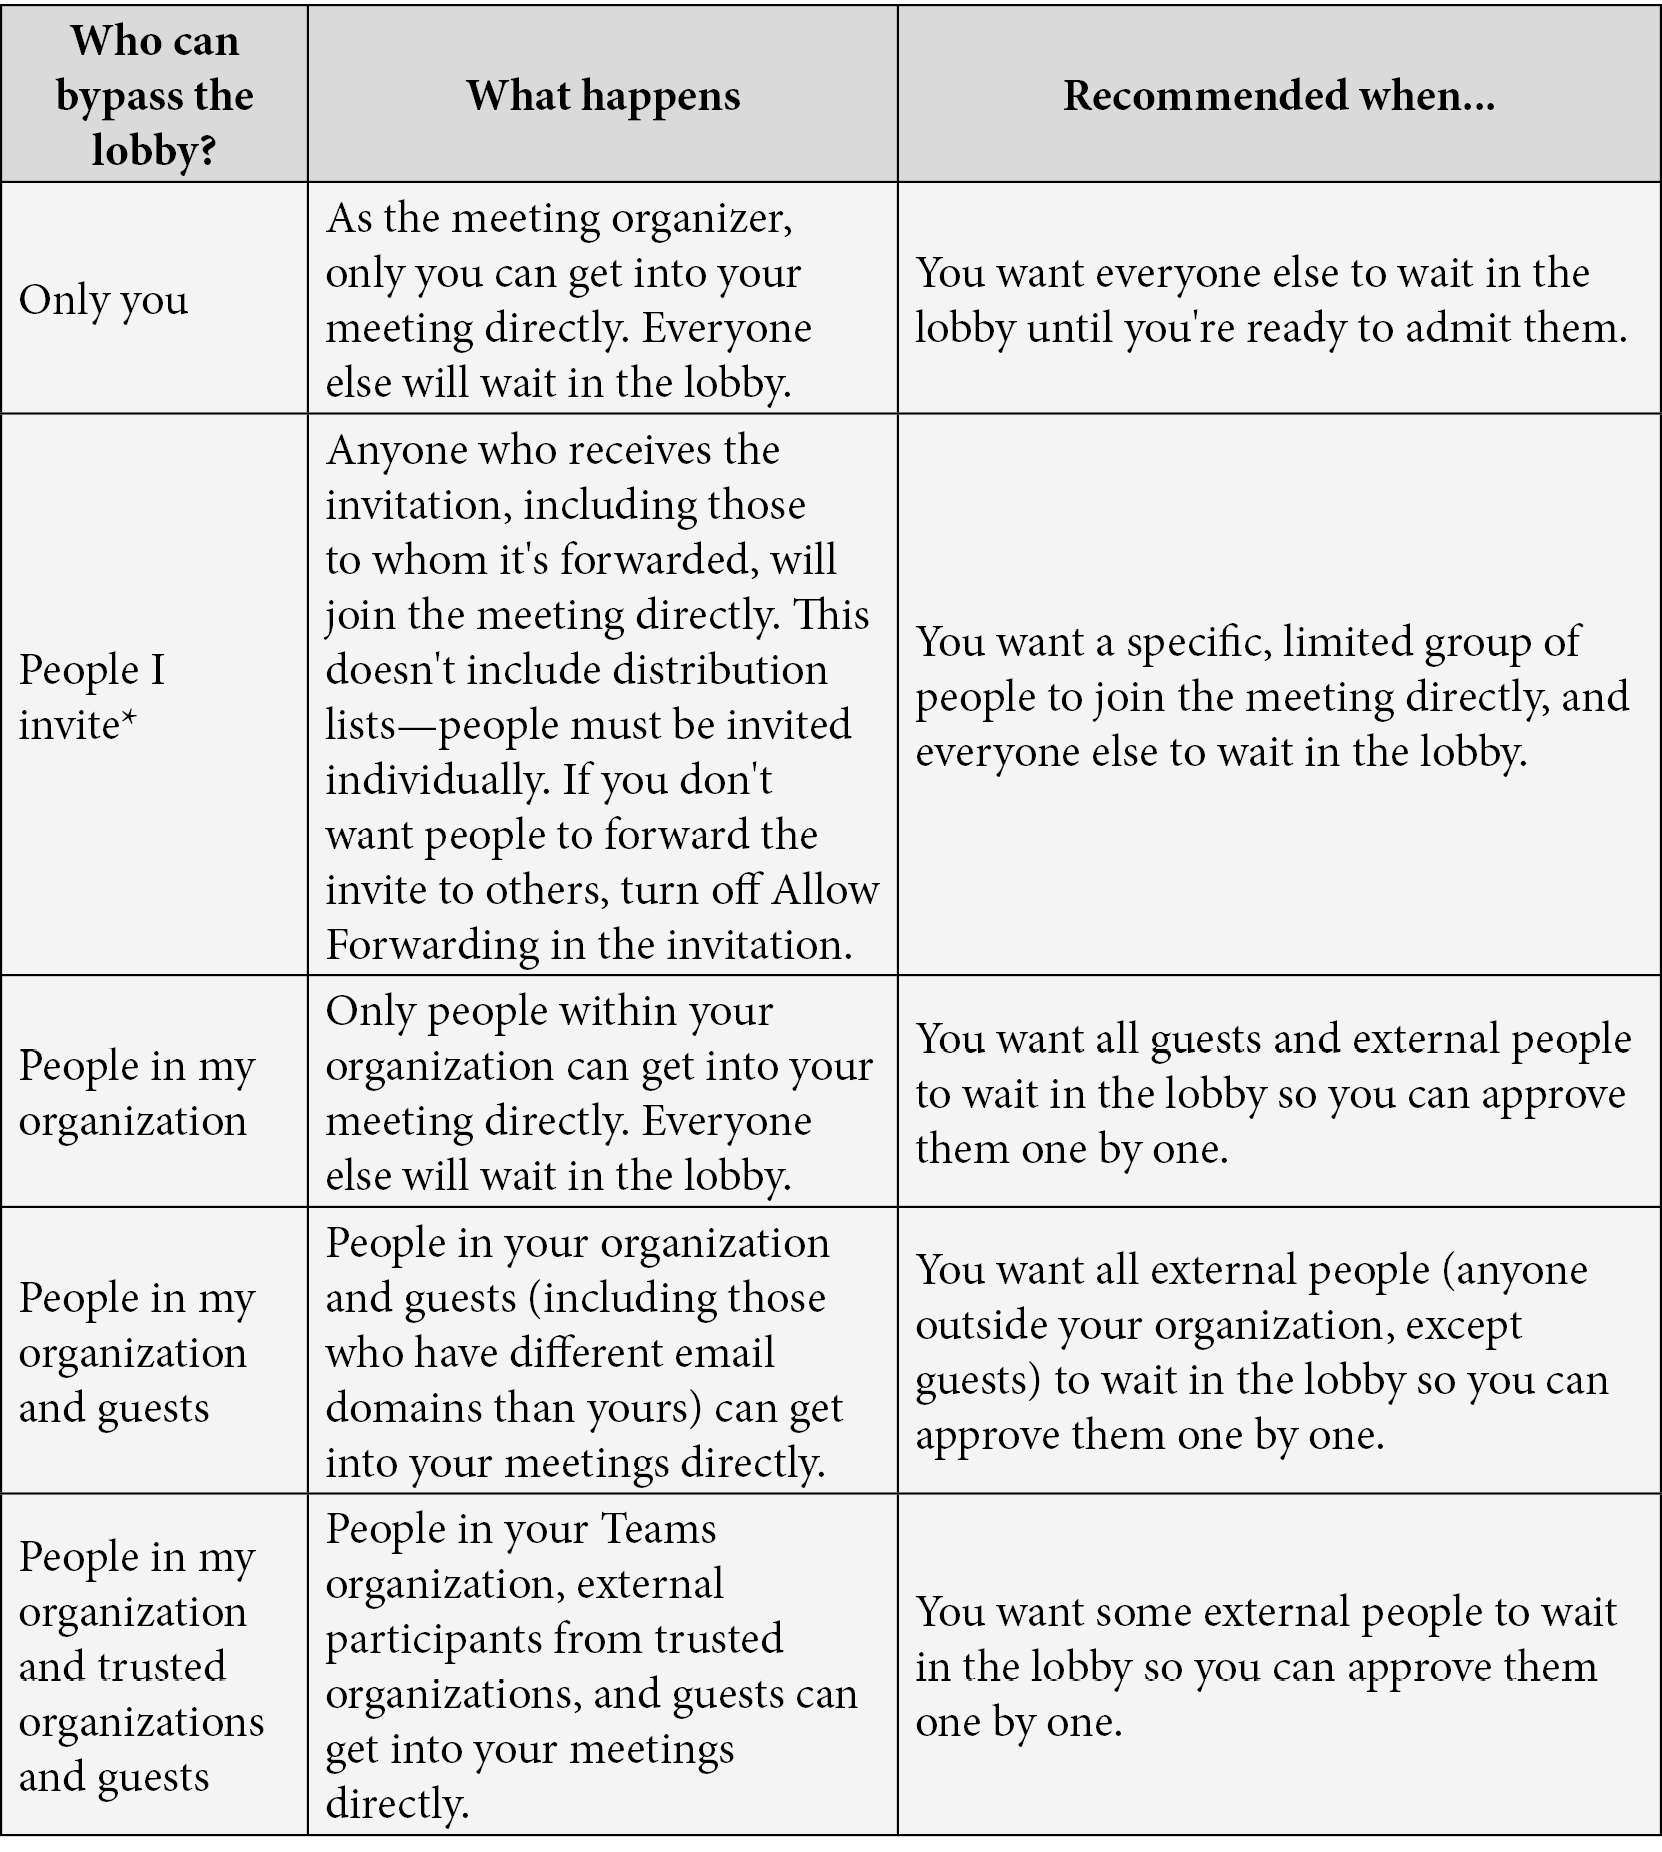
Figure 1.22 – Options for lobby settings
- Caller Bypass: You can allow callers who are dialing in using mobile to be auto-admitted into the meeting, thus bypassing the lobby.
Figure 1.23 – Allowing callers to bypass the Lobby
- Notifications: You may want to receive an alert when someone calling in by phone joins or leaves your meeting.
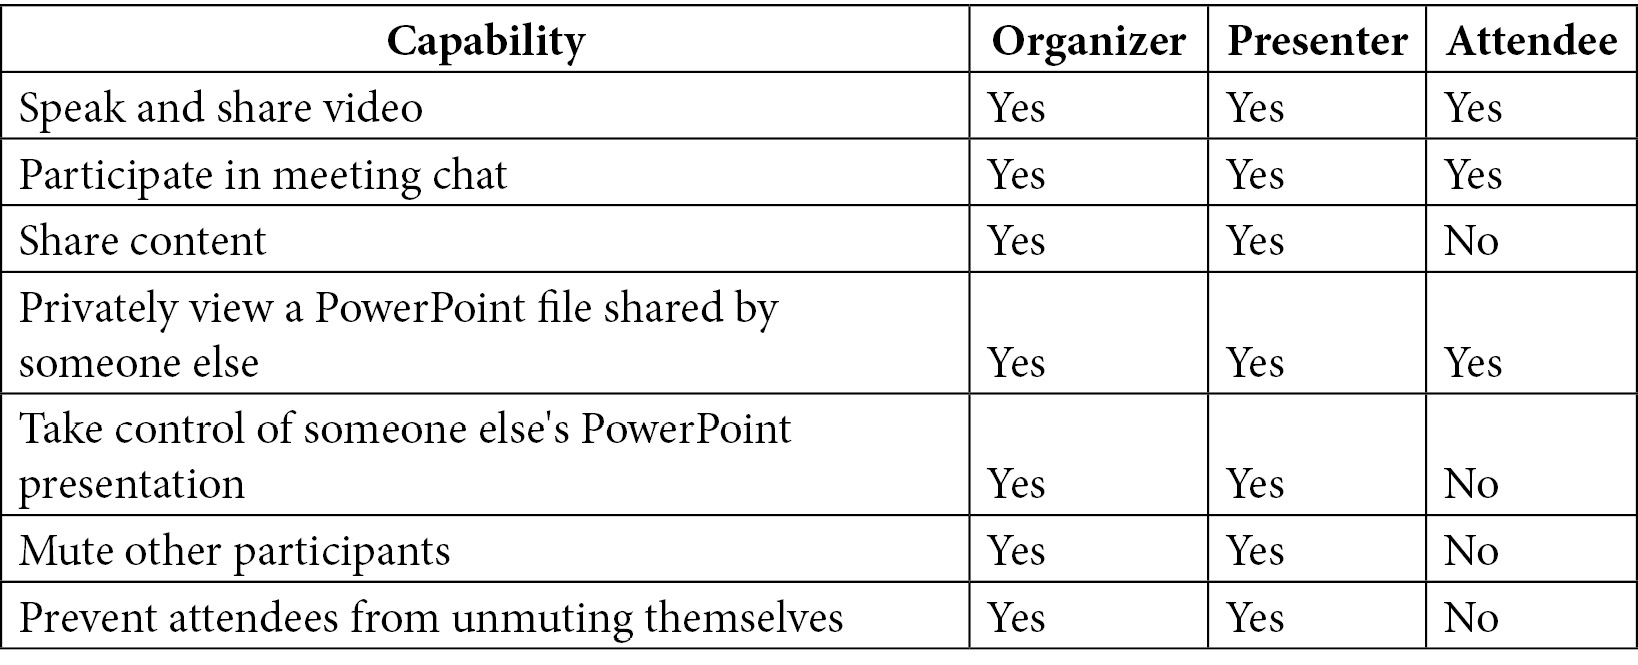
- Meeting Roles: Meetings can have participants who are internal to the organization or are external guests or vendors. It is vital for an organizer to know the roles of each participant, and Microsoft Teams allows you to preconfigure the settings once the meeting request is created. This can also be done during the meeting. There are two roles to choose from: presenter and attendee. Presenters can do just about anything that needs doing in a meeting, while the role of an attendee is more restricted. The following table outlines the abilities of an Organizer, Presenter, and Attendee:
Figure 1.24 – Capabilities of meeting roles
Managing meeting roles
Microsoft Teams allows you to change meeting roles before the meeting or during the meeting. It is always recommended that the options are configured before the meeting to avoid last-minute changes.
Note
You'll need to send out the meeting invite before you can assign roles.
The next sections will go through how to manage meeting roles depending on when they are being modified.
Before the meeting
If managing roles before a meeting has started, follow these steps:
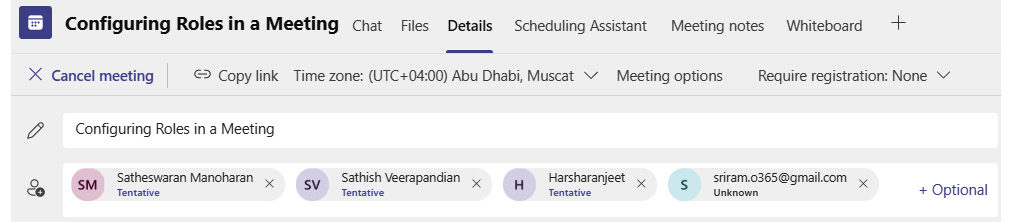
- Click on the Calendar tab on the Teams client, click on the meeting on the calendar, and click Edit.
Figure 1.25 – Select Edit
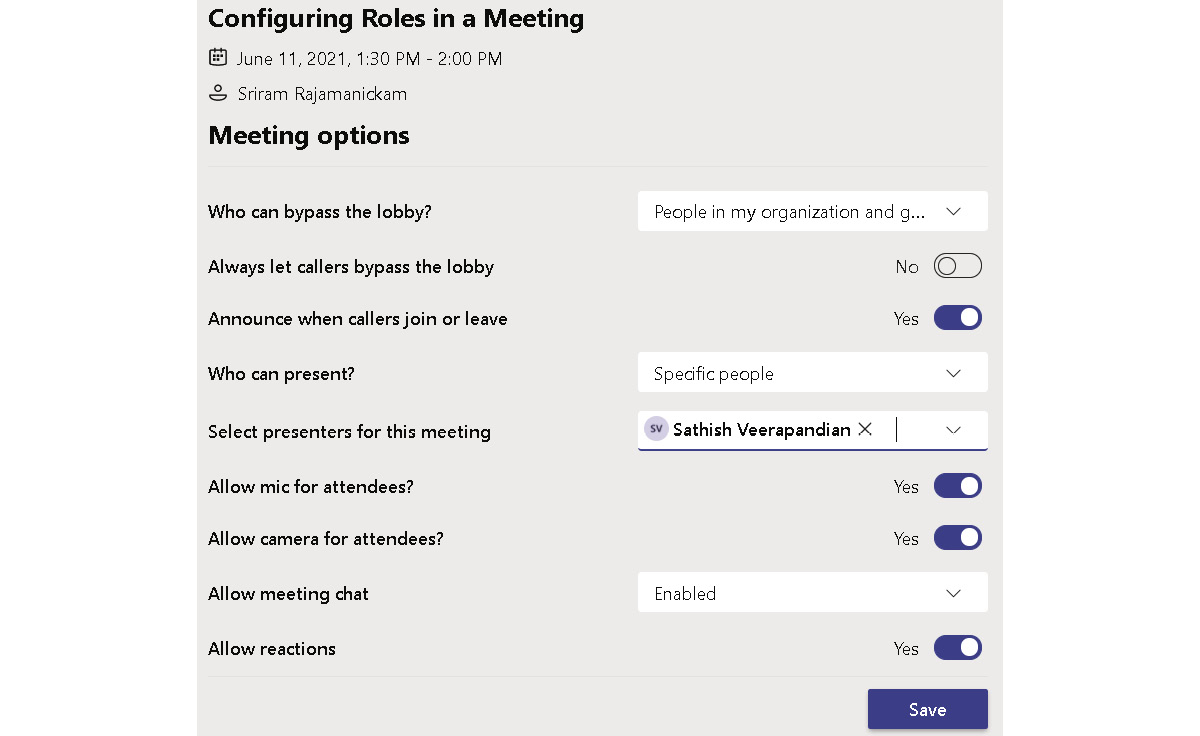
- Editing the meeting allows you to add/remove recipients and change the time, location, and room systems. It also allows you to configure roles for the participants of the meeting. To modify the roles, you can click on Meeting options.
Figure 1.26 – Meeting options
This will open all available meeting options that you can customize. The good thing here is that you can even modify the other settings that are mentioned above in this console. In this example, I just wanted one of my colleagues to be the presenter and everyone else to be an attendee.
Figure 1.27 – Configuring Roles in a Meeting
Allowing camera and mic options for participants
Mostly all meeting conversations require bidirectional communication and face-to-face interaction allows a meeting to be more productive. However, it may cause certain inconveniences as remote working is continuing for many organizations, and sometimes participants join a meeting from a noisy environment. The Microsoft Teams client allows you to decide as an organizer to allow mic and camera for attendees. We can simply toggle the settings on/off. It also allows you to change these at any time during the meeting. To allow these options, click on the Meeting options icon during the meeting. When turned off, the participants' camera and mic will be grayed out.
Figure 1.28 – Toggling camera and mic for attendees
We can now join the meeting and see the experience we have created by clicking on the Join button on the meeting item.
Figure 1.29 – Joining the meeting
During the meeting
All the roles options mentioned in the previous section can be modified even after the meeting is started. Once the organizer or the presenter completes the presentation, if you would like other participants to turn on their mic or camera, the organizer or presenter is able to change the settings by clicking on Meeting options.
Figure 1.30 – Changing role options during a meeting
Sharing content during a meeting
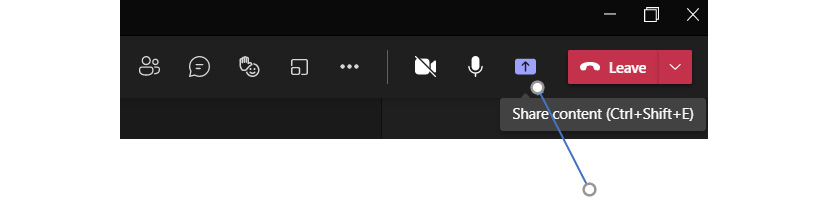
As we have seen in the previous section on role configuration, you can define who is allowed to present their content during a meeting. Only the allowed participants will have Share content as an available option.
Figure 1.31 – Share content option during a meeting
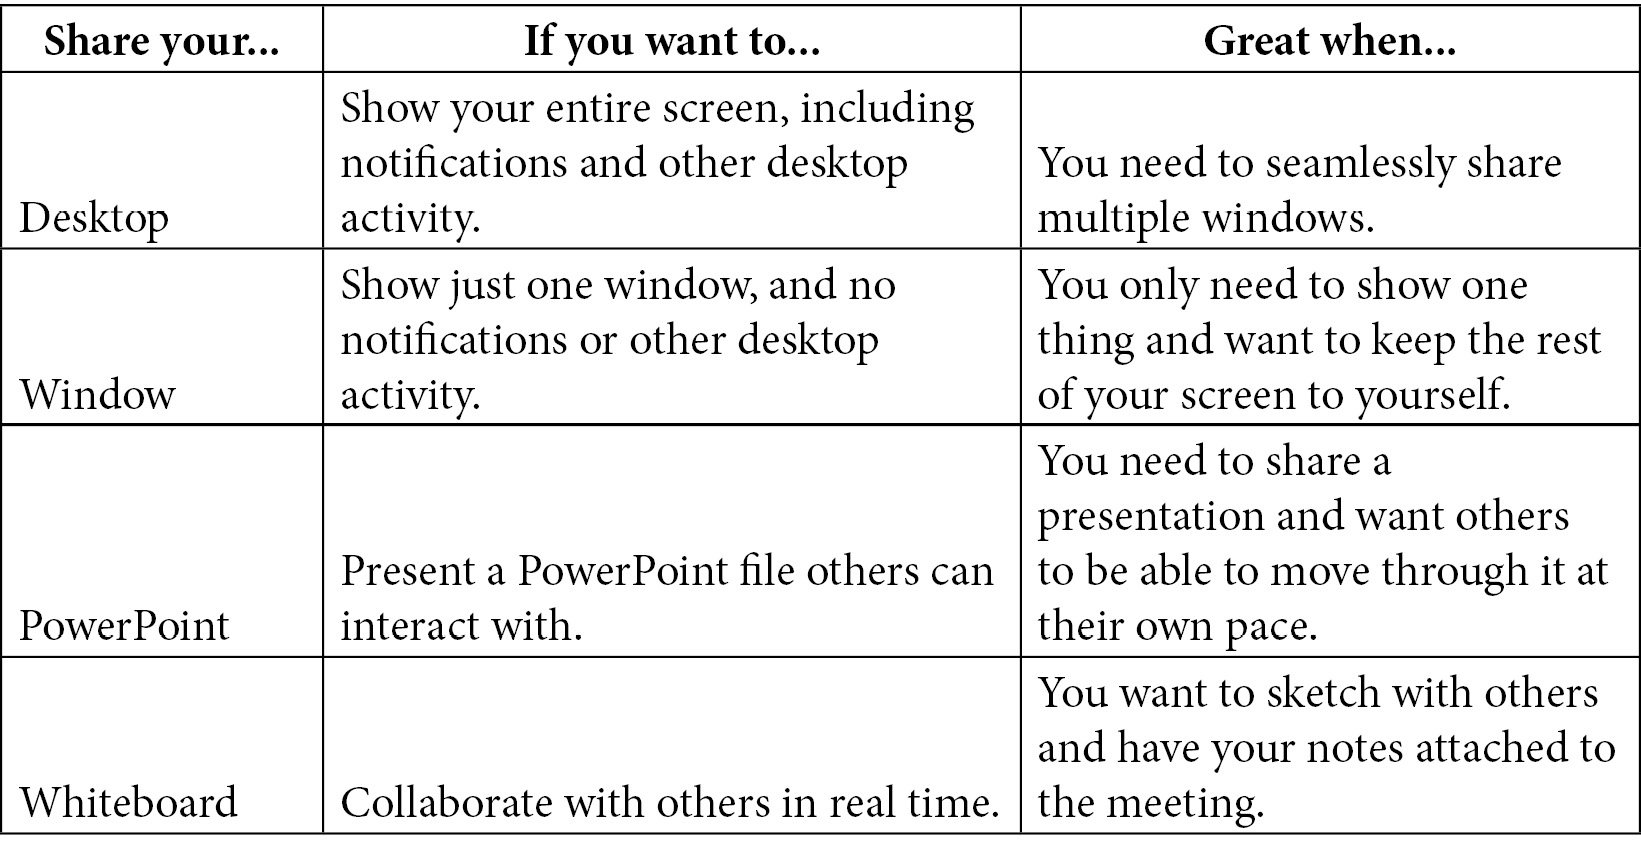
The organizer or presenter can share their desktop, Windows, PowerPoint, or Whiteboard. The following table describes the outcome of each sharing option that is available.
Organizers are allowed to include their computer audio when they present any audio files where all the participants in the meeting can hear the video and audio buffer from the organizer's computer.
Figure 1.32 – Include computer sound
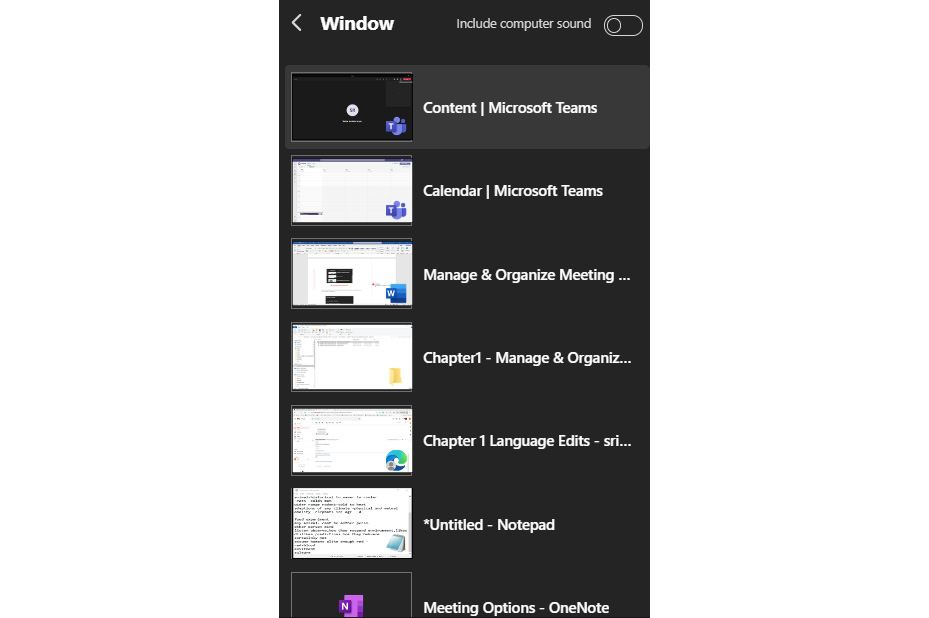
If you choose to present your windows, Teams will show all the tools and files that are open on your system, and you can choose the desired one to present.
Figure 1.33 – Selecting which screen to share
If you choose to present a PowerPoint slide, Teams allows you to choose files from your computer or OneDrive.
Figure 1.34 – Presenting files from different locations
Presenter mode
The meeting organizer can customize the presenter mode by choosing whether they would like to present Content Only or Standout.
Note
Presenter mode is relatively new and Microsoft will be rolling out this option to tenants, so if it is not available in your organization, an IT admin should be able to guide you on the timeline of this option becoming available to end users.
- Standout mode shows the presenter in front of the content.
- Reporter mode displays content above the presenter's shoulder.
- Side-by-side mode has the content and the presenter displayed side by side.
Breakout rooms
Breakout rooms allow the organizer of the meeting to bring participants into smaller groups for lively brainstorming sessions. At times, it may be difficult to have a productive meeting, especially when you have a large audience with different areas of expertise in a single meeting. Breakout rooms easily create subgroups, and Teams allows you to add participants manually or automatically to these subgroups. We can set a timeline for each group, promote collaboration within groups, interact with participants, broadcast a message to the subgroups, and finally, close the breakout rooms.
Notes
These features are not currently available in breakout rooms:
Call me
Adding people to the meeting from the participants panel
Adding additional people to the meeting chat
Copying the Join meeting info
Let's see breakout rooms in action.
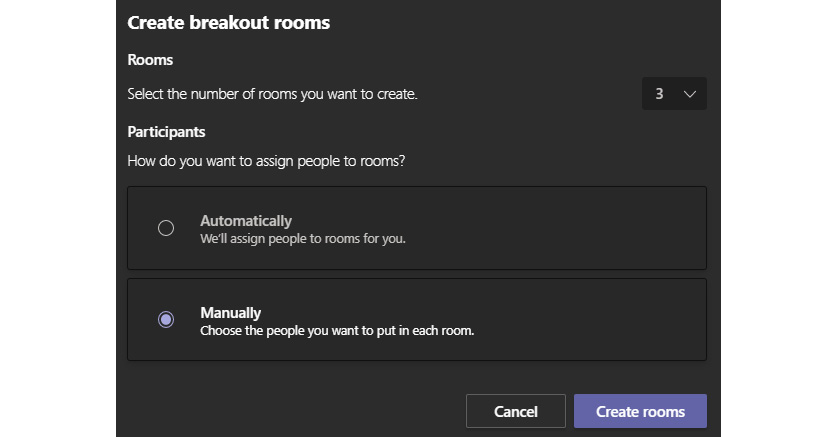
Creating breakout rooms
To create breakout rooms, a meeting should be initiated. In the top-right corner, you will have a Breakout rooms option.
Figure 1.35 – Enabling breakout rooms
Select the option to manually or automatically create breakout rooms. Automation will allow Microsoft Teams to auto-split the users based on the number of rooms selected.
Note
If automatic selection is selected, breakout rooms cannot be edited or modified, so it is recommended to go with manual selection and click Create rooms.
Figure 1.36 – Creating Breakout Rooms
Assigning people to breakout rooms manually
Based on the number of rooms selected on the previous screen, Teams will create the rooms and allow you to select participants to add to breakout rooms.
You can rename the rooms as per the logical naming convention that you would like to use.
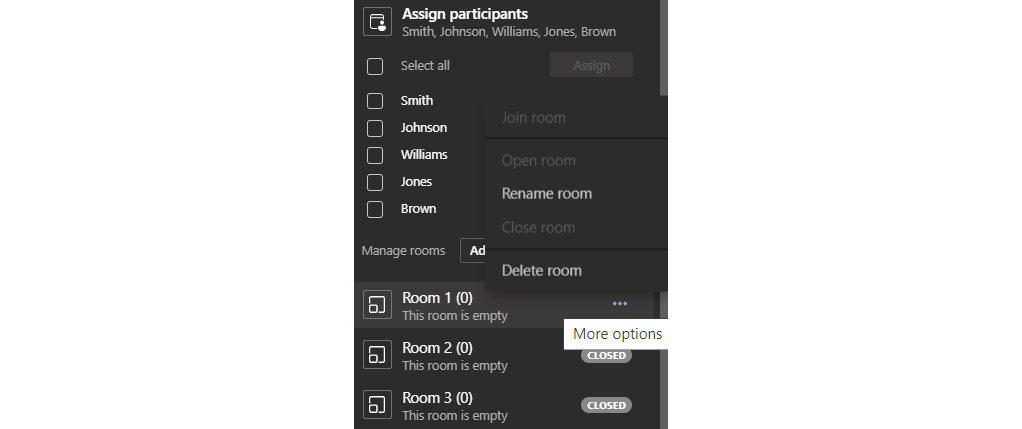
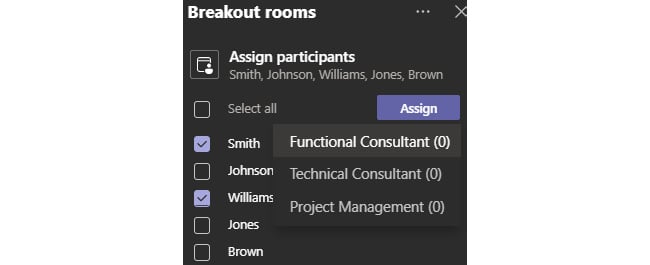
Click on the Assign participants option and select users to add them to the room.
Figure 1.37 – Assign participants
Select the participants and click the Assign button to assign the users to the renamed group. The organizer can always assign members to different groups.
Note
Currently, participants who joined the meeting via PSTN or Teams devices cannot be assigned to rooms. We suggest using the main meeting as a breakout room for these people.
Figure 1.38 – Not all participants can be assigned to rooms
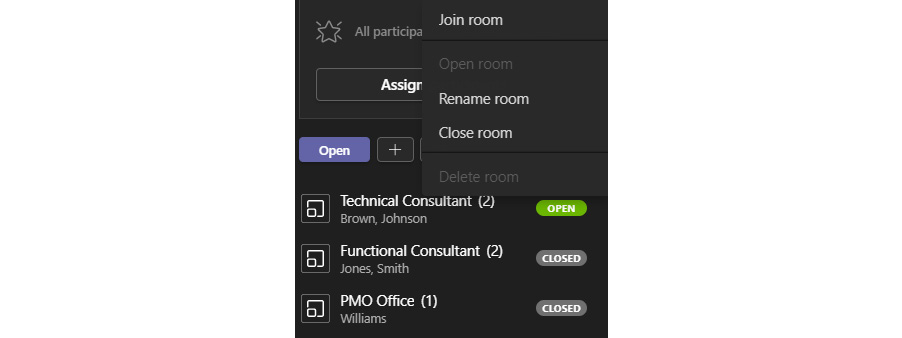
The organizer can join any room, which will allow them to interact in the respective breakout rooms.
Figure 1.39 – Joining a room as the organizer
Sending announcements to breakout rooms
You may want to send announcements to give time updates, for example, or share discussion prompts. So, all individual rooms get a message labeled with the Important category, click on the  Announcement button:
Figure 1.40 – Sending an announcement
The organizer can navigate to the chat space on the Teams client and navigate to any breakout room that is created and collaborate normally, like in a Teams channel.
Figure 1.41 – An announcement across all rooms
Click on the Close room option on the breakout room to close all rooms to get back into the original meeting.
Note
Each and every breakout room will have an attendance report available for download so you can see the time spent in each room.
Once the meeting rooms are closed, the room members can no longer send any messages or collaborate further.
You now have a better understanding and have become familiarized with different options available in a Teams meeting. In the upcoming section, we will cover the highlights of channel meetings and channel notes.


 Free Chapter