Although there is no well-established standard process for mobile forensics, there are some common guidelines that can be followed to ensure that the examination will be carried out through a proper methodology. This will make the process forensically sound and the results reliable.
Generally, a mobile forensics examination can be broken down into the following six steps:
- Seizure and identification
- Preservation
- Acquisition
- Analysis
- Validation
- Reporting
Tip
The key point to understand here is that the process you use to examine the mobile device and extract data from it is what makes the examination forensic. It is neither the software nor the hardware you use, but solely the process that you use during the examination that makes it truly forensic.
These guidelines and processes should be periodically reviewed as technology continues to evolve and different mobile devices are marketed.
Seizure and identification
The first step pertains to the physical seizure of the device. This involves gathering information on the type of incident that the device was involved in and at least some basic information on the device's owner.
The way the seizure occurs depends on your jurisdiction, so you should be familiar with laws regarding seizing and analyzing smart devices and what the requirements are (that is, a search warrant is usually required). At this stage, you should also have a general understanding of what data you are expected to find, as this will help you define specific objectives and plan the next steps according to your requirements.
First and foremost, you need to document everything you do and consider how to preserve evidence. How you handle the device matters and it can have a huge impact on the outcome of the investigation.
You should also note the state that the device was found in. The following are some examples:
- Is the device powered on or off?
- Is the device protected by a passcode?
- Is the passcode known?
- Is the SIM card present?
- Is there any visible damage?
- What's the date and time on the device?
- If the device is on, what apps are running?
- Basic ownership information.
One of the fundamental aspects of a forensically sound process is that operations should be carried out without altering or changing the contents of data that resides on the device in any way. Note that iOS devices are live, dynamic computer systems, so any kind of interaction with the device would result in changes to system files and databases, not to mention the possibility of inadvertently deleting temporary files that could contain useful evidence. Care should be taken to limit all interaction with the device, except for the preservation operations, which will be indicated in the next section.
Once the device has been seized, an investigator could be tempted to manually access data from the device, such as by running messaging apps and viewing conversations directly from the device's screen; however, this should be strongly discouraged as this would result in system logs and other system-related files being altered, which is not forensically sound behavior.
At this stage, the investigator will also have to identify the device, its hardware model, and the iOS version. This information will be useful if you wish to start assessing what options the investigator has for extracting evidence from the device.
For each examination, the investigator should also identify the following:
- The legal authority for examining the device
- The goals of the examination
- Other sources of potential evidence (including cloud storage)
Preservation
Smartphones are, by design, meant to communicate through cellular networks, Bluetooth connections, and wireless Wi-Fi networks. To prevent the device from communicating, it is important to isolate the device as soon as possible. Isolating the device prevents new data (incoming calls, incoming messages, and so on) from modifying existing evidence and thus enforces data preservation. Additionally, if the device were allowed network access, data destruction could occur as Apple products can be remotely wiped via a kill signal.
The easiest way to isolate an Apple device is by enabling Airplane mode; this deactivates the device's wireless and cellular connections. You can enable Airplane mode from the device's Settings or, if the device is locked, directly from the control center by swiping up from the bottom. If the device is an iPhone X or newer, you can access the control center by swiping down from the top-right corner. However, it's worth noting that isolating the device can also be accomplished by putting the device in a Faraday bag, a container made of metallic shielding that blocks the radio frequencies used by cellular networks, GPS, and Wi-Fi networks.
Don't forget to keep the device charged to ensure it doesn't power off. Generally speaking, you want the device to remain in the state in which you found it:
- If the device was off, leave it off.
- If it was on, make sure you leave it on so that it doesn't lock!
This is particularly important if the device is passcode protected and the investigator doesn't have the code: if the device powers off, it would transition from an AFU state to a BFU state, rendering data recovery much more challenging and, in some cases, impossible. We will learn more about device states later in this chapter.
Tip
One of the most common mistakes is removing the SIM card from an unlocked device to isolate it from a cellular network. This may make sense when you're working with different devices, but you want to avoid removing the SIM card from iPhones or iPads because doing so will result in iOS automatically locking the device, biometric unlock will be disabled, and USB restricted mode will be activated.
After successfully seizing and isolating the device, care should be taken to maintain the device's chain of custody. NIST defines the chain of custody as follows:
"A process that tracks the movement of evidence through its collection, safeguarding, and analysis life cycle by documenting each person who handled the evidence, the date/time it was collected or transferred, and the purpose for the transfer."
You can learn more about this topic by visiting the following website: csrc.nist.gov.
Acquisition
Acquisition is the process of obtaining information and evidence from a device.
Before the actual acquisition process begins, you should have a clear understanding of what kind of evidence you're looking for as this will have a great influence on the tools you choose to use.
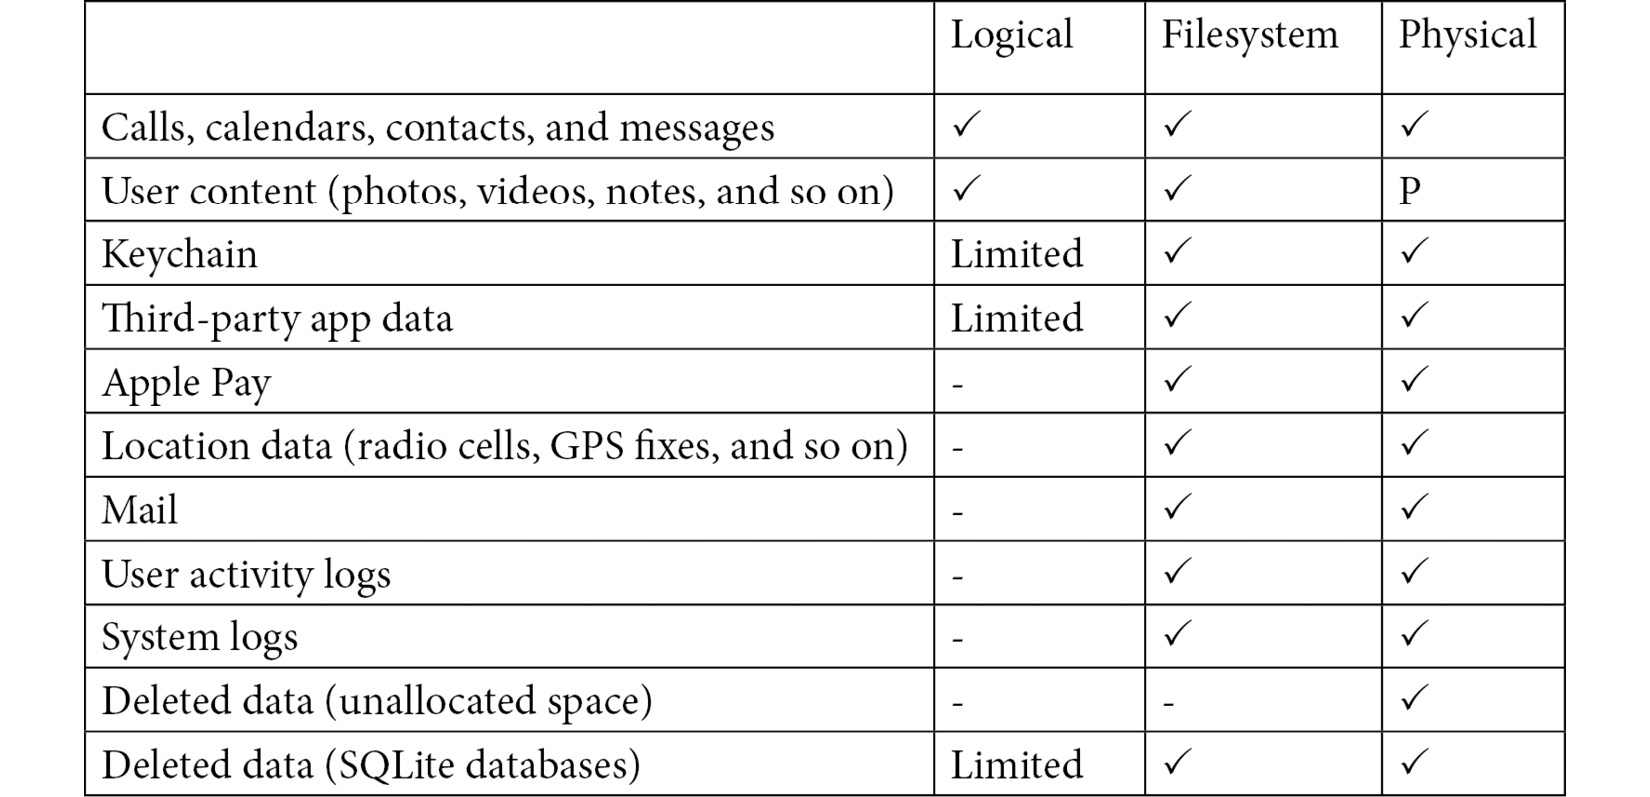
Generally speaking, there are three different kinds of data acquisition, and the method the investigator chooses affects how much data can be extracted from the device:
- Logical acquisition
- Full filesystem acquisition
- Physical acquisition
In the following table, you can see what kind of data can be extracted with each method:
Table 1.2 – Comparison of data that can be extracted with different acquisition methods
Logical and filesystem extractions
As you can see, a logical acquisition will extract some user-generated data from the device such as photos, messages, and notes. A logical extraction will usually be the easiest and quickest type of extraction and most forensic tools support it. However, considering the number of files available on an iOS device, only acquiring the full filesystem will give access to precious evidence such as third-party app data, precise location data, and pattern-of-life information.
A filesystem extraction is a representation of the files and folders from the user partition of the device; it is possible to partially recover deleted data by analyzing databases and temporary files, such as WAL files.
Physical extraction
Devices up to and including the iPhone 4 can undergo a full, forensically sound physical extraction of the entire raw disk. This kind of extraction delivers the most data as, much like a standard hard drive, both the system and the user partitions are extracted, as well as unallocated areas of the disk. This is incredibly useful as it allows investigators to recover deleted data, including messages, photos, and videos. However, with the introduction of iOS 5, Apple changed the way data was encrypted on disk and enabled other security features, such as data protection class keys. At the time of writing, extracting a physical image of modern iOS devices is simply not possible.
Choosing the best acquisition method
Investigators should always perform a logical acquisition first and then, if possible, attempt a filesystem or physical acquisition.
Jailbreaking the device is generally required to enable unrestricted access to the device's filesystem; however, more and more vendors are adding the possibility to run forensically sound checkm8-based extractions (all operations are performed in the device's volatile RAM) or agent-based extractions. Both options allow you to obtain the full filesystem without jailbreaking the device.
At the end of the day, the method you choose will usually depend on four variables:
- The state in which you find the device (locked or unlocked)
- The device model and iOS version
- The tools you have access to
- The possibility of jailbreaking the device
If the device is locked and you don't have the passcode, there is not a simple solution that can consistently bypass iOS security. However, depending on the device model, several options can provide a limited amount of data. We will examine these in detail in the next chapter.
If the device is unlocked, depending on the available tools, you can attempt a filesystem extraction. You should start with the less intrusive option, such as an in-memory checkm8 exploit, if your tools support it. If the device doesn't allow checkm8 exploiting, you can attempt an agent-based extraction if the iOS version is compatible. Although this entails installing an agent on the device and some minor changes can occur, this is considered forensically safe. If neither of these options is available, you can consider jailbreaking the device through checkra1n or unc0ver. Make sure you understand how the jailbreak works, how it affects the device, and what the risks are. Finally, if none of these options are available, you will have to go for a logical acquisition.
We will learn all about extracting data from iOS devices in the next chapter, but for now, it's important to note that the phone should be acquired using a tested method that is repeatable and is as forensically sound as possible. It is highly recommended to experiment with various tools on test devices to determine which acquisition method and tool work best with different devices.
If you don't have direct access to the device, there are other sources of evidence you can consider, such as iTunes backups and iCloud extractions.
Analysis
The main point of doing a forensic examination is to find, extract, and process evidence related to a particular case or investigation.
Although there is no standard process to analyze what you extracted from a device, here are some guidelines that should help you get started:
- Go through all the available data to become familiar with the main sources of evidence found on the device.
- Use your tools and forensic software to quickly parse common data sources, such as SMS databases, installed apps, call logs, photos, and so on.
- Attempt to recover any deleted data both with software and by manually carving binary files, logs, plists, and SQLite databases.
- Identify key artifacts by searching for keywords and details that are specific to your investigation.
- Harvest metadata from files and look for hidden evidence (timestamps, geolocation data, binary BLOBs, and so on).
- Find relationships between different artifacts.
- Perform temporal analysis on all acquired evidence, building a timeline of relevant artifacts and events.
When you're dealing with a limited amount of data, it may be possible to assess evidence by manually browsing through all the folders and viewing the contents of the files on your workstation. However, when you're looking at gigabytes of data sources, including SQLite databases, caches, and plists, you'll probably have to resort to using forensics tools. In such cases, investigators must develop a strategy to use the best tools, depending on the type of digital evidence and the goals of your investigation.
We'll cover commercial tools in detail in Chapter 2, Data Acquisition from iOS Devices and Chapter 3, Using Forensic Tools, but before that, it must be noted that all mobile forensics tools are just application software. These tools are not magical things that conduct autonomous processing and reporting simply by clicking a button! Digital investigators must understand the features and limits of each tool.
Mobile forensic tools typically differ in the kind of extraction that can be done, but different tools are also compatible with different devices and different versions of the iOS operating system. With the variety of different types of mobile devices, no single software supports all mobile devices.
Automated tools can speed up the time it takes to process huge datasets and I strongly believe that the modern investigator should have more than one tool available. However, this process is not a substitute for a methodical, manual forensic examination and validation.
In the end, it all comes down to the target device model, the iOS version, the type of extraction, the goal of the examination, and how the produced evidence might be used later.
Validation
After processing evidence from the device, the investigator must verify the accuracy of all the steps that have been carried out. This process should not focus exclusively on verifying the data extracted from the device. It should also entail validating the tools that were used for the examination and validating the entire process to ensure it has been carried out in a forensically sound way.
Unfortunately, validation is one of the most overlooked aspects.
Before starting an examination, it is highly recommended to experiment with various tools on test devices and known datasets to determine which acquisition and analysis tools work best with specific iOS device models and versions.
Established procedures should lead to the process of acquisition and analyzing a device. This is especially true when an investigator is working on data from third-party apps or Unidentified Forensic Objects (UFOs). Practices must be tested to ensure that the results that have been obtained are valid and independently reproducible.
An examiner who is called to testify on their findings should be able to explain not only what evidence was found, but also where that data was found and how the iOS operating system generated those artifacts. This could entail manually decoding binary data and file carving. Analyzing actual binary files that user data was parsed from, along with SQLite databases and plists, offers the investigator the opportunity to perform deep analysis of the iOS device's filesystem, extracting evidence that could be missed by relying only on automatic tools.
The following list resembles some of the best practices regarding verification and validation:
- Hash values: All the files that are extracted from the device should be hashed during the acquisition process to ensure that no changes occur. If you're doing a filesystem extraction, you can calculate the hashes for each file at the end of the process. Data integrity can be verified by calculating the hash for a single file and checking it against the original value.
- Deterministic tools: All the tools that are used for an examination should be deterministic: a given tool should produce the same output when given the same input data, under the same circumstances.
- Data verification: Check if known data stored on the device is reported accurately, without any modifications. Generally, data that's extracted from the device should match the data that's viewed on the device's screen.
- Tool accuracy: The quality of the output of a tool should be checked by using multiple tools to extract/process the same data and compare results.
- Process testing: When working on UFOs or artifacts where there is not an established examination process yet, validate your findings by testing each solution on different devices and under known control conditions and evaluate the results of each test.
Reporting
The last step in the mobile forensics process is reporting. Reporting can be defined as the process of preparing a detailed summary of what was done to acquire and analyze digital evidence from a mobile device. A forensic report should also include all the relevant evidence, presented in a clear, concise manner, and the conclusions that were reached in the investigation.
Many forensic tools provide a built-in reporting feature that allows you to automatically generate a digital report that includes items from the investigation, such as the following:
- Key artifacts
- Device identification (model, s/n, phone number, and so on)
- Case number and the analyst's name
- Date and time of when the examination took place
- Tools that were used for extraction and analysis
Depending on your jurisdiction, a forensic report should also describe how the data was extracted (logical, physical, or filesystem extraction) and explain what measures were taken to ensure the entire process was repeatable and forensically sound.
Timeline analysis
One of the most common forms of forensic reporting includes temporal analysis, which is defined as the process of creating a timeline of events that occurred on the device at a specified date and time.
A timeline generally includes data from a variety of sources; for example, location data, system logs, and messaging evidence can be combined and can lead to the discovery of what happened, where it happened, and when it happened.
Determining when events occurred on the device and associating device usage with an individual by reporting logs, files, and timestamps can be extremely useful.


 Free Chapter