Sign In Start Free Trial
Account

Add to playlist

Create a Playlist

Modal Close icon
You need to login to use this feature.
  • Book Overview & Buying Raspberry Pi 3 Home Automation Projects
  • Table Of Contents Toc
  • Feedback & Rating feedback
Raspberry Pi 3 Home Automation Projects

Raspberry Pi 3 Home Automation Projects

By : Bhadoria, Ruben Oliva Ramos
2 (1)
close
close
Raspberry Pi 3 Home Automation Projects

Raspberry Pi 3 Home Automation Projects

2 (1)
By: Bhadoria, Ruben Oliva Ramos

Overview of this book

Raspberry Pi 3 Home Automation Projects addresses the challenge of applying real-world projects to automate your house using Raspberry Pi 3 and Arduino. You will learn how to customize and program the Raspberry Pi 3 and Arduino-based boards in several home automation projects around your house. This book aims to help you integrate different microcontrollers like Arduino, ESP8266 Wi-Fi module, Particle Photon and Raspberry Pi 3 into the real world, taking the best of these boards to develop some exciting home automation projects. We will start with an interesting project creating a Raspberry Pi Powered smart mirror and move on to Automated Gardening System, which will help you build a simple smart gardening to keep your garden healthy with minimal effort. You will also learn to build projects such as CheerLights into a holiday display, a project to erase parking headaches with OpenCV and Raspberry Pi 3, create Netfl ix's "The Switch" for the living room and lock down your house like Fort Knox with a Windows IoT face recognition-based door lock system. By the end of the book, you will be able to build and automate the living space with intriguing IoT projects and bring a new degree of inter connectivity to your world.
Table of Contents (7 chapters)
close
close

What is the Raspberry Pi?

The Raspberry Pi is a credit-card-sized single-board computer that was developed by the Raspberry Pi Foundation in 2012. The foundation's main goal is to promote computer literacy across the globe by offering an affordable and mutable bit of hardware to the masses. It's become a huge hit among the maker communities and is paving its way through education as a cheap, practical, and convenient way to teach digital and physical making. As we move through the text, I will be centering my conversation on the base model and necessities of a Raspberry Pi 3, as this is the most current version of the Raspberry Pi on the market. If you're using a Raspberry Pi 2 or B+, I’ll make sure to point out the differences in hardware usage as we move along.

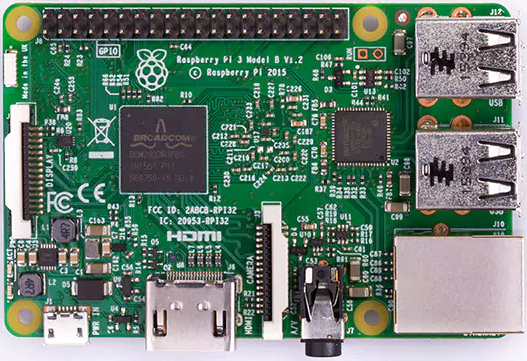
While taking a closer look, the Raspberry Pi 3 boasts of some impressive specs for its size:

  • A 1.2 GHz 64-bit quad-core ARMv8 CPU
  • 802.11n Wireless LAN
  • Bluetooth 4.1
  • Bluetooth Low Energy (BLE)
  • 1 GB RAM
  • Four USB ports
  • 40 GPIO pins
  • Full HDMI port
  • Ethernet port
  • Combined 3.5mm audio jack and composite video
  • Camera Interface (CSI)
  • Display Interface (DSI)
  • Micro SD card slot
  • VideoCore IV 3D graphics core

Furthermore, the Raspberry Pi 3 has the same form factor as the earlier models, the Raspberry Pi 2 and the B+, allowing you to reuse the casing and accessories.

Raspberry Pi Model 3:
You will need the following materials for this project:

  • Project materials:
    • Raspberry Pi 2/3
    • Micro USB charging cable
    • Wi-Fi dongle (if you are using Pi 2)
    • A microSD card
    • Monitor (HDMI/VGA)
    • Two-way glass/acrylic
    • Wooden frame
  • Optional materials:
    • PIR motion sensor
    • Pi Camera Module
    • Ultrasonic sensor—HC-SR04
    • HDMI-to-VGA converter

Purchasing the Raspberry Pi

When purchasing a Raspberry Pi, it may look a bit intimidating at first, given the sheer amount of add-ons or the variety of kits from which you can choose. At a minimum, for this project and the others in this book, you’ll need a kit that contains a Raspberry Pi 3, a micro-USB charging cable, an 8 gigabyte (or larger) microSD card preinstalled with NOOBS, and an HDMI cable. For the novice user, it’s generally recommended that you also acquire an HDMI monitor and a USB-connected keyboard and mouse to easily display and interact with the Raspberry Pi interface:

The Raspberry Pi revision 2 and B+ models differ from the Raspberry Pi revision 3, as neither revision 2 or B+ have Bluetooth or Wi-Fi built into the board itself. So, if you’re working with either of these models, be aware that you will have to purchase a Wi-Fi dongle (highly recommended) or a Bluetooth dongle in order to have these connectivity options available to you.

Setting up the Raspberry Pi

Assuming that you’ve gotten the required materials, it’s now time to get the Raspberry Pi up and running. Before powering it on, you're going to make sure that you connect the Pi to a monitor, connect the keyboard and mouse, and make sure that the microSD card is inserted. If you have any dongles to plug into the extra USB ports, now would be the time to do that.

In discussing the microSD card, with most kits bought online for the Raspberry Pi, the microSD card will come preloaded with NOOBS (known as New Out Of the Box Software), which lets you easily set up Raspbian, the Foundation’s officially supported operating system. Raspbian is a Linux distribution based on the Debian distribution. You can, however, purchase a microSD card that does not have the NOOBS installation preloaded on it. If this is the case, using your home computer or laptop, you can manually install NOOBS or the image of your choosing onto the SD card. Here are the steps for the manual installation, as aligned to the Raspberry Pi Foundation’s suggestions:

  1. Visit the SD Association’s website (https://www.sdcard.org/) and download SD Formatter 5.0 for either Windows or Mac systems.
  2. Follow the instructions to install the software.
  3. Insert your SD card into the computer or laptop’s SD card reader and make note of the drive letter allocated to it, for example, F or G.
  4. In SD Formatter, select the drive letter for your SD card and format it.
  5. Download the NOOBS ZIP file from the Raspberry Pi Foundation Downloads page (https://www.raspberrypi.org/downloads/noobs/).
  6. Save this to a folder on your computer and then extract the files.
  7. Once your SD card has been formatted and the files from the ZIP are extracted, you are going to drag the unzipped files onto the SD card. As a note, make sure you’re dragging the contents of the NOOBS folder onto the SD card. If you move the entire NOOBS folder itself, the installation process will not follow through.
  8. When the files have finished transferring, eject the SD card and place it into your Raspberry Pi.

Assuming the microSD card has made it to your Raspberry Pi and all of the requisite hardware is connected, it is now time to power on the board by plugging in the micro USB charging cable.

This will take a little time as you go through the setup screen, but you’ll be looking at the Raspbian desktop shortly:

Create a Note

Modal Close icon
You need to login to use this feature.
notes
bookmark search playlist font-size

Change the font size

margin-width

Change margin width

day-mode

Change background colour

Close icon Search
Country selected

Close icon Your notes and bookmarks

Delete Bookmark

Modal Close icon
Are you sure you want to delete it?
Cancel
Yes, Delete

Delete Note

Modal Close icon
Are you sure you want to delete it?
Cancel
Yes, Delete

Edit Note

Modal Close icon
Write a note (max 255 characters)
Cancel
Update Note

Confirmation

Modal Close icon
claim successful

Buy this book with your credits?

Modal Close icon
Are you sure you want to buy this book with one of your credits?
Close
YES, BUY