Deploying MicroStrategy 10
We know only one way to master MicroStrategy, through practical exercises. Let's start by downloading and deploying MicroStrategy 10.2.
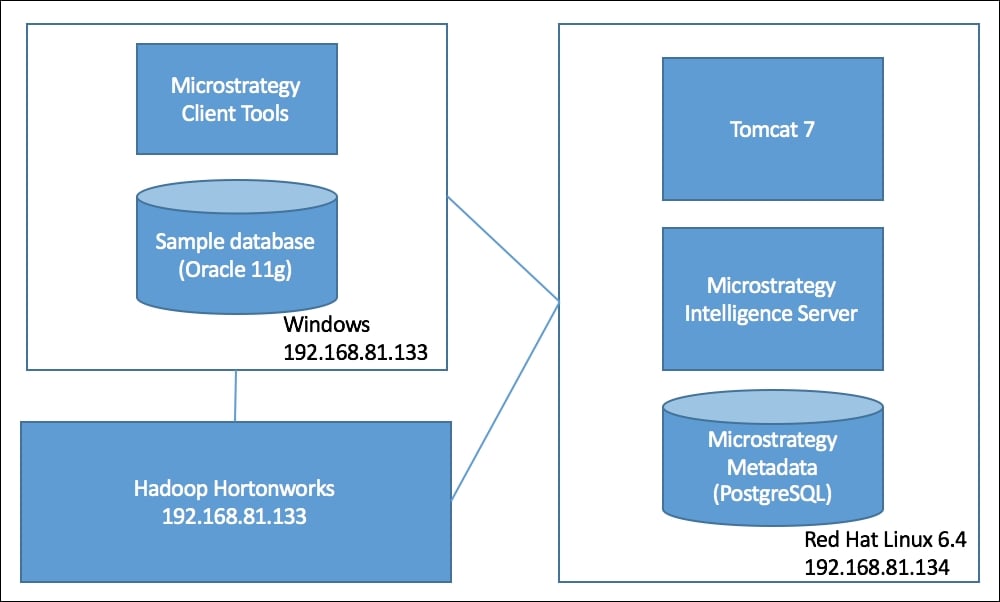
Overview of training architecture
In order to master MicroStrategy and learn about some BI considerations, we need to download the all-important software, deploy it, and connect to a network. During the preparation of the training environment, we will cover the installation of MicroStrategy on a Linux operating system. This is very good practice, because many people work with Windows and are not familiar with Linux, so this chapter will provide additional knowledge of working with Linux, as well as installing MicroStrategy and a web server. Look at the training architecture:
There are three main components:
- Red Hat Linux 6.4: Used for deploying the web server and Intelligence Server.
- Windows machine: Uses MicroStrategy Client and Oracle database.
- Virtual machine with Hadoop: Ready virtual machine with Hadoop, which will connect to MicroStrategy using a brand new connection.
In the real world, we should use separate machines for every component, and sometimes several machines in order to run one component. This is called clustering. Let's create a virtual machine.
Creating a Red Hat Linux virtual machine
Let's create a virtual machine with Red Hat Linux, which will host our Intelligence Server:
Now we can create a virtual machine with RHEL 6.4. We have several options in order to choose the software for deploying virtual machine. In our case, we will use a VMware workstation.
Before starting to deploy a new VM, we should adjust the default settings, such as increasing RAM and HDD, and adding one more network card in order to connect the external environment with the MicroStrategy client and sample database. In addition, we should create a new network.
When the deployment of the RHEL virtual machine is complete, we should activate a subscription in order to install the required packages. Let us do this with one command in the terminal:
# subscription-manager register --username <username> --password
    <password> --auto-attach
Performing prerequisites for MicroStrategy 10
According to the installation and configuration guide, we should deploy all necessary packages. In order to install them, we should execute them under the root:
# su
# yum install compat-libstdc++-33.i686
# yum install libXp.x86_64
# yum install elfutils-devel.x86_64
# yum install libstdc++-4.4.7-3.el6.i686
# yum install krb5-libs.i686
# yum install nss-pam-ldapd.i686
# yum install ksh.x86_64
Moreover, we should change the parameters of the kernel:
# nano/etc/sysctl.conf
kernel.sem=250 32000 32 2048
kernel.shmmni = 4096
vm.max_map_count=5242880
Then, save and reboot.
Installing MicroStrategy 10 Intelligence Server
In order to download MicroStrategy software, we should already have an account on the MicroStrategy Resource Portal at https://resource.microstrategy.com, or we can create one using a corporate email address. Even if we do not have a license for MicroStrategy, we can obtain one for 30 days. That is enough to finish this book and learn the new features of MicroStrategy 10.
MicroStrategy 10.2 is available, and we are going to use this version in the book.
Let's download distributive 10.2.0008.0052_10.2_GA_Linux.tar and put it on the virtual machine with Linux 10.2.0008.0052_10.2_GA_Linux.tar.
Let's create a folder for MicroStrategy using the root user and change its rights in order to extract the archive into this folder:
# mkdir mstr10
# chmod 777 mstr10
Then we should extract the MicroStrategy distributive into our new folder. We can use the default Archive Manager.
After successful extraction, we should create four folders for MicroStrategy, in order to deploy the software and write the installation logs.
Using the root user, we can run the following commands:
# mkdir /mstr10/microstrategy
# mkdir /mstr10/microstrategy_home
# mkdir /mstr10/microstrategy_logs
# mkdir /mstr10/microstrategy_health_agent
By default, there are three methods of installation for MicroStrategy Server:
- GUI: The most common approach, using a graphical interface and navigation with a mouse
- Command line: The approach for terminal-only machines
- Silent installation: Automatic installation process that does not need human participation, but it is important to think about parameters and settings
In Red Hat, we have a GUI and can use its benefits. Let's install:
# cd /mstr10/Installations/QueryReportingAnalysis_Linux
# ./setup.sh
user name Microstrategy
name masteringbi
Copy and paste your license key.
Choose the destination locations that we have already created:
- Home directory:
/mstr10/microstrategy_home - Install directory:
/mstr10/microstrategy - Log directory:
/mstr10/microstrategy_logs - Health agent:
/mstr10/microstrategy_health_agent
All the other parameters we can leave as is.
Configuring Intelligence Server
After successful installation of MicroStrategy 10.2, we should set up a MicroStrategy repository and connect it to the Intelligence Server. In our case, we will use a PostgreSQL database on the RHEL virtual machine for the repository.
Installing a PostgreSQL database
Let's download and install the PostgreSQL database server:
# yum install postgresql-server
# service postgresql initdb
# chkconfig postgresql on
# service postgresql start
# s
# psql
Creating a metadata database
Let's create a new database in PostgreSQL for MicroStrategy metadata. In order to do this, we should go to the terminal and run the following:
# psql
# CREATE DATABASE mstrmd;
# CREATE USER mstr PASSWORD 'happy2016';
# GRANT ALL ON DATABASE mstrmd TO mstr;
In addition, we should register the plpgsql language in our new database:
# \c mstrmd
# CREATE TRUSTED LANGUAGE plpgsql;
By default, PostgreSQL uses IDENT-based authentication, and this will never allow you to log in with a username and password. We should change the method of authentication by modifying the pg_hba.conf file. Go to this folder:
# cd /var/lib/pgsql/data
# nano pg_hba.conf
Replace IDENT on trust and restart PostgreSQL:
# service postgresql restart
Creating a metadata data source
Using the MicroStrategy connectivity wizard, we can create a new DSN. In order to open the wizard, we should run the following commands:
# cd /mstr10/microstrategy_home/bin
# ./mstrconnectwiz
Let's choose PostgreSQL ODBC driver and fill in the form with our credentials:
MicroStrategy has a configuration file that keeps all DSNs. We can create a new DSN directly in this file. We can look at our new DSN like this:
# vi /mstr10/microstrategy_home/odbc.ini
Here is our DSN metadata. In addition, we can configure the parameters of our connection in order to increase performance.
In order to create metadata tables in the brand new database, we should run Configuration Wizard:
# cd /mstr10/microstrategy_home/bin
# ./mstrcfgwiz
During this process, wizard will automatically:
- Create metadata tables and history list tables
- Configure Intelligence Server
Tip
MicroStrategy metadata is a core piece of software. In other words, the number of tables in a database that contain a definition of all MicroStrategy objects.
In Configuration Wizard, we should create a new database and choose our DSN:
The next step is the configuration of Intelligence Server using fresh metadata tables. We can use masteringbi as a server definition. After successful configuration we can close wizard and deploy MicroStrategy Web.
Installation of MicroStrategy Web
We need a web server in order to deploy MicroStrategy Web and other components, such as Mobile Server and Operations Manager. For this book, we have chosen the Tomcat web server as our web application server.
Web application server installation
Let us install Tomcat on our RHEL server. Open the terminal and give the following commands:
- Install Java if it is needed:
# yum install java-1.8.0-openjdk
# java -version
openjdk version "1.8.0_65"
- Download and deploy the Tomcat server:
# cd /tmp
# wget
      http://www.us.apache.org/dist/tomcat/tomcat-7/v7.0.67/
      bin/apache-tomcat-7.0.67.tar.gz
# tar xzf apache-tomcat-7.0.67.tar.gz
# mv apache-tomcat-7.0.67 /usr/local/tomcat7
- Run Tomcat:
# cd /usr/local/tomcat7
# ./bin/startup.sh
- Create a Tomcat user for MicroStrategy Web:
# cd /usr/local/tomcat7/conf
# nano tomcat-users.xml
  <role rolename="admin"/>
  <role rolename="manager-gui"/>
  <user username="admin" password="admin" roles="admin,manager-gui"/>
- Then, restart Tomcat.
In order to access Tomcat, we should go to http://localhost:8080/.
Now we can deploy MicroStrategy Web and Operations Manager on a brand new Tomcat server. Let's do it:
# cp /mstr10/microstrategy/OperationsManager/MicroStrategyWeb.war
      /usr/local/tomcat7/webapps
# cp /mstr10/microstrategy/OperationsManager/MicroStrategyOM.war
      /usr/local/tomcat7/webapps
Then we need restart Tomcat:
# /usr/local/tomcat7/bin/shutdown.sh
# /usr/local/tomcat7/bin/startup.sh
After deploying, we should go to the web admin:
http://localhost:8080/MicroStrategy/servlet/mstrWebAdmin
Then, connect to our server. We can do this just by adding the localhost server. In properties, we should mark that it automatically connects to Intelligence Server.
Later in the book, we will create projects and they will be available here:
http://localhost:8080/MicroStrategy/servlet/mstrWeb
In addition, we can go to Operations Manager in order to configure it:
http://localhost:8080/MicroStrategyOM/servlet/mstrOM
Tip
If you change the war filename, you will have to use a different URL. For example, mstr.war the URL will be http://localhost:8080/mstr.
The Operation Manager will be configured in Chapter 9, MicroStrategy System Administration.
We have finished the installation and configuration of Intelligence Server. Now we need to install the MicroStrategy Client tools on the Windows machine.
We should open a port in the firewall for Tomcat on the Linux machine, in order for the Windows machine to access it:
# nano /etc/sysconfig/iptables
Add a new line for port 8080:
-A INPUT -m state --state NEW -m tcp -p tcp --dport 8080 -j ACCEPT
We should also open a port for Intelligence Server:
-A INPUT -m state --state NEW -m tcp -p tcp --dport 34952 -j ACCEPT
Then, restart the service:
# service iptables restart
As a result, we can access MicroStrategy from Windows.
According to our training architecture, we will use at least two machines. One is a Windows machine for client tools and the Oracle database, and a Linux machine for Intelligence Server and the PostgreSQL repository database. Let's look at how we can quickly create a network. This knowledge is very important for BI guys, because usually BI software has complex architecture and communicates with each other through the network. In our small example, the reader can learn basic considerations for building a network between several machines. Let's build a network using VMware:
- At the top of the VMware Workstation desktop, select Edit and then select Virtual Network Editor.
- Change the settings on this screen to match these:
- Enable Use local DHCP service to distribute IP address to VMs.
- Click the OK button. Now the preset IP address included in the images should work for VMware Workstation and VMware Player.
- Open Control Panel and locate the Network and Sharing Center option. Double-click on it.
- The private network is the bridged adapter and the public network is host-only. If your image is not making connections, look at the properties of the public network. Select the Local Area Connection 2 link:
- Click the Properties button.
- Select the Internet Protocol Version 4 (TCP/IPv4) entry and then click the Properties button.
Now we should change the network for Red Hat also. Let's do it:
- Go to the terminal and run the
system-config-network utility to change the IP address:# system-config-network
- With the red highlight on the Device Configuration option, press the Enter key.
- If you need to update the IP address, use the cursor keys to move up and down through the fields and then you can make the update. Use the cursor keys or the Tab key to move to the Ok button and press the Enter key or the spacebar to select Ok.
After you work your way back to the first screen, you'll have to use the Tab key to navigate to the Save & Quit button:
- Restart the network service:
# service network restart
- Check the result:
# ifconfig
As a result, the Linux and Windows machines now live on one network and can easy communicate with each other. Using this approach, we can connect other machines that run other software. For example, we could run Oracle on a separate machine. In addition, we can create a cluster of several machines running MicroStrategy.
Tip
MicroStrategy prefers up to four nodes in a cluster, but you can install more than four if you want.
Now we can install the MicroStrategy Client tools and connect Intelligence Server.
Installing MicroStrategy 10 tools
One of the simplest tasks is installing the client tools on the Windows machine. We should install the following software:
- MicroStrategy Analyst
- MicroStrategy Developer
- MicroStrategy Architect
- MicroStrategy Server Administrator
- MicroStrategy Object Manager
- MicroStrategy Command Manager
- MicroStrategy System Manager
- MicroStrategy Integrity Manager
We should connect to our Intelligence Server, which is based on RHEL. Let's run Developer on port 34952 with the server name as the IP address 192.168.81.134. There are not any projects yet, but soon we will create one good project using our great expertise.
Installing Oracle database
For our book, we decided to use Oracle 11g because it is the most popular RDBMS in the world. We can download Oracle from http://www.oracle.com/technetwork/database/enterprise-edition/downloads/112010-win64soft-094461.html.
In our case, we will install it on the same machine as MicroStrategy, in order to save resources. In the real world, we should use a separate server. The installation process is pretty simple and straightforward. Just download the software and run setup.exe.
Deploying data in Oracle database
The last step before finishing this chapter is to deploy our sample database, which we will use throughout this book in order to build advanced visualizations, dashboards, and many other things.
There are SQL files in the attachment that comes with this book. We are going to deploy these in our Oracle database:
In order to deploy these files in the Oracle database, we should:
- Run SQLPlus.
- Connect to the Oracle database as a system user.
- Run these commands:
@<Full_path>/Schema.sql;
@<Full_path>/dw.sql;
In the next chapter, we will create a schema based on this database.


 Free Chapter