The previous sections in this chapter briefly described the Kubernetes components and how they work internally with each other. On the other hand, we also demonstrated how to use some Kubernetes API objects (Pods, Services, and Deployments) to compose your applications.
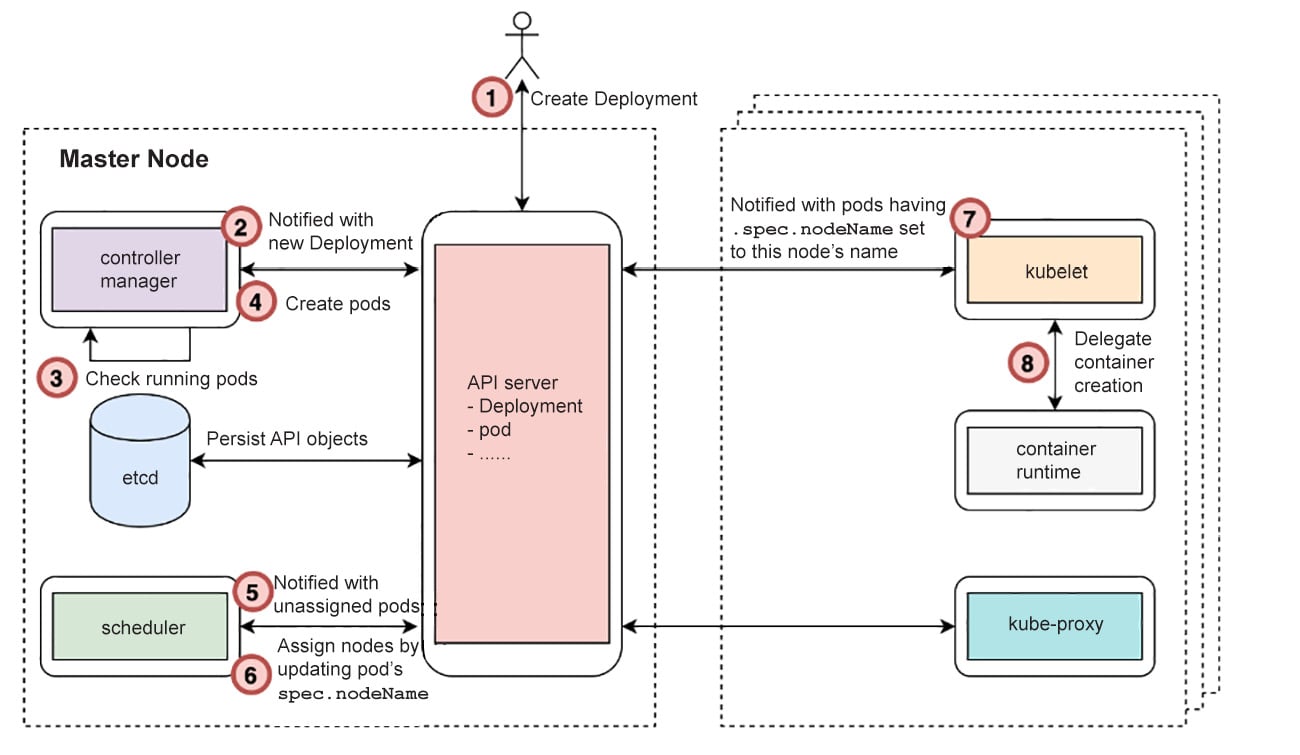
But how is a Kubernetes API object managed by different Kubernetes components? Let's consider a pod as an example. Its life cycle can be illustrated as follows:
Figure 2.20: The process behind the creation of a pod
This entire process can be broken down as follows:
- A user starts to deploy an application by sending a Deployment YAML manifest to the Kubernetes API server. The API server verifies the request and checks whether it's valid. If it is, it persists the Deployment API object to its backend datastore (etcd).
Note
For any step that evolves by modifying API objects, interactions have to happen between etcd and the API server, so we don't list the interactions as extra steps explicitly.
- By now, the pod hasn't been created yet. The controller manager gets a notification from the API server that a Deployment has been created.
- Then, the controller manager checks whether the desired number of replica pods are running already.
- If there are not enough pods running, it creates the appropriate number of pods. The creation of pods is accomplished by sending a request with the pod spec to the API server. It's quite similar to how a user would apply the Deployment YAML, but with the major difference being that this happens inside the controller manager in a programmatic manner.
- Although pods have been created, they're nothing but some API objects stored in etcd. Now, the scheduler gets a notification from the API server saying that new pods have been created and no node has been assigned for them to run.
- The scheduler checks the resource usage, as well as existing pods allocation, and then calculates the node that fits best for each new pod. At the end of this step, the scheduler sends an update request to the API server by setting the pod's
nodeName spec to the chosen node.
- By now, the pods have been assigned a proper node to run on. However, no physical containers are running. In other words, the application doesn't work yet. Each kubelet (running on different worker nodes) gets notifications, indicating that some pods are expected to be run. Each kubelet will then check whether the pods to be run have been assigned the node that a kubelet is running on.
- Once the kubelet determines that a pod is supposed to be on its node, it calls the underlying container runtime (Docker, containerd, or cri-o, for instance) to spin up the containers on the host. Once the containers are up, the kubelet is responsible for reporting its status back to the API server.
With this basic flow in mind, you should now have a vague understanding of the answers to the following questions:
- Who is in charge of pod creation? What's the state of the pod upon creation?
- Who is responsible for placing a pod? What's the state of the pod after placement?
- Who brings up the concrete containers?
- Who is in charge of the overall message delivery process to ensure that all components work together?
In the following exercise, we will use a series of concrete experiments to help you solidify this understanding. This will allow you to see how things work in practice.
Exercise 2.05: How Kubernetes Manages a Pod's Life Cycle
As a Kubernetes cluster comprises multiple components, and each component works simultaneously, it's usually difficult to know what's exactly happening in each phase of a pod's life cycle. To solve this problem, we will use a film editing technique to "play the whole life cycle in slow motion", so as to observe each phase. We will turn off the master plane components and then attempt to create a pod. Then, we will respond to the errors that we see, and slowly bring each component online, one by one. This will allow us to slow down and examine each stage of the process of pod creation step-by-step. Follow these steps to complete this exercise:
- First, let's delete the Deployment and Service we created earlier by using the following command:
kubectl delete deploy k8s-for-beginners && kubectl delete service k8s-for-beginners
You should see the following response:
deployment.apps "k8s-for-beginners" deleted
service "k8s-for-beginners" deleted
- Prepare two terminal sessions: one (host terminal) to run commands on your host machine and another (Minikube terminal) to pass commands inside the Minikube VM via SSH. Thus, your Minikube session will be initiated like this:
minikube ssh
You will see the following output:
Figure 2.21: Accessing the Minikube VM via SSH
Note
All kubectl commands are expected to be run in the host terminal session, while all docker commands are to be run in the Minikube terminal session.
- In the Minikube session, clean up all stopped Docker containers:
docker rm $(docker ps -a -q)
You should see the following output:
Figure 2.22: Cleaning up all stopped Docker containers
You may see some error messages such as "You cannot remove a running container ...". This is because the preceding docker rm command runs against all containers (docker ps -a -q), but it won't stop any running containers.
- In the Minikube session, stop the kubelet by running the following command:
sudo systemctl stop kubelet
This command does not show any response upon successful execution.
Note
Later in this exercise, we will manually stop and start other Kubernetes components, such as the API server, that are managed by the kubelet in a Minikube environment. Hence, it's required that you stop the kubelet first in this exercise; otherwise, the kubelet will automatically restart its managed components.
Note that in typical production environments, unlike Minikube, it's not necessary to run the kubelet on the master node to manage the master plane components; the kubelet is only a mandatory component on worker nodes.
- After 30 seconds, check the cluster's status by running the following command in your host terminal session:
kubectl get node
You should see the following response:
NAME         STATUS       ROLES      AGE       VERSION
minikube     NotReady     master     32h       v1.16.2
It's expected that the status of the minikube node is changed to NotReady because the kubelet has been stopped.
- In your Minikube session, stop
kube-scheduler, kube-controller-manager, and kube-apiserver. As we saw earlier, all of these are running as Docker containers. Hence, you can use the following commands, one after the other:docker stop $(docker ps | grep kube-scheduler | grep -v pause | awk '{print $1}')
docker stop $(docker ps | grep kube-controller-manager | grep -v pause | awk '{print $1}')
docker stop $(docker ps | grep kube-apiserver | grep -v pause | awk '{print $1}')You should see the following responses:
Figure 2.23: Stopping the containers running Kubernetes components
As we explained in the Kubernetes Components Overview section, the grep -v pause | awk '{print $1}' command can fetch the exact container ID ($1 = the first column) of the required Docker containers. Then, the docker pause command can pause that running Docker container.
Now, the three major Kubernetes components have been stopped.
- Now, you need to create a Deployment spec on your host machine. Create a file named
k8s-for-beginners-deploy2.yaml with the following content:apiVersion: apps/v1
kind: Deployment
metadata:
name: k8s-for-beginners
spec:
replicas: 1
selector:
matchLabels:
tier: frontend
template:
metadata:
labels:
tier: frontend
spec:
containers:
- name: k8s-for-beginners
image: packtworkshops/the-kubernetes-workshop:k8s-for- beginners
- Try to create the Deployment by running the following command on your host session:
kubectl apply -f k8s-for-beginners-deploy2.yaml
You should see a response similar to this:
Figure 2.24: Trying to create a new Deployment
Unsurprisingly, we got a network timeout error since we intentionally stopped the Kubernetes API server. If the API server is down, you cannot run any kubectl commands or use any equivalent tools (such as Kubernetes Dashboard) that rely on API requests:
The connection to the server 192.168.99.100:8443 was refused – did you specify the right host or port?
- Let's see what happens if we restart the API server and try to create the Deployment once more. Restart the API server container by running the following command in your Minikube session:
docker start $(docker ps -a | grep kube-apiserver | grep -v pause | awk '{print $1}')This command tries to find the container ID of the stopped container carrying the API server, and then it starts it. You should get a response like this:
9e1cf098b67c
- Wait for 10 seconds. Then, check whether the API server is online. You can run any simple kubectl command for this. Let's try getting the list of nodes by running the following command in the host session:
kubectl get node
You should see the following response:
NAME         STATUS       ROLES      AGE       VERSION
minikube     NotReady     master     32h       v1.16.2
As you can see, we are able to get a response without errors.
- Let's try to create the Deployment again:
kubectl apply -f k8s-for-beginners-deploy2.yaml
You should see the following response:
deployment.apps/k8s-for-beginners created
- Let's check whether the Deployment has been created successfully by running the following command:
kubectl get deploy
You should see the following response:
NAME               READY     UP-TO-DATE    AVAILABLE   AGE
k8s-for-beginners  0/1       0             0           113s
From the preceding screenshot, there seems to be something wrong as in the READY column, we can see 0/1, which indicates that there are 0 pods associated with this Deployment, while the desired number is 1 (which we specified in the replicas field in the Deployment spec).
- Let's check that all the pods that are online:
kubectl get pod
You should get a response similar to the following:
No resources found in default namespace.
We can see that our pod has not been created. This is because the Kubernetes API server only creates the API objects; the implementation of any API object is carried out by other components. For example, in the case of Deployment, it's kube-controller-manager that creates the corresponding pod(s).
- Now, let's restart the
kube-controller-manager. Run the following command in your Minikube session:docker start $(docker ps -a | grep kube-controller-manager | grep -v pause | awk '{print $1}')You should see a response similar to the following:
35facb013c8f
- After waiting for a few seconds, check the status of the Deployment by running the following command in the host session:
kubectl get deploy
You should see the following response:
NAME               READY     UP-TO-DATE    AVAILABLE   AGE
k8s-for-beginners  0/1       1             0           5m24s
As we can see, the pod that we are looking for is still not online.
- Now, check the status of the pod:
kubectl get pod
You should see the following response:
Figure 2.25: Getting the list of pods
The output is different from the one in step 15, as in this case, one pod was created by kube-controller-manager. However, we can see Pending under the STATUS column. This is because assigning a pod to a suitable node is not the responsibility of kube-controller-manager; it's the responsibility of kube-scheduler.
- Before starting
kube-scheduler, let's take a look at some additional information about the pod:kubectl get pod -o wide
You should see the following response:
Figure 2.26: Getting more information about the pod
The highlighted NODE column indicates that no node has been assigned to this pod. This proves that the scheduler is not working properly, which we know because we took it offline. If the scheduler were to be online, this response would indicate that there is no place to land this pod.
Note
You will learn a lot more about pod scheduling in Chapter 17, Advanced Scheduling in Kubernetes.
- Let's restart
kube-scheduler by running the following command in the Minikube session:docker start $(docker ps -a | grep kube-scheduler | grep -v pause | awk '{print $1}')You should see a response similar to the following:
11d8a27e3ee0
- We can verify that
kube-scheduler is working by running the following command in the host session:kubectl describe pod k8s-for-beginners-66644bb776-kvwfr
Please get the pod name from the response you get at step 17, as seen in Figure 2.26. You should see the following output:
Name:         k8s-for-beginners-66644bb776-kvwfr
Namespace:    default
Priority:     0
Node:         <none>
We are truncating the output screenshots for a better presentation. Please take a look at the following excerpt, highlighting the Events section:
Figure 2.27: Examining the events reported by the pod
In the Events section, we can see that the kube-scheduler has tried scheduling, but it reports that there is no node available. Why is that?
This is because, earlier, we stopped the kubelet, and the Minikube environment is a single-node cluster, so there is no available node(s) with a functioning kubelet for the pod to be placed.
- Let's restart the kubelet by running the following command in the Minikube session:
sudo systemctl start kubelet
This should not give any response in the terminal upon successful execution.
- In the host terminal, verify the status of the Deployment by running the following command in the host session:
kubectl get deploy
You should see the following response:
NAME               READY     UP-TO-DATE    AVAILABLE   AGE
k8s-for-beginners  1/1       1             1           11m
Now, everything looks healthy as the Deployment shows 1/1 under the READY column, which means that the pod is online.
- Similarly, verify the status of the pod:
kubectl get pod -o wide
You should get an output similar to the following:
Figure 2.28: Getting more information about the pod
We can see Running under STATUS and that it's been assigned to the minikube node.
In this exercise, we traced each phase of a pod's life cycle by breaking the Kubernetes components and then recovering them one by one. Now, based on the observations we made about this exercise; we have better clarity regarding the answers to the questions that were raised before this exercise:
- Steps 12 – 16: We saw that in the case of a Deployment, a controller manager is responsible for requesting the creation of pods.
- Steps 17 – 19: The scheduler is responsible for choosing a node to place in the pod. It assigns the node by setting a pod's
nodeName spec to the desired node. Associating a pod to a node, at this moment, merely happened at the level of the API object.
- Steps 20 – 22: The kubelet actually brings up the containers to get our pod running.
Throughout a pod's life cycle, Kubernetes components cooperate by updating a pod's spec properly. The API server serves as the key component that accepts pod update requests, as well as to report pod changes to interested parties.
In the following activity, we will bring together the skills we learned in the chapter to find out how we can migrate from a container-based environment to a Kubernetes environment in order to run our application.
Activity 2.01: Running the Pageview App in Kubernetes
In Activity 1.01, Creating a Simple Page Count Application, in the previous chapter, we built a web application called Pageview and connected it to a Redis backend datastore. So, here is a question: without making any changes to the source code, can we migrate the Docker-based application to Kubernetes and enjoy Kubernetes' benefits immediately? Try it out in this activity with the guidelines given.
This activity is divided into two parts: in the first part, we will create a simple pod with our application that is exposed to traffic outside the cluster by a Service and connected to a Redis datastore running as another pod. In the second part, we will scale the application to three replicas.
Connecting the Pageview App to a Redis Datastore Using a Service
Similar to the --link option in Docker, Kubernetes provides a Service that serves as an abstraction layer to expose one application (let's say, a series of pods tagged with the same set of labels) that can be accessed internally or externally. For example, as we discussed in this chapter, a frontend app can be exposed via a NodePort Service so that it can be accessed by external users. In addition to that, in this activity, we need to define an internal Service in order to expose the backend application to the frontend application. Follow these steps:
- In Activity 1.01, Creating a Simple Page Count Application, we built two Docker images – one for the frontend Pageview web app and another for the backend Redis datastore. You can use the skills we learned in this chapter to migrate them into Kubernetes YAMLs.
- Two pods (each managed by a Deployment) for the application is not enough. We also have to create the Service YAML to link them together.
Ensure that the targetPort field in the manifest is consistent with the exposed port that was defined in the Redis image, which was 6379 in this case. In terms of the port field, theoretically, it can be any port, as long as it's consistent with the one specified in the Pageview application.
The other thing worth mentioning here is the name field of the pod for Redis datastore. It's the symbol that's used in the source code of the Pageview app to reference the Redis datastore.
Now, you should have three YAMLs – two pods and a Service. Apply them using kubectl -f <yaml file name>, and then use kubectl get deploy,service to ensure that they're created successfully.
- At this stage, the Pageview app should function well since it's connected to the Redis app via the Service. However, the Service only works as the internal connector to ensure they can talk to each other inside the cluster.
To access the Pageview app externally, we need to define a NodePort Service. Unlike the internal Service, we need to explicitly specify the type as NodePort.
- Apply the external Service YAML using
kubectl -f <yaml file name>.
- Run
minikube service <external service name> to fetch the Service URL.
- Access the URL multiple times to ensure that the Pageview number gets increased by one each time.
With that, we have successfully run the Pageview application in Kubernetes. But what if the Pageview app is down? Although Kubernetes can create a replacement pod automatically, there is still downtime between when the failure is detected and when the new pod is ready.
A common solution is to increase the replica number of the application so that the whole application is available as long as there is at least one replica running.
Running the Pageview App in Multiple Replicas
The Pageview app can certainly work with a single replica. However, in a production environment, high availability is essential and is achieved by maintaining multiple replicas across nodes to avoid single points of failure. (This will be covered in detail in upcoming chapters.)
In Kubernetes, to ensure the high availability of an application, we can simply increase the replica number. Follow these steps to do so:
- Modify the Pageview YAML to change
replicas to 3.
- Apply these changes by running
kubectl apply -f <pageview app yaml>.
- By running
kubectl get pod, you should be able to see three Pageview pods running.
- Access the URL shown in the output of the
minikube service command multiple times.Check the logs of each pod to see whether the requests are handled evenly among the three pods.
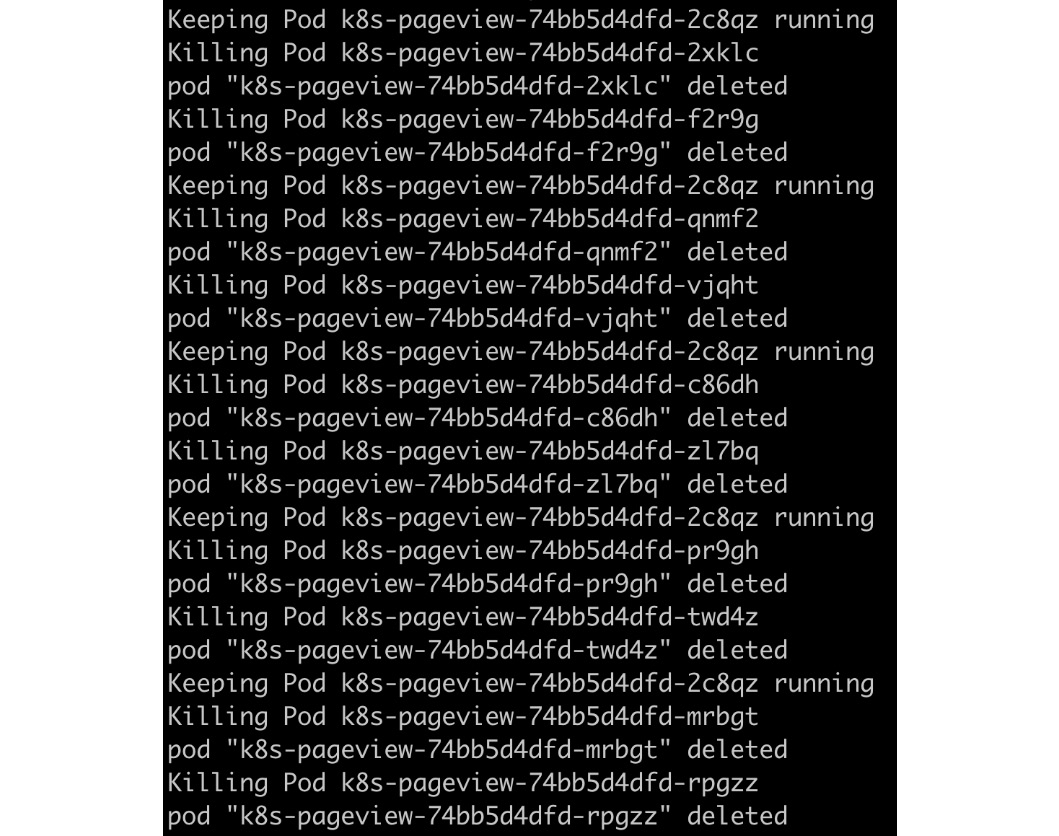
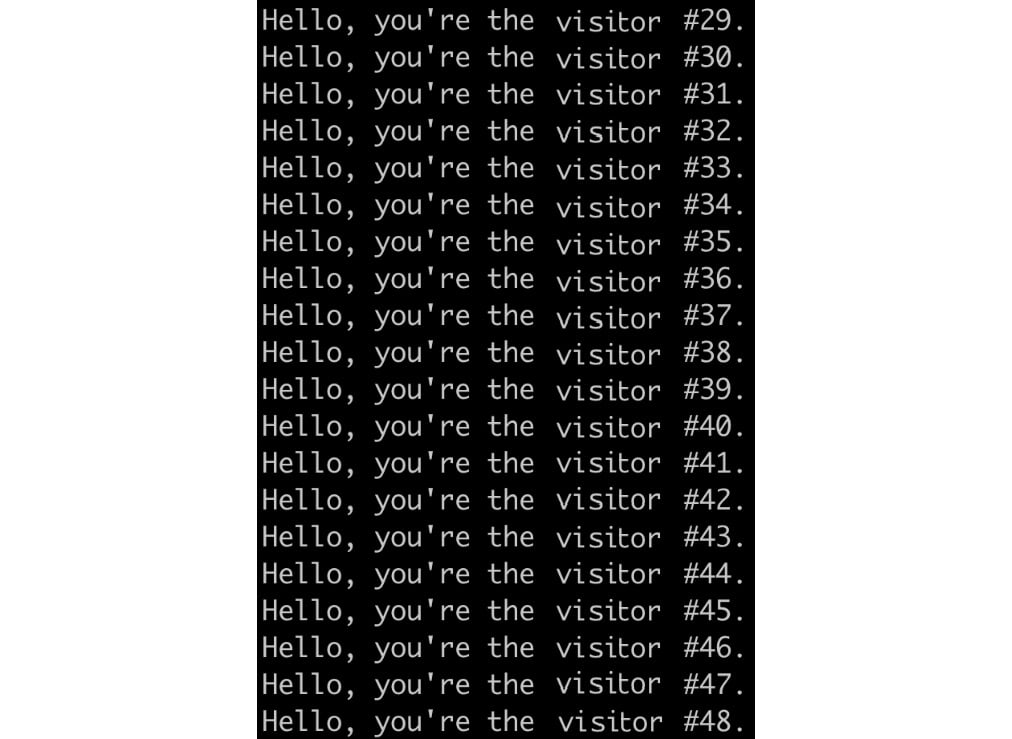
- Now, let's verify the high availability of the Pageview app. Terminate any arbitrary pods continuously while keeping one healthy pod. You can achieve this manually or automatically by writing a script. Alternatively, you can open another terminal and check whether the Pageview app is always accessible.
If you opt for writing scripts to terminate the pods, you will see results similar to the following:
Figure 2.29: Killing pods via a script
Assuming that you take a similar approach and write a script to check whether the application is online, you should see an output similar to the following:
Figure 2.30: Repeatedly accessing the application via the script
Note
The solution to this activity can be found at the following address: https://packt.live/304PEoD.
A Glimpse into the Advantages of Kubernetes for Multi-Node Clusters
You can only truly appreciate the advantages of Kubernetes after seeing it in the context of a multi-node cluster. This chapter, like many of the other chapters in this book, uses a single-node cluster (Minikube environment) to demonstrate the features that Kubernetes provides. However, in a real-world production environment, Kubernetes is deployed with multiple workers and master nodes. Only then can you ensure that a fault in a single node won't impact the general availability of the application. And reliability is just one of the many benefits that a multi-node Kubernetes cluster can bring to us.
But wait – isn't it true that we can implement applications and deploy them in a highly available manner without using Kubernetes? That's true, but that usually comes with a lot of management hassle, both in terms of managing the application as well as the infrastructure. For example, during the initial Deployment, you may have to intervene manually to ensure that all redundant containers are not running on the same machine. In the case of a node failure, you will have to not only ensure that a new replica is respawned properly but to guarantee high availability, you also need to ensure that the new one doesn't land on the nodes that are already running existing replicas. This can be achieved either by using a DevOps tool or injecting logic on the application side. However, either way is very complex. Kubernetes provides a unified platform that we can use to wire apps to proper nodes by describing the high availability features we want using Kubernetes primitives (API objects). This pattern frees the minds of application developers, as they only need to consider how to build their applications. Features that are required for high availability, such as failure detection and recovery, are taken care of by Kubernetes under the hood.


 Free Chapter