Sign In Start Free Trial
Account

Add to playlist

Create a Playlist

Modal Close icon
You need to login to use this feature.
  • Book Overview & Buying Hands-On Cloud Solutions with Azure
  • Table Of Contents Toc
  • Feedback & Rating feedback
Hands-On Cloud Solutions with Azure

Hands-On Cloud Solutions with Azure

By : Leonardo
2 (1)
close
close
Hands-On Cloud Solutions with Azure

Hands-On Cloud Solutions with Azure

2 (1)
By: Leonardo

Overview of this book

Azure provides cloud-based solutions to support your business demands. Building and running solutions on Azure will help your business maximize the return on investment and minimize the total cost of ownership. Hands-On Cloud Solutions with Azure focuses on addressing the architectural decisions that usually arise when you design or migrate a solution to Microsoft Azure. You will start by designing the building blocks of infrastructure solution on Azure, such as Azure compute, storage, and networking, followed by exploring the database options it offers. You will get to grips with designing scalable web and mobile solutions and understand where to host your Active Directory and Identity Solution. Moving on, you’ll learn how to extend DevOps to Azure. You will also beneft from some exciting services that enable extremely smooth operations and streamlined DevOps between on-premises and cloud. The book will help you to design a secure environment for your solution, on both the Cloud and hybrid. Toward the end, you’ll see how to manage and monitor cloud and hybrid solutions. By the end of this book, you will be armed with all the tools and knowledge you need to properly plan and design your solutions on Azure, whether it’s for a brand new project or migration project.
Table of Contents (11 chapters)
close
close

How do I start using Azure?

When one starts using Azure, there are many new things to learn, like how resources are configured and used in the environment. So, I headed over to the Azure portal (https://portal.azure.com) and created an account. There are several things to consider here; you can pay as you go, configure an Enterprise Agreement, use an Azure Pass, sign up for Dev Essentials, or use an MSDN subscription to set up how you will pay for the resources. You can also configure spending limits to help control costs and also control enterprise costs. With an Enterprise Agreement, you can use a Dev/Test subscription to help offset costs. Enterprise Agreement Dev/Test subscriptions get you a significant price reduction, percentage-wise, over production versions. If you plan on using Azure a lot, I would recommend engaging with Microsoft to get an Enterprise Agreement. To get an Enterprise Agreement, you will need to reach out to a Microsoft account representative for the requirements, which you can review here: https://www.microsoft.com/en-us/licensing/licensing-programs/enterprise.aspx. As a side note, you can also create your account through Office 365 services, but for the sake of simplification, we will stick with the Azure portal side. Once your account has been created, you will access the portal and be presented with the Azure default dashboard. For a Tenant to be created, you must have what is referred to as a privileged account, which is defined as an Azure account in the Tenant or Enterprise Agreement. At the end of the day, it is an organization's network account.

Once the Tenant has been created, it will act as a virtual representation of your organization within Azure. This equates to the earlier physical network structures that were used within an organization which was secured by firewalls, network resources, and directory services that were usually housed in a data center. A Tenant in Azure follows the same structural basis but is a virtual instance of the organization that is backed by the Azure Active Directory (AAD) services. All Tenants require AAD, as this is the digital identity service model for securing all SaaS, IaaS, and PaaS resources. Think of the Tenant as your organization container, with the same type of physical boundaries as a physical data center network would have. The following diagram shows a simplified view of a Tenant:

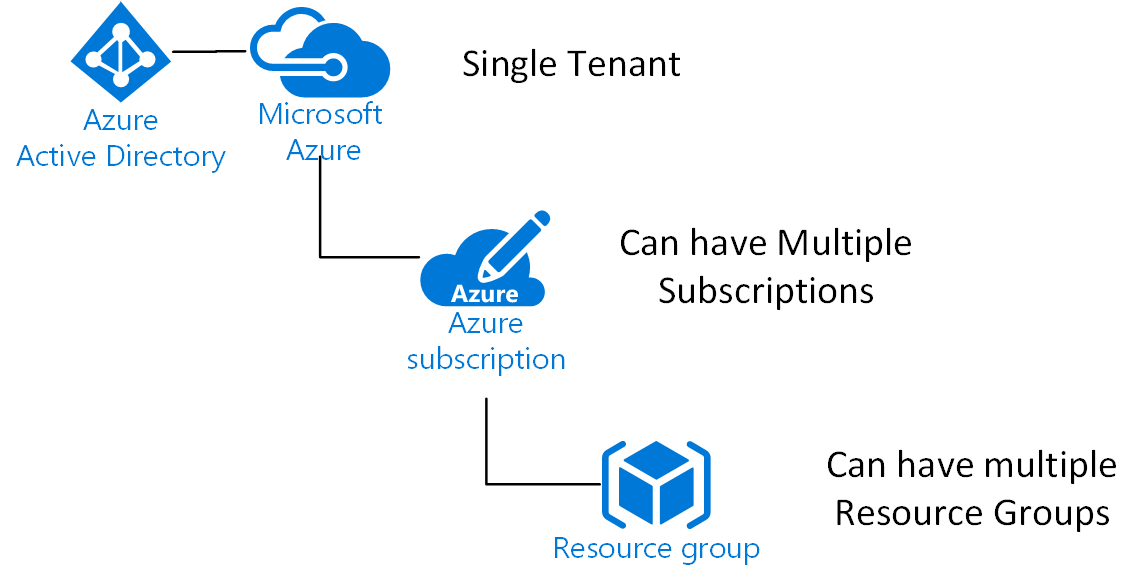
AAD services, as shown in the preceding diagram, can be synchronized with an on-premise Active Directory (AD) through a process called Active Directory Federation Service (ADFS). This is the process of syncing users/groups and helps with providing access to cloud and on-premises resources without the need to add users to both directory services. Now that we have our Tenant, it has hard resource sharing boundaries that can’t be broken, just like your physical network. A Tenant is also assigned a Tenant ID that is used to identify the organization, and the privileged account is assigned the owner. Within your Tenant, you have an Office 365 or O365 container that houses your SaaS products such as Exchange, SharePoint, Power App, and so on, and the Azure Container that houses your subscriptions and resource groups. This book isn’t about O365 and the SaaS-based container, but more about the Azure container and the guidance needed to architect, develop and deploy solutions. Now, regarding Azure, we need to discuss the structure of how resources are handled: you start with a Tenant, then you have a subscription, and then you have a resource group, as shown in the following diagram:

A Subscription (Sub) in Azure is a container that groups together resources and users, and also has limits. The limits have changed over time and can be increased with support tickets from Microsoft. You can review the limits at https://docs.microsoft.com/en-us/azure/azure-subscription-service-limits. Subs themselves have sharing limits as well. For instance, currently, Key Vaults, App Service Certs, and Express Routes, to name a few, do not span subscriptions. You can also include resources in Resource Groups (RG) from another subscription. You also do not have the intellisense in the portal for resources, not in the same subscriptions. RGs are application life cycle resource containers within a subscription that houses all the resources that make an application or piece of an application or infrastructure. You create a subscription when your tenant is created. You can also do this through your Enterprise Portal.

Architectural tip:
When you have created your Tenant and start building out your Subs, you should keep to a simplistic approach. This means that you should start minimally, for example, you should have a Tenant and a Sub or two. I generally start with a production Sub and a non-production Sub. In your non-production Sub, you should get Dev/Test pricing through you EA or use MSDN as your non-production Sub by using resource groups at application containers.

The reason for this suggestion is that resources have boundaries, and hybrid solutions require VPNs or Express Route, which have Sub boundaries and require VNet integration to other Subs, which will become multiple points of failure. I suggest you only add more Subs based on very specific needs, such as client work you need to transfer later on to a client.

I have set up my Tenant – what's next?

After you have configured and set up your Tenant and Subs, perform the following steps:

  1. Let’s login into the portal at https://portal.azure.com/. Once you have signed into Azure, you will enter the default dashboard.
Dashboards are extremely powerful, and we will discuss leveraging them at each step in supporting and monitoring the resources that are built.
  1. Now, there are several ways we can add resources through the portal, but in this first section, we will add them into the portal. There are several ways to search for resources using the portal once you have logged in, as shown in the following screenshot:
Resource search on Azure Portal
  1. You can use the top search for quick resource lookup by typing in the name of the resource you need, for example, App Service Cert or Certificates.
  1. If you would like to search by visible name, you can use the All Services link from the side menu. This will bring up the services blade, as shown in the following screenshot:
All services blade

Now, some resources come from the Azure Marketplace, such as VM images and Web Applications. These are provided from the Marketplace via ARM resource deployments that are created by Microsoft or certified vendors. The Azure Resource Management (ARMare template systems that are used by Azure deployment mechanisms. These are basically JSON files that describe the resources being deployed.  We will discuss them in details in Chapter 6, Deploying Solutions to Azure.  The marketplace is a great starting place for applications such as WordPress.

Let's walk through a marketplace example

Let's walk through an example of how to set up a WordPress site using on the Portal and Marketplace. This will not only provide an understanding of how to use the Marketplace but how the underlying ARM templates are leveraged in the deployment of resources from the Marketplace:

  1. In the top search bar, type Marketplace, as follows:
  1. Select Marketplace from the services menu.
  1. Once the Marketplace blade is open, select Everything and type WordPress, as follows:
  1. Select the first WordPress in the list.

  1. Click on the Create button, as shown in the following screenshot:
  1. Enter an App Name, Subscription, Resource Group Name, and Database Provider to Azure Database for MySQL. Leave the App Service plan/Locations settings as their default options for the demo:
  1. For this walk-through, when you click on Database and the Database blade comes up, just add a password, select a basic pricing tier, and click OK:
  1. Then, click the Create button.
  2. Once this has been created, you will receive a notification stating that is has been completed. Click on Go to resource, where you will be able to access and configure your WordPress site.

Optional steps to add a custom domain and SSL Certificate

  1. Go to your App Service Resource and click on Custom Domains, use the IP Address to point your domain at, once you add your A record, then click on + Add Hostname to add.

  1. You will need to add your private or public certs, which you can leverage App Service Certificates (which I recommend), and once added, +Add a Binding and turn on HTTPS only.

During this exercise, we created several things: an App Service, an App Service Plan, a MySQL server, and a MySQL database instance. An App Service is the instance of code needed to run the application. In this case, this is the WordPress PHP code. This is connected to the Marketplace code repository that, in most cases, keeps the code updated based on refreshes to the Marketplace.  It is deployed from the Marketplace using a process called ARM template. An ARM template is a JSON representation of the resources that are deployed to an Azure Resource Group.  The ARM template process leverages a Desired State Configuration (DSC), to manage the configuration state of the resources, and this process helps with creating or updating the resources should the template be run again to update the resources within the application Resource Group.  In the case of WordPress, the updates are handled by the portal. An App Service Plan, commonly call VM backed, is the virtual resources allocated to the App Service. Think of the VM as something that houses the web server, and the App Service as an IIS app on the box. The MySQL server instance houses the MySQL database instance for the WordPress site, which is almost the same as the on-premise version in IIS, but is instance-based and hides the server's implementation. So, as you can see, the implementation of the application is basically the same as it would be on-premise, but it is more instance-based in Azure. There is no need to worry about the infrastructure implementation as you would with an on-premise solution.

The App Service Plan controls the resources used to back up your App Service for dev or demo environments. I would use Free or Shared to help keep the cost down.  If you require custom URLs or SSL, you will need to use a basic or standard plan, which will increase the cost significantly, so be mindful of the requirements you need for your App Service. For larger organization you can get premium tiers and for those using PII or GDPR you can leverage isolated tier or App Service Environment or ASE to isolate applications and protect data.

Create a Note

Modal Close icon
You need to login to use this feature.
notes
bookmark search playlist download font-size

Change the font size

margin-width

Change margin width

day-mode

Change background colour

Close icon Search
Country selected

Close icon Your notes and bookmarks

Delete Bookmark

Modal Close icon
Are you sure you want to delete it?
Cancel
Yes, Delete

Delete Note

Modal Close icon
Are you sure you want to delete it?
Cancel
Yes, Delete

Edit Note

Modal Close icon
Write a note (max 255 characters)
Cancel
Update Note

Confirmation

Modal Close icon
claim successful

Buy this book with your credits?

Modal Close icon
Are you sure you want to buy this book with one of your credits?
Close
YES, BUY